
Bantu knots are a popular natural hairstyle achieved by twisting sections of hair into a knot. Some women choose to wear hair in their knotted form for this Bantu knots style. Others choose to unravel the hair after a few hours to achieve a curly style with loose waves, depending on the hair texture. Bantu Knots are said to have originated centuries ago with the Zulu tribes in southern Africa.
You are in the right place if you have been looking for a great Bantu knots tutorial for your natural hair! Out of the millions of hairstyles I’ve tried since being natural, Bantu Knots were by far the worst until now.
In the past, I tried this style on wet hair and dry hair with no luck. I tried every product you can imagine…, but still no luck.
After wearing my hair straight for a week, I decided I was ready to go back curly. Tired of the usual twist out and braid out, I wanted to try something new. Although nervous, I decided to give Bantu knots another try.
The perk of having other friends as bloggers is you can trust their methods and use them for help, so I knew exactly who to ask. My friend Lianne, also known as @chronicurls, shared her Bantu knot-out tutorial with me.
Although nervous, I took another chance on Bantu knots. The results: AMAZING! Here’s how I got the best Bantu knot out ever, along with following Lianne’s tutorial.
The Best Bantu Knots Tutorial Ever

1. Prep Hair
The best decision you can make for Bantu knots is to start on dry hair and stretched hair. You can start with a blowout or stretch your curls with something like the Q-Redew. Bantu knots take FOREVER to dry, so this is a vital step to ensure the hair is not too saturated.
I installed my Bantu knots on a week-old blowout, and 12 hours later, they were still a little damp so trust me when I say you don’t want to install on completely wet hair. Although you might be starting on dry hair, make sure the hair is still properly conditioned beforehand.
2. Apply MINIMAL products
Strictly following Lianne’s Bantu knot-out tutorial, I only used two products. Again, you don’t want to saturate the hair too much. You don’t need a lot of products for a successful style, but you must choose your products wisely. For my Bantu knots, I chose the following:
- Curluxe Naturals DewLuxe Moisture Mist: This mist is lightweight and doesn’t completely drench my hair so I knew this product was perfect for bantu knots. The CurlLuxe Moisture Mist also includes hydrolyzed keratin, which is a great protein ingredient for strengthening the hair. (2-3 pumps on each knot)
- Camille Rose Naturals Aloe Whipped Butter Gel: I reviewed this product almost two years ago, and I’m STILL IN LOVE! It’s not quite a gel and not exactly a butter, which is why I like it so much. I get the light weight of a gel but the moisture of a butter. It’s the perfect combination, in my opinion. (Use a dime size amount on each knot.)
You can also use a few pumps of water and a leave-in conditioner. There are really no “right or wrong” products to use.
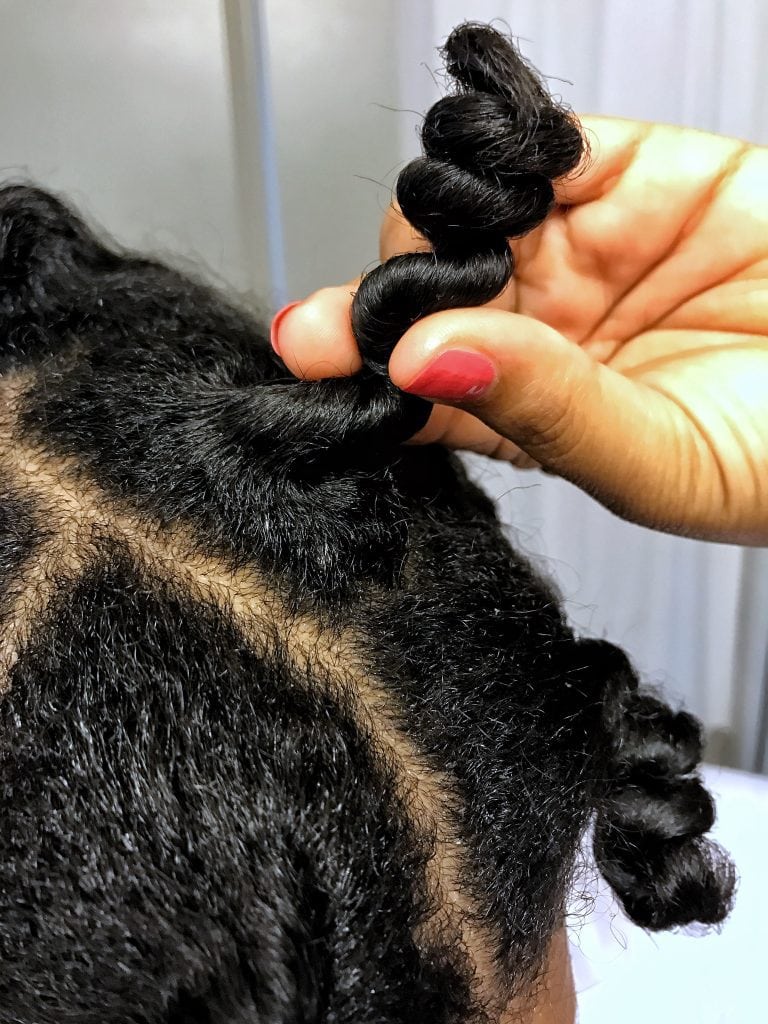
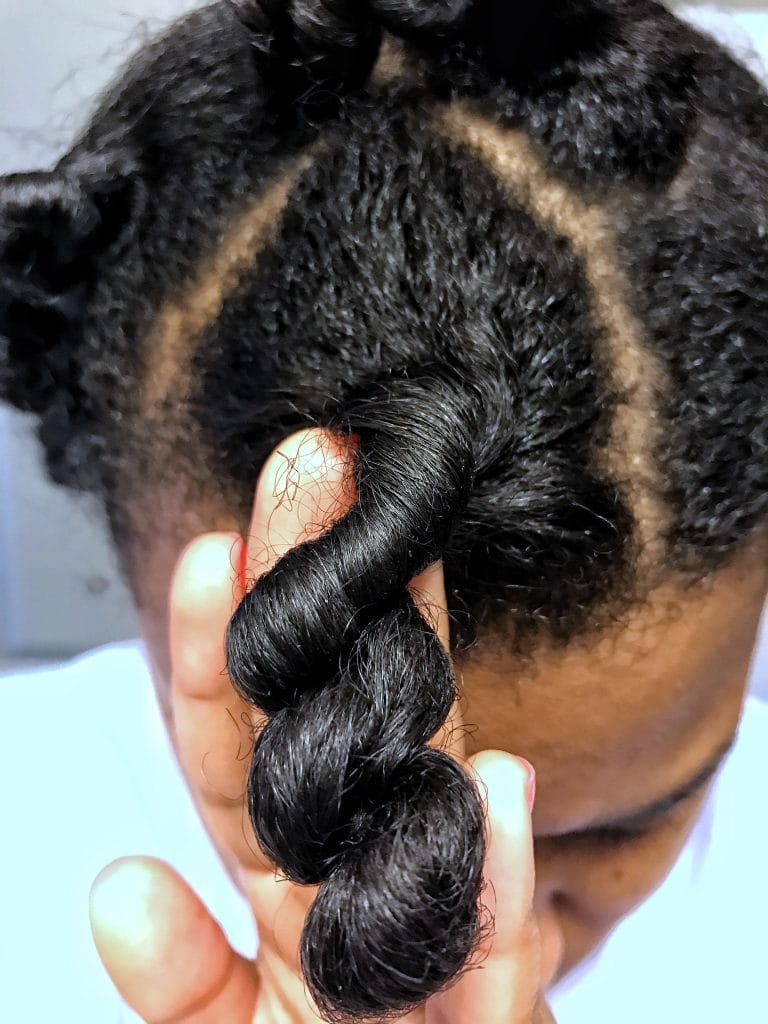
3. Decide on the size and twist the Bantu knot strategically
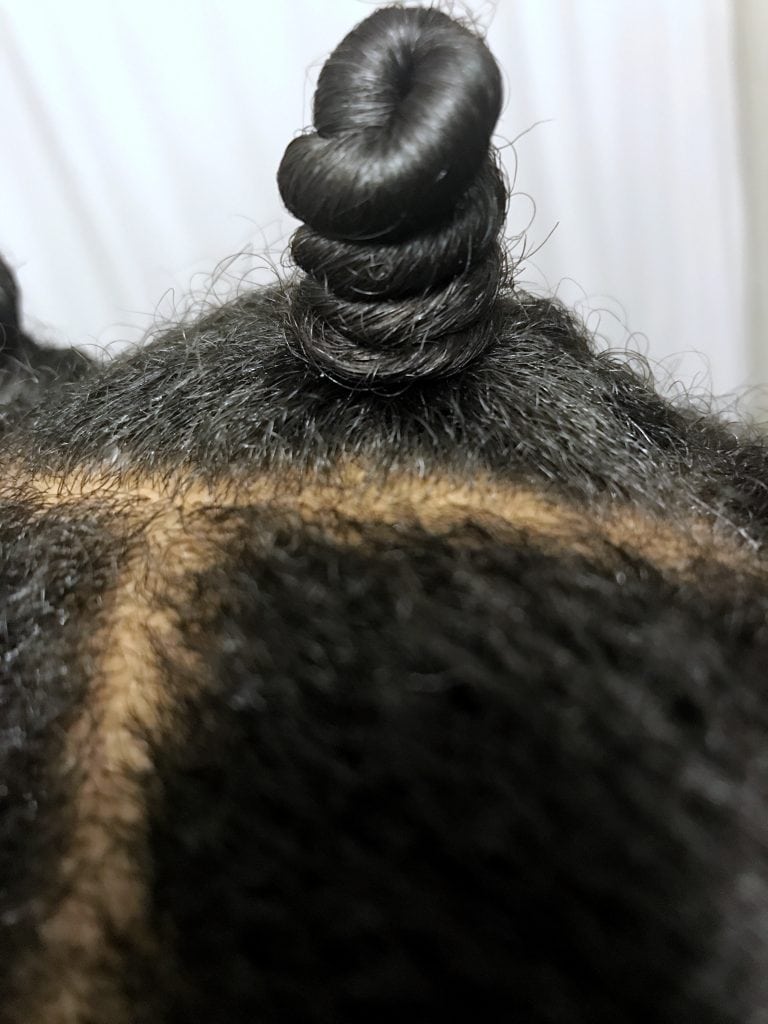
After watching @chronicurls bantu knot out tutorial, I decided to have a fewer knots than her video for a a couple of reasons. First, I was starting with straight flat ironed hair. As a result, larger sections could be easily applied because my hair was less dense.
Second, I wanted big curls, so I decided on bigger sections. (NOTE: larger sections also take longer to dry. I didn’t quite think that part all the way through.)
The most important part is to constantly wrap the hair in a circular motion, with each circle stacked on top of each other. (see picture above). Once I saw my installed knot look like a set of tires sitting on top of each other, I knew I had just mastered the art of the Bantu knot.
THIS SHOULD BE YOUR SIGN TOO! The stacked circular knots set the foundation for how the hair will dry and, ultimately, how curly your results will be. (More detail explaining this in Lianne’s tutorial also).
4. Allow Adequate Time For Hair to Dry Completely
As I stated above, after using minimal product AND installing on dry hair, my hair was still damp 12 hours later. Unlike a twist out, with bantu knots, your hair is winded up really tight, which makes it harder to dry. So allow ample time for this step.
Throw on a headwrap for a day or so and take it out when you feel your hair is really, really dry. Now, your hair should be completely dry for the style to work best and avoid frizz.
Since my hair was still damp, I used a diffuser to finish drying it before I unraveled the Bantu knots.
5. Unravel carefully. Separate, Fluff & Slay!
Bantu Knot Out Results

Got questions? Leave them down below. Good luck, and if you try this style, you will also love my perm rods tutorial. If you enjoyed this Bantu knot tutorial let me know!

Charlene Walton McCraney is a Dallas beauty and lifestyle blogger. After years of styling her and several friends’ hair as a hobby, offering advice and tips, she decided to combine two of her favorite things…writing and talking about natural hair!
TexturedTalk.com was created to promote healthy hair care for women of all textures and has since evolved into other beauty and lifestyle topics. Charlene loves teaching other aspiring bloggers on how to take their passion and turn it into amazing content to provide value.
Charlene is a previous beauty contributor to NaturallyCurly.com, CurlyNikki.com, and 21ninety.com.
When she’s not blogging she is probably crunching numbers as a Senior Financial Analyst, dancing or figuring a way to meet Beyonce in person. :)

Love this journey! It takes courage to try a style you’ve struggled with again, and I’m so glad the persistence (and Lianne’s tutorial!) paid off for you. That final result must have been incredible! Thanks for the excellent breakdown on prep and product selection—it makes me feel much more confident about attempting a Bantu knot-out again! 🙌
The advice about using minimal products helps avoid buildup and improves the overall outcome.
This article is perfect for me, Thank you for writing with heart!
Thanks ya! Tulisan ini ngebantu banget.
Salut, artikelnya berbobot banget. Terima kasih!
Terima kasih sudah berbagi hal bermanfaat seperti ini.
Wah, informatif banget! Makasih banyak ya.
Mantap! Terima kasih sudah menulis ini.
Gokil! Baru tahu hal ini, makasih banyak.
big W for who created this page!
“all the games are very good on this blog, really inspiring everyone to be successful
Sagatoto
Great article
Great article! Thanks a lot for sharing thissss.
This tutorial is exactly what I needed! As someone who’s struggled with Bantu knots before, your tip about doing them on straight hair instead of wet or dry hair was a game-changer. The 5-step process is so clear and easy to follow. Thank you for sharing both the cultural background and practical advice in one place!
Makasih! Artikel ini bantu banget. visit blog kas138 daftar
The content here is engaging and thoughtfully presented. It’s a great place to find valuable tips and detailed explanations.
This is so helpful! I’ve been struggling with Bantu Knots for ages, and the “start on dry and stretched hair” tip makes so much sense—that’s probably where I’ve been going wrong by starting on wet hair.
Sportzfy APK delivers a smooth streaming experience with a simple interface and quick navigation. It offers a range of sports content, though availability may vary. Ideal for users seeking convenient access, but always download apps from trusted sources for safety.
INTERWIN DAFTAR
Solid advice here. I’ll definitely try some of these ideas. Stop by my site too. https://papitogel-f.com/
Bhulekh UP is the official online land records portal launched by the Government of Uttar Pradesh to provide transparent and easy access to land-related information for citizens.bhulekh up
Interesting topic and great delivery. If you have time, you’re welcome to visit my site too. https://kairitoto-s.com/
Brilliant! The section on quarterly planning provided the exact information I needed. I also share tips and tricks for productivity every week. Why not subscribe to my newsletter while you’re at it? Papitogel
I really like this blog and especially your posts, they are really very useful, i will be back later. Thank you.
I really like this blog and especially your posts, they are really very useful, i will be back later.
Terima kasih sudah berbagi. Saya juga pengguna NIKSLOTS.
Bagi pengguna yang menginginkan akses cepat, Kera4D menjadi solusi game online berbasis digital.
https://kera4d.it.com/
Navigasi yang sederhana membantu pengguna mengakses game online di Kera4D tanpa kebingungan.
https://desty.page/kera4d_daftar
Kera4D memberikan fleksibilitas akses game online melalui berbagai perangkat digital.
https://heylink.me/kera4d2/
Sistem yang efisien membuat Kera4D menawarkan pengalaman akses game online yang cepat.
https://mez.ink/kera4dvip
Proses login yang sederhana menjadi bagian dari kemudahan akses game online di Togel2win.
https://www.reverbnation.com/togel2win?profile_view_source=header_icon_nav
Karena berbasis web, Kera4D memungkinkan game online dimainkan tanpa instalasi aplikasi.
https://soundcloud.com/togel2win-695412099/repost
Great tutorial, clear steps and helpful tips for getting perfect Bantu knots!
A useful resource to belajar conversation bahasa Inggris and speak more confidently in daily situations!
Soft, durable, and cost-effective wholesale t-shirts for teams, events, and brands.
Permit me to express my utmost admiration for the intellectual acumen demonstrated in this post. The manner in which you have elucidated this topic is unparalleled and readers who want to explore related discussions in more detail may find additional references at Papitogel.
Soft, durable, and cost-effective wholesale t-shirts for teams, events, and brands.
Paito SGP
Kera4d berkembang dengan mengikuti perubahan digital modern. Inovasi dilakukan bertahap.
Dinamika era digital memengaruhi arah pertumbuhan slotbola88. Platform menyesuaikan diri.
togel2win memanfaatkan teknologi digital modern untuk menjaga kualitas layanan. Pembaruan rutin dilakukan.
Dalam era digital modern, Kera4d fokus pada efisiensi sistem. Teknologi mendukung pengelolaan.
For first-time users, DiamondExch offers a structured and user-friendly platform to explore online betting. By understanding Diamond Exchange ID creation, learning how to navigate the platform, choosing beginner-friendly games, and following responsible betting practices, new users can place their first bet with confidence.
Visit – https://diamondexchh.com/
Cricbet99 ensures that all financial transactions are protected with advanced encryption technologies, keeping your personal and banking details safe from third-party access. The platform supports a variety of payment methods, including credit and debit cards, UPI, net banking, and popular e-wallets, making it convenient for users to deposit and withdraw funds.
https://www.cricbet99s.in/
The great website and information shared are also very appreciable. https://www.jacketsmasters.com/product/steve-mcqueen-harrington-jacket/
I recently came across soju88, and the platform looks professionally managed.
Konsistensi City yang goyah baru-baru ini menjadi peluang besar bagi Arsenal.
Watch  Live TV Channels online at your convenience through Flix Fox Access all Indian TV news, entertainment, sports, spiritual, kids, movies, and Music.
Konten ini cukup bermanfaat untuk pembaca. Referensi lain ada di : DEWADEPO DAFTAR || DEWADEPO LOGIN || DEWADEPO ALTERNATIF || DEWADEPO TOGEL
Wawasan praktis dengan artikel yang kreatif fokus dengan desain yang bijaksana.
KERA4D.KNVED
Situs web berkualitas tinggi dengan grafik terbaru yang memukau dan dengan lisensi terpecaya.
PEMKO.IT
Gold jewellery in Chandigarh is admired for its craftsmanship, purity, and stylish designs. From traditional bridal pieces to contemporary everyday wear, the city offers a wide selection for every taste and occasion. Trusted jewellers provide certified gold, personalised service, and competitive pricing, making Chandigarh a popular destination for gold jewellery shopping.
FR Legends is an exciting mobile racing game that focuses on drifting and car culture. The game allows players to customize their cars in great detail from engine upgrades to unique body kits and liveries
I really enjoyed reading this article, especially the practical explanation. I discuss related subjects on my site as well Papitogel
Kami menciptakan platform untuk pengusaha muda Indonesia, memfasilitasi koneksi yang memperkuat peluang bisnis dan kolaborasi. Support my Site slot gacor
An unicorn pyjama is a really good cloth!
Apkvip.orgApkvip.org is a reliable platform for Android users looking to discover and download mobile applications
BOLAQIUQIU is a list of login links for the 2026 World Cup soccer betting site.
Tried the Gelatin Trick approach for a few days and what I liked is how simple it is to fit into a routine. If anyone wants the step-by-step version I followed, I left it here: Gelatin trick
게임 커뮤니티를 중심으로 문제제기가 이뤄졌지만, 이용자들에 따르면 고객센터에 문의해도 별다른 안내나 보상 없이 패치가 이뤄졌다.불밤출장마사지
For anyone confused about the Gelatin Trick, I put everything in one place (ingredients + how to do it + common mistakes). Hope it helps:
Take your coaching to the next level with Coach Campbell, Football Coaching Books—trusted by new and veteran coaches alike. Whether you’re aiming to be a head coach or assistant, these books offer real insights, strategies, and motivation to help you succeed. Known as some of the BestFootball Books out there, they’re packed with practical tools for building winning programs. Don’t miss your chance to grow with Campbell Football, your go-to source for top Football Books and coaching success.
At 7Stami, we’re dedicated to empowering women through wellness, support, and career development. Our Women’s Wellness Center offers holistic health services tailored to women’s unique needs, while our Community Health and Wellness programs promote balance and connection. We provide guidance on careers for women, host rejuvenating Wellness Retreats for Women, and create safe spaces where Women with Women can grow and thrive together. Whether you’re seeking healing, purpose, or professional direction, our Women’s Center for Health and Wellness is here to support every step of your journey. 7Stami is where women uplift women—mind, body, and spirit.
Midnight Cry Evangelistic Ministry, founded in 1977, is a Christ-centered Evangelistic Center Church with a mission to reach the lost, strengthen believers, and prepare hearts for the Lord’s return. Through powerful preaching, dedicated Church Ministries, and a welcoming Church Ministries, Church Hospitality Ministry. We create a place where faith grows and lives are transformed. Rooted in love, service, and truth, we invite you to join us in sharing the Gospel, building the body of Christ, and answering The Midnight Cry.
Aksi Perawat Selundupkan Pil Koplo Ke Lapas Lumajang – https://marcellatracco.com/aksi-perawat-selundupkan-pil-koplo-ke-lapas-lumajang/
Explore our exclusive inventory of high-quality celebrity jackets and drama-styled merchandise inspired by the most stylish apparel movies of the decade. starletleathers Perfect for the fashion-forward US audience, this collection lets you channel your favorite on-screen icons with effortless ease and cinematic flair. Don’t miss our massive men’s and women’s jackets sale to snag these limited-edition pieces and upgrade your wardrobe with Hollywood-tier luxury today.
For anyone confused about the Gelatin Trick, I put everything in one place (ingredients + how to do it + common mistakes). Hope it helps:GELATIN TRICK REVIEW
Thanks for sharing such detailed information on this topic. Thanks! Please write an article about ED Treatment Doctors in Orlando.
This article cleared up a lot of confusion for me. Please write an article about Write For Us + Technology. Thanks!
Our exclusive range of men’s and women’s celebrity jackets is designed for fashion-forward individuals across the USA who value quality, authenticity, and standout style. b3 flight jacket Made with high-grade materials and meticulous attention to detail, these jackets allow you to recreate your favorite movie looks without compromising comfort or durability.
Konten Menarik yang Layak Dijadikan Referensi KERA4D LOGIN
This article came at just the right time when I was searching for references on this topic. The explanation is comprehensive yet concise. It’s very helpful in broadening my understanding before making important decisions regarding this matter. I hope you continue to consistently produce useful content like this. >> <a href="https://www.lemnews.com/artikel/tips-internet-aman-untuk-pemula-bima138"<Link Bima138
Confused about finding an online betting site for the 2026 World Cup? bolaqiuqiu login is the official and trusted online football betting agent site for the 2026 World Cup.
동두천 출장안마 추천 후기
동두천 지역에서 믿고 이용할 수 있는 동두천 출장샵을 찾는 분들께
추천하고 싶은 동두천 출장마사지였습니다.
위생 관리도 깔끔했고 전반적으로 안정적인 동두천 출장안마 서비스였습니다.
👉
동두천 출장안마 이용 안내
منصة مسار التعليمية تعد من أهم الأنظمة الرقمية بالمغرب، حيث تُمكن من تدبير الحياة المدرسية للتلميذ، والاطلاع على النقط والنتائج باستعمال حساب massar moutamadris بسهولة.
Anggota Tapsel Ini Justru Pesta Sabu Bareng Bandar – https://iflorabella.com/anggota-tapsel-ini-justru-pesta-sabu-bareng-bandar/
For anyone confused about the Gelatin Trick, I put everything in one place (ingredients + how to do it + common mistakes). Hope it helps:
I have always emailed this website to all of my colleagues because I want them to read it and then click on my links.
Tashan Win register process is simple and user-friendly. It takes only a few steps to create an account and start playing.
Artikel yang sangat informatif dan tersusun dengan baik. Penjelasannya mudah dipahami serta memberikan wawasan baru bagi pembaca. Terima kasih sudah berbagi konten berkualitas seperti ini. BERITA TERKINI
A really good post. I wanted to let you know how much I’ve liked reading your blog entries since I recently came upon your weblog. In any event, I’ll be following your feed and hope to see more from you soon!
Null’s Brawl Stars permet de jouer librement avec toutes les options débloquées. Les mises à jour régulières et la performance stable rendent l’expérience plus amusante pour les fans.
This is a great article! I’d love to try this recipe soon. Thanks for sharing your insights. Jackets Aura
Some parts here actually cleared up confusion I’ve had for a while, which led me to revisit site again.
Such a helpful breakdown on bantu knots! 💫✨ I love how this guide explains the steps and benefits clearly — makes it feel so much easier to try for different hair lengths and textures. Thanks for the inspo!
Massar Service is a very helpful platform for students and parents in Morocco to check grades, track academic progress, and stay updated with school information easily.
live sdy
I had a very good experience with the diamond exchange platform. It offers many live sports options and the interface is easy to use. It is a nice place for sports fans who want an exciting and enjoyable online experience.
https://diamondexch-cricketid.com/
Sports lovers should explore this platform for live cricket updates, multiple sports options, fast speed, and a smooth, reliable experience anytime.
https://diamondexch-id.co.in/
Plan your bali tour trip with My Travel Case and enjoy a perfect island vacation filled with culture and beauty.
Hi there! This post couldn’t be written any better! Reading through this post reminds me of my previous room mate! He always kept talking about this. I will forward this article to him. Pretty sure he will have a good read. Thank you for sharing! Life Experience Degree
I had a great experience with the Diamond Exchange platform. It offers a wide range of live sports options, and the interface is very easy to use. It’s a great choice for sports fans looking for an exciting and enjoyable online experience. https://www.letrasbonitashub.com.mx/
Greetings, I do believe your blog could possibly be having browser compatibility problems. When I look at your website in Safari, it looks fine however, if opening in Internet Explorer, it’s got some overlapping issues. I merely wanted to give you a quick heads up! Apart from that, wonderful blog! Life Experience Degrees
SEO on Amazon Webstore: Boost Your Product Visibility
SEO on Amazon Webstore is essential for sellers who want to improve product visibility and attract more buyers. With millions of products listed online, proper optimization ensures your products appear in the right search results, helping you stand out in a crowded marketplace.
The main focus of SEO on Amazon Webstore is keyword optimization. By researching and including relevant keywords in product titles, descriptions, bullet points, and backend search terms, sellers can improve their ranking in Amazon’s search results. Higher rankings lead to more clicks and potential sales.
Creating clear, engaging, and informative content is also critical. Well-written titles, detailed product descriptions, and professional images give buyers confidence in your product. Positive customer reviews and competitive pricing further enhance visibility and conversion rates.
This is such a helpful and well-written article! The step-by-step guide on Bantu knots is clear and easy to follow. I really appreciate the detailed explanations and tips. Thank you for sharing this valuable content with us!
TNREGINET – EC Online is a very useful service that helps people easily check and download the Encumbrance Certificate online. It simplifies the process of verifying property records and ensures transparency in property transactions, saving both time and effort for users.
I recently came across some similar design references and found this site quite interesting: https://beckygregorydesign.com/
— worth checking if you’re into creative design work.
This is a very inspiring website with a clean and modern design. I really enjoyed browsing through the content. By the way, I also found some interesting insights from my site : https://beckygregorydesign.com/ keep sharing great ideas!
The discussion about mental health here is very relevant to the current situation. Many people ignore early signs due to the stigma. I wish more media outlets would discuss this openly. Thank you for providing a refreshing and empathetic perspective for our loyal readers. you can also check kilat77 slot login
UP Bhulekh Map is an online digital platform launched by the Government of Uttar Pradesh to provide easy access to land maps (भू-नक्शा) for citizens. It allows users to view detailed information about land parcels, including boundaries, plot numbers, and location details directly from their homes. By integrating map-based visualization with land records like Khasra and Khatauni, the platform ensures transparency, reduces the need for physical visits to government offices, and helps people verify property information quickly and accurately.
Looking for a private cabin for rent in West Delhi? G Connect Spaces in Hari Nagar offers fully-equipped cabins designed for productivity and comfort. Perfect for professionals and small teams, our cabins come with high-speed internet, ergonomic seating, and a peaceful work environment. Experience the best coworking space in West Delhi tailored to your business needs!
Looking to reach your audience instantly? As a leading Bulk SMS Service Provider, we offer reliable and cost-effective messaging solutions tailored to your business needs. Whether you’re promoting offers or sending alerts, our platform ensures high delivery rates and real-time tracking. Recognized as the Best SMS Service Provider, we help businesses grow through seamless communication. Based in the capital, we are a trusted Bulk SMS Service Provider in Delhi, serving clients across industries. Choose us for instant connectivity, personalized support, and scalable SMS solutions. Reach thousands with a single click – boost engagement today!
WhatsApp Business API is a scalable communication solution that enables businesses to connect with customers on WhatsApp at scale. It supports automated messages, notifications, and customer support through verified business profiles. With rich media, templates, and chatbot integration, brands can deliver personalized experiences. The API ensures secure, reliable, and real-time communication. It is ideal for customer engagement, alerts, and transactional messaging.
ServiceNow C-Suite on the ServiceNow platform provides executives with AI-powered insights, unified dashboards, and real-time data. It supports strategic decision-making, improves operational visibility, aligns business priorities, and helps leaders drive efficiency, innovation, and enterprise-wide digital transformation initiatives.
UCLan student accommodation to rent offers a variety of modern living options near University of Central Lancashire. Students can choose from shared apartments or private studios, featuring essential amenities, flexible contracts, and convenient access to campus and city facilities.
Maid Service Near Me
Maiya Samman Yojana that explains the scheme’s benefits, eligibility rules, and the basic steps to apply. It helps women understand how they can receive financial assistance from the government.
Pikashow apk download is a popular streaming app that lets users watch movies, live TV, and web series for free. It offers a wide range of content including Hollywood, Bollywood, and sports channels. With a simple interface and fast streaming, it delivers a smooth viewing experience.
Stream your favorite movies and series with Film app, designed for smooth and reliable performance. It offers multiple categories and updated content regularly. A perfect solution for entertainment on the go.
Precision farming technology uses GPS, sensors, drones, and data analytics to monitor crop conditions and optimise agricultural operations. It enables efficient irrigation, targeted fertiliser use, improved productivity, reduced waste, and sustainable farming practices, helping farmers achieve higher yields and better resource management.
I really love it you never see its level of exploiting effieciency as i experienced
https://sites.google.com/view/waveexe/home/
One practical way to increase hackathon registrations is by improving discoverability. Platforms such as Where U Elevate help organizers present their hackathons to a wider network of students and communities.
Efficient event planning is incomplete without dependable logistics, and London Courier Services for Your Event ensure that all essential materials are delivered safely and on time. Professional couriers specialize in transporting event-related items such as staging gear, promotional kits, and registration materials with accuracy and speed. Their structured delivery process minimizes risks and ensures smooth preparation before the event begins. Event organizers rely on fast and reliable service to manage tight deadlines and urgent requirements. Real-time tracking keeps every delivery fully visible and under control. Careful handling protects fragile and sensitive items throughout transit. From corporate events to exhibitions and private functions, dependable courier services are essential. Choosing London Courier Services for Your Event guarantees seamless and timely event logistics.
Dreaming of tax-free living in Dubai? While Dubai imposes no personal income tax, US citizens aren’t fully off the hook. The IRS requires American expats to file US taxes no matter where they live. Understanding taxes in Dubai for US citizens means navigating FBAR, FATCA, and the Foreign Earned Income Exclusion. Don’t let confusion cost you thousands — get informed, stay compliant, and make your Dubai move financially stress-free!
I recently tried this Escort Service VIP Road Raipur and was thoroughly impressed. The Escort Service VIP Road Raipur offers stunning companions with unmatched professionalism and discretion. From the moment I contacted this Escort Service VIP Road Raipur, everything was handled seamlessly. The ladies are elegant, well-mannered, and truly engaging. If you’re looking for a reliable Escort Service VIP Road Raipur, look no further. Complete privacy, premium experience, and absolute satisfaction guaranteed. Highly recommended!
Preparing for the Common University Entrance Test (CUET) can feel overwhelming, especially with increasing competition every year. One of the most effective ways to boost your preparation is by practicing a CUET Sample Paper regularly. These papers not only help you understand the exam pattern but also improve your speed, accuracy, and confidence.
Preparing for the IBPS Clerk exam requires a smart strategy, consistent practice, and a clear understanding of the exam pattern.
Thanx for sharing us, very important this online marketing assignment help is super convenient, quick support, and makes learning marketing way easier.
Good Article… Thanks!
Looking to buy Menopur online safely and affordably? Menopur is a trusted fertility medication used in IVF and ovulation treatments worldwide. When you buy Menopur online, always choose a licensed, verified pharmacy to ensure product authenticity and proper storage. Compare prices, check prescriptions requirements, and consult your fertility specialist before ordering. Buying Menopur online offers convenience, privacy, and often better pricing — making your fertility journey smoother and more accessible from the comfort of your home.
Great post. The ausangate trek is one of the most rewarding trekking experiences in Peru, especially for travelers from the USA, UK, and Canada looking for something beyond the usual tourist routes. I like how this route combines mountain scenery, local culture, and a real sense of adventure. Andean Path Travel is also a good option for travelers who want proper local guidance and a smoother trekking experience. Anyone planning the Ausangate trek should definitely prepare well for the altitude, but the views and overall journey are absolutely worth it.
Just got my Tiger Exchange ID with Amiri Tiger and wow—the tiger exchange 247 vip login is next-level! Super fast, smooth, and perfect for following live IPL action. Never missed a match or a bet. If you’re serious about IPL, this is the only platform you need. Total game-changer! Don’t wait—get your ID now!
SAP Joule Training in Pune is becoming a smart choice for professionals who want practical SAP AI skills. A quality SAP Joule Training in Pune program should include hands-on projects, real business use cases, and updated SAP tools. Many learners prefer SAP Joule Training in Pune at Ascents Learning to improve job readiness, understand intelligent automation, and build stronger careers in enterprise technology with practical, industry-focused training.
मैया सम्मान योजना is a government welfare scheme designed to support women financially and improve their social security. Under मैया सम्मान योजना, eligible women receive financial assistance to help manage household needs and enhance their independence. The मैया सम्मान योजना aims to empower women and provide respect, stability, and better living opportunities for families.
Students seeking assignment help for statistics often need clear explanations, accurate calculations, and well-structured solutions. From probability concepts to data analysis, mastering statistics requires both theoretical understanding and practical application. Reliable academic assistance ensures that complex topics like regression, hypothesis testing, and distributions become easier to grasp. With guidance tailored to academic standards, learners can improve their problem-solving skills and submit high-quality assignments on time. Many trusted academic platforms in India are known for offering such specialized support, helping students achieve better results while deepening their understanding of statistical concepts through professionally crafted solutions.
If you are searching for a reliable china sourcing agent, working with an experienced team makes a big difference in product quality, supplier verification, pricing, and smooth delivery. A trusted China sourcing agent helps businesses avoid common sourcing mistakes, reduce risks, and manage communication with manufacturers more effectively. Supply Base Solutions is known for supporting businesses that want dependable sourcing support from China. From finding verified suppliers to handling negotiations and quality checks, the right sourcing partner can save both time and money. Choosing a professional China sourcing agent is a smart step for businesses planning long-term import success.
Three months after the marketing manager of a medium size e-commerce company went through three cheaper freelancers, the marketing manager eventually discovered that the cheap option was actually costing them the most in revisions, delays and lost rankings. Today Professional Content Writing Services prices are available at a huge variety; by determining what goes into these costs you can save time as well as money.
Power of attorney UAE is an important legal document when you need someone to act on your behalf for property, business, or personal matters. In the UAE, the process should be handled carefully to avoid legal mistakes and delays. Compton Conveyancing helps clients understand the requirements, documentation, and proper legal steps involved in preparing a valid Power of attorney UAE. Whether you need it for real estate transactions, business representation, or family-related matters, professional guidance makes the process easier and more secure. Choosing the right legal support for Power of attorney UAE can save time, reduce stress, and protect your interests.
BPVS – Reliable visa agency in Mumbai providing fast, professional, and stress-free visa services. Enjoy smooth and easy visa approvals today.
This is such a detailed and helpful Bantu knots tutorial! I really like how you explained starting on dry, stretched hair—it makes a big difference. The product tips and drying advice are especially useful. I enjoy learning styles like this in my free time, even while taking breaks with apps like nulls brawl ios. Great guide overall!
Thanks for this. I really like what you’ve posted here and wish you the best of luck with this blog!
electrician dubai
Looks like a very nice and interesting idea, but the problem is, curtain cleaning dubai it will cost a lot to the homeowner to take services of a professional interior decorator.
Love the detailed breakdown on how to style and maintain bantu knots — clear steps and great visuals make it easy to follow! Just like mastering a creative technique in hair styling requires understanding structure and form, students working on design projects can benefit from Architecture assignment Help to strengthen their planning and creative execution.
One of the best platforms for online gaming and live sports is Diamond Exchange ID . Easy to join, secure to use, and full of opportunities to win big rewards. Highly recommended.
https://diamondexch-cricketid.com
Book NMIMS solved assignment for April 2026 at an affordable price. Get high-quality 100% plagiarism free NMIMS Assignment Answers within budget.
Get NMIMS solved assignments for April 2026 at an affordable price. We offer high-quality 100% plagiarism-free NMIMS Assignments within budget.
Get NMIMS solved assignment for April 2026 in budget. Book NMIMS Assignments by contacting us at +91 8882309876 with high-quality assignments.
Great step-by-step guide—very easy to follow and helpful for beginners! The tips on using minimal product and allowing enough drying time really make a difference in achieving defined results, since tightly wrapped knots can take longer to dry . Creative styling like this also highlights the importance of structure and technique, where students can benefit from management assignment help to better organize and present their academic work effectively.
It’s interesting how you highlighted the importance of starting with dry and stretched hair for Bantu knots. I’ve always struggled with drying time, so the tip about a blowout or stretching curls beforehand is a game-changer. It makes perfect sense that saturated hair would take ‘FOREVER’ to dry, as you put it.
It’s so helpful that you emphasized starting with dry, stretched hair for Bantu knots. I’ve definitely made the mistake of trying this style on wet hair before, and the drying time alone was enough to deter me from trying again. Your point about the Knots taking ‘FOREVER to dry’ really resonated with my past experiences.
Many successful sellers prefer Amazon Wholesale because it offers a structured and scalable sourcing method. By working with verified distributors, they gain access to bulk inventory, competitive pricing, and stable supply chains. This helps maintain smooth operations, improve profit margins, and support long-term growth in the Amazon marketplace environment.
Nulls brawl its a private Brawl Stars server where you can enjoy unlimited gems, coins, and unlocked brawlers without grinding. It’s great for testing skins, trying out new features, and having fun without restrictions. https://nulsbrawl.fr/
It’s interesting how starting with dry, stretched hair is emphasized for Bantu knots. I’ve always thought soaking wet hair was the way to go for most curly styles, but knowing it helps with drying time – and preventing dampness even 12 hours later – makes a lot of sense for avoiding frizz and getting good results.
It’s interesting how you note that Bantu knots take ‘forever’ to dry, even on already dry hair. That’s a crucial point, as I’ve definitely rushed that step in the past and ended up with less-than-ideal results. The advice to start with dry, stretched hair makes a lot of sense now.
It’s interesting how you highlighted the importance of starting Bantu knots on dry, stretched hair, especially after experiencing dampness 12 hours later even with minimal product. That’s a crucial tip many people probably overlook, assuming damp hair is fine. I’ll definitely keep that in mind for my next attempt to avoid frizz.
It’s interesting how you highlighted the importance of starting Bantu knots on dry, stretched hair. I’ve always struggled with them taking forever to dry, so that tip about beginning with a blowout or stretched curls makes a lot of sense. It sounds like a real time-saver.
It’s interesting how you highlighted the importance of starting Bantu knots on dry, stretched hair. I’ve always struggled with them taking forever to dry, so that tip about beginning with a blowout or stretched curls makes a lot of sense. It sounds like a real time-saver Appreciate the practical breakdown here.!
Scanlab CC is a service that helps people manage digital tasks smoothly. Scanlab makes things easier and faster for users. With scanlab cc, you can complete work efficiently without stress, making online operations simple and clear.
For More Information:
https://https-scanlab.cc/login
This article is a great guide for anyone interested in trying Bantu knots, especially beginners. I really like how it explains the process step by step, making it easy to understand and follow. Bantu knots are not only a stylish look but also a protective hairstyle that helps maintain hair health while creating beautiful curls without heat . The tips about using minimal products and starting with properly prepared hair are especially helpful for getting the best results. Content like this is very useful for people exploring natural hair care. Similarly, platforms like Radhe Exchange Login are also gaining attention for offering smooth and user-friendly digital experiences. Overall, this was an informative and well-explained post.
https://radheexchhxyz.com/radhe-exchange-login/
It’s interesting how starting with dry, stretched hair is emphasized for Bantu knots.
This is such an amazing and detailed tutorial 👏 I really appreciate how you’ve broken everything down step by step—it makes Bantu knots feel much easier and more achievable, especially for beginners. Your personal experience adds so much value, and the tips about starting on dry hair and using minimal products are super helpful.
I also love how you explained the technique of wrapping the knots properly—that’s something many people struggle with, and you made it very clear. The final results sound absolutely beautiful!
Content like this is truly inspiring and helpful for anyone exploring natural hairstyles. Great work and thank you for sharing your knowledge 💫
Also, for anyone who loves bold and creative fashion, do check out Creed Leather for high-quality cosplay costumes in the USA. A great place to explore unique styles and bring your favorite character looks to life 😊
Using Reddy Anna Login has been quite convenient for me so far. I usually worry about login delays or errors, but here everything worked without any hassle. The process is straightforward, and I didn’t face any glitches while accessing my account. It’s refreshing to see a platform that actually focuses on ease of use instead of overcomplicating things. Even on my slower internet connection, the page loaded quickly. That’s a big plus for me, and I’m pretty satisfied with how reliable it feels.
Bantu knots are such a versatile and beautiful natural hairstyle love how they can be styled both as knots and then transformed into those soft, defined curls afterward. It’s a great option for anyone looking to protect their hair while still keeping things stylish and low-maintenance. The flexibility really makes it stand out, especially for different textures and occasions. Appreciate you sharing this simple yet effective styling method! For more interesting tips and ideas, you can always Play now and explore something new.
Really enjoyed reading this piece on Bantu knots. It explains the style in a way that feels both practical and cultural, which is rare these days. I like how the process of twisting hair into small coiled buns is broken down simply, making it approachable even for beginners . The versatility of the style stood out to me, especially how it protects hair while also creating curls. It’s not just fashion, it’s identity too. Honestly, guides like this make experimenting less intimidating. For anyone curious about trying something new and meaningful, I’d say Play Now and explore more details yourself.
Experienced sellers understand that inventory consistency directly impacts store performance. An Amazon Wholesale Business provides the kind of structured supply chain that supports high-performing stores. Bulk sourcing not only reduces costs but also ensures product availability across all listings. This consistency improves seller metrics, customer satisfaction, and overall credibility. For serious retailers, it becomes a key part of long-term success.
What stood out to me the most is how these websites manage to simplify complex ideas into something very easy to understand. Whether it’s about food, health, or lifestyle, the explanations are clear and relatable. I particularly liked the article about choosing the right mattress—it’s something people often overlook. Similarly, when I explore platforms like Gold365 Login, I appreciate when things are simple and user-friendly. Good content always makes a difference, and this selection definitely delivers value.
This was such a helpful and beautifully explained post.
People often search random things like Laser247 Login , but content like this is actually useful and worth spending time on.
I really appreciate how clearly you broke down Bantu knots in a way that feels both informative and approachable. Hairstyle content can sometimes feel too rushed or overly basic, but this had enough detail to be genuinely helpful. It also celebrates texture and styling in a very positive way, which makes it even more enjoyable to read. Overall, this is a great beauty and hair care post that feels practical, stylish, and easy for readers to connect with.
Dependable Wholesale kitchen products offer businesses a wide selection of kitchen essentials at competitive prices. Their range includes cookware, storage containers, cutting tools, and baking equipment. Bulk ordering ensures cost savings and uninterrupted supply. These products are suitable for high-demand commercial kitchens. Working with reliable Wholesale kitchen products suppliers guarantees quality, consistency, and performance.
I just read the Bantu knots tutorial and found it genuinely helpful for anyone looking to try this iconic hairstyle. The step‑by‑step approach made it easy to understand how to section, twist, and secure each knot for beautiful curls or classic looks. I appreciated the cultural context and the encouragement to experiment on different hair textures. Whether you’re a beginner or experienced at styling your hair, this guide delivers clear tips. By the way, while exploring styles I also remembered to check my fairdeal live 247 login for updates — and that organized mindset helps with all online tasks.
Looking for an ovidrel prescription online ? You’re making a smart choice! Ovidrel is a trusted trigger shot used in fertility treatments to stimulate ovulation effectively. Getting your ovidrel prescription online has never been easier — simply consult a licensed fertility specialist virtually, receive your prescription, and order from a verified pharmacy. An ovidrel prescription online saves time, ensures convenience, and keeps your fertility treatment on track. Always verify your online pharmacy is legitimate before purchasing for safe, effective fertility care!
Online sellers who want to avoid inventory risks often rely on dropshipping distributors UK
This model allows businesses to sell products without purchasing stock upfront. Distributors take care of packaging and shipping, ensuring orders reach customers on time. Retailers can focus on marketing strategies and customer engagement while suppliers handle logistics. With dependable dropshipping distributors UK, businesses can operate more efficiently and scale without heavy investment.
Online sellers who want to avoid inventory risks often rely on dropshipping distributors UK. This model allows businesses to sell products without purchasing stock upfront. Distributors take care of packaging and shipping, ensuring orders reach customers on time. Retailers can focus on marketing strategies and customer engagement while suppliers handle logistics. With dependable dropshipping distributors UK, businesses can operate more efficiently and scale without heavy investment.
Many sellers face low profit margins due to poor sourcing decisions and overpriced suppliers, which makes scaling difficult. wholesalers for amazon fba solve this problem by connecting sellers with cost-effective wholesale suppliers offering competitive pricing. This allows better margin control, improved pricing strategies, and long-term profitability in competitive Amazon niches.
Benchtop Bioreactor systems are widely used in research labs, biotech startups, and process development settings where accuracy, control, and space efficiency matter. A reliable Benchtop Bioreactor helps scientists manage pH, temperature, dissolved oxygen, and agitation for consistent cell culture and fermentation results. Ritai Bioreactor offers advanced solutions designed for practical lab use, easy monitoring, and dependable performance. Whether you are working in biopharma, microbial studies, or vaccine development, Ritai Bioreactor supports smooth scale-up from lab trials to pilot production. Choosing the right Benchtop Bioreactor improves productivity, reduces risk, and supports better experimental outcomes in modern biotechnology environments.
Hello! I hope you don’t mind me asking something slightly off-topic—I’m looking for advice from someone with blogging experience. How difficult is it to start a blog? I’m not very technical, though I usually learn quickly once I dive in. I’ve been thinking about starting my own blog, but I’m feeling a bit uncertain about where to begin. Do you have any tips or suggestions? I’d truly appreciate any guidance you can offer. Thanks so much in advance!
This tutorial is super helpful and easy to follow! I really appreciate how you explained each step in detail, especially the tips about starting on dry hair and using minimal products. It makes a huge difference for beginners like me. Snaptroid also helps me find useful beauty and hair tutorials like this quickly. Definitely going to try these Bantu knots soon. Thanks for sharing such valuable tips!
El uso de letras en cursivas permite dar estilo y elegancia a cualquier texto digital o escrito. Con herramientas como un transformador de letras cursivas, puedes convertir fácilmente palabras comunes en formatos atractivos. Por ejemplo, crear una letra r mayúscula cursiva, una e en cursiva mayúscula o incluso una letra d mayúscula cursiva ayuda a destacar nombres, títulos o mensajes. Estas opciones son ideales para redes sociales, diseños creativos y contenido visual llamativo.
A website that offers ebike reviews and electric bikes for sale is a one-stop resource for anyone interested in electric cycling. It provides detailed reviews, comparisons, and guides to help users find the best e-bike for their needs. Many of these sites also allow visitors to purchase bikes directly, combining research and shopping in a convenient online experience.
This was such a helpful tutorial! I’ve honestly struggled with Bantu knots before, especially getting them to dry properly, so your tip about starting on stretched, dry hair makes so much sense. I also love how you explained the wrapping technique—it’s something I was definitely doing wrong. Your results look amazing! Can’t wait to try this method myself. Thanks for sharing such detailed steps! 💕
Great job for publishing such a beneficial web site. Your web log isn’t only useful but it is additionally really creative too.Pretty good post. I just stumbled upon your blog and wanted to say that I have really enjoyed reading your blog posts. Buy verified okx accounts
Chennai is a city where tradition meets modern sophistication, and this blend is beautifully reflected in its interior design preferences. Today, homeowners are increasingly turning to a luxury furniture store in Chennai to create elegant, functional, and timeless living spaces. Whether you are designing a new home or upgrading your interiors, luxury furniture offers unmatched quality, comfort, and style.
A luxury furniture store in Chennai provides more than just furniture—it delivers a complete lifestyle upgrade. From curated collections to bespoke designs, these stores cater to discerning homeowners.
Delhi, being one of India’s busiest metropolitan cities, is home to countless corporate offices, industries, healthcare institutions, and residential complexes. Managing such diverse infrastructures requires expertise, precision, and consistency. This is why businesses are increasingly choosing the Best Facility Management Services in Delhi to maintain smooth and efficient operations.
From maintaining cleanliness to ensuring safety and technical performance, the Best Facility Management Services in Delhi offer comprehensive solutions that enhance productivity and create a positive environment.
Order a premium ball gags at MyDarkShop designed for comfort and durability. Adjustable straps ensure a secure and comfortable fit, while strong construction provides reliable use. Perfect for couples looking to explore playful restraint and enhance their roleplay experiences
I’ve always liked how styles like Bantu knots celebrate texture and natural hair, but they also make you notice how visible the scalp can be in certain looks. That’s where something like scalp micropigmentation for women starts to make sense, especially if thinning or wider partings are bothering you. I came across it recently and liked how it works with your existing hair rather than changing your style, just giving that fuller, more even look
MSME Loan come with lower interest rates and flexible repayment options.
Wedding Venue in Delhi
Wedding Venues in Delhi is here to help you find and book the perfect place for your special day. We offer a range of wedding services to make your wedding planning easy and stress-free. We can also customize your wedding according to your budget and preferences.
When I first started looking for a reliable supplier of natural hair, I came across Raw Hair Wholesale and decided to give it a try. From my personal experience, the company truly lives up to its promise of quality and professionalism. Their selection of textures — straight, wavy, and curly — is impressive, and the hair feels incredibly soft and natural.
One thing that stood out to me was their commitment to providing 100% unprocessed hair sourced directly from trusted regions. The durability and overall appearance exceeded my expectations, especially for wholesale pricing. If you like silky hair extensions, there are great choice https://raw-hair-wholesale.com/raw-hair/silky/ which I personally found to be smooth, shiny, and easy to style.
Shipping was fast, and the service felt reliable throughout. Overall, I was satisfied with my purchase and would consider them a solid partner for anyone in the beauty industry.
Through the MPTAAS portal, students can register, complete their profiles, apply for various scholarships, and track their application status online without needing to visit government offices. It supports multiple schemes for school and college students, helping them continue their education without financial barriers.
Athena Behavioral Health offers specialized Panic Disorder Treatment for women in Gurgaon. Our compassionate team of expert psychiatrists and therapists provides personalized care through CBT, mindfulness therapy, and holistic healing programs — helping individuals overcome panic attacks, restore emotional calm, and reclaim a confident, fear-free life.
Finance and Accounting Services help businesses stay compliant, maintain records, and reduce financial risks through organized processes.
Informative post! For anyone looking for a trusted guard rail supplier in Malaysia, Vgsteel offers excellent solutions with strong, corrosion-resistant materials ideal for highways and infrastructure projects.
Excellent insights! Vgsteel is a leading highway guardrail manufacturer offering reliable, corrosion-resistant solutions that ensure maximum protection on roads.
Low-Cost Meeting Rooms Available in Mayapuri offer affordable, fully-equipped spaces for your business needs. Perfect for meetings, workshops, and conferences, these rooms provide all essential amenities without compromising on quality.
You have got some great posts in your blog. I will be visiting again.
Looking to reach your audience instantly? As a leading Bulk SMS Services Provider, we offer reliable and cost-effective messaging solutions tailored to your business needs. Whether you’re promoting offers or sending alerts, our platform ensures high delivery rates and real-time tracking. Recognized as the Best SMS Service Provider, we help businesses grow through seamless communication. Based in the capital, we are a trusted Bulk SMS Service Provider in Delhi, serving clients across industries. Choose us for instant connectivity, personalized support, and scalable SMS solutions. Reach thousands with a single click – boost engagement today!
WhatsApp solutions offer businesses a powerful way to connect with customers through instant messaging, enabling real-time communication, support, and marketing. With features like WhatsApp Business API, automated responses, and secure messaging, companies can enhance customer experience and streamline operations. It also supports multimedia sharing, making interactions more engaging and personalized. Overall, WhatsApp solutions help businesses build stronger relationships and drive growth efficiently.
Wedding Venues in Delhi is here to help you find and book the perfect place for your special day. We offer a range of wedding services to make your wedding planning easy and stress-free. We can also customize your wedding according to your budget and preferences.
watch all animes in high quality
Essentials Hoodie is the American Streetwear Fear Of God Essentials brand. Get Up To 30% Off on Essential Hoodies Online Store. Fast Shipping Worldwide.
I really enjoyed this post. The Short Inca trail is a great option for travelers from the USA, Canada, and UK who want to experience Machu Picchu without taking a long multi-day trek. It offers the right mix of history, scenery, and manageable hiking. Andean Path Travel does a great job helping travelers plan a comfortable and well-organized Peru experience. This route is ideal for anyone looking for a memorable adventure with expert local support.
Excellent quality Cotton Canvas Fabric! The material is strong, durable, and has a great texture, making it perfect for a variety of uses, such as bags, upholstery, and DIY projects. It’s easy to work with and holds its shape beautifully. Truly a reliable and versatile fabric—highly recommended!
Great post! Meth addiction is a serious issue that needs proper medical care and emotional support. Finding a reliable Meth Addiction Treatment Center in Delhi is very important for safe recovery. Professional treatment with detox and therapy can help individuals regain control of their lives.
Wedding Venues in Chattarpur and MG Road. List of in Chattarpur, Banquet Halls, Hotels for Party destination races in Chattarpur and MG Road Ever thought of enjoying a multi-theme Wedding Function while being at just one destination? If no then you must not have visited Chattarpur & MG Road Farmhouses.
This update feels like a big upgrade for players in 2026. The addition of Sirius and Najia is exciting, but I’m more interested in the trophy prestige system. It sounds like something that will keep players engaged longer.
Any business that has difficulties in doing secretarial tasks such as filing and scheduling can have a number of issues with the help of a virtual secretary. It is a necessity to succeed, but it can be agony, expensive, and time-consuming. Under Admin Support Services you receive assistance at need be and only charge on an hourly basis. It is the best option when you are running a small business that cannot hire a full-time administration or do not have a formal office.
Great article! The Vietnam kitesurfing season is truly exciting, and Surfpoint offers an amazing experience with ideal wind conditions and professional support for riders of all levels.
Corteiz Vêtements marque streetwear. Jusqu’à 30 % de réduction sur la boutique officielle Corteiz France. Remise exceptionnelle.
https://corteizsofficial.fr/
Great read! I found your points really helpful, especially for studenthis blog is very much informative. The Dissertation Helper UK provided here is excellent. From case studies to care plans and clinical reflections, every assignment is plagiarism-free, well-crafted, and delivered on time. Highly recommended for students seeking reliable and high-quality academic support.
This is a really helpful and motivating post! I especially liked how you emphasized the importance of staying focused and managing time effectively. It’s something many of us struggle with, especially when trying to do my assignment without distractions.
Play online billiards anytime, anywhere with billi99. Realistic physics, live opponents, and skill-based matches. Download now and start your winning streak today.
For More Info:- https://bili99.net/
Impressive and informative post, really enjoyed reading it. It adds value for every cricket lover. For enhanced access and reliability, try the seamless experience on the shreenath365 platform. Get id now
For More Info: https://shreenath365.com/
I appreciated the post highlighting digital cricket trends. Reddyplay11 offers users a simple, secure way to explore platforms while maintaining consistent performance and easy navigation. Get id now
For More Info:- https://reddyplay11.net/
Loved this post, clear and informative content shared. Appreciate the effort. Check laserbet for more updates and helpful cricket information. Get id now
For More Info:- https://laserbet.net/
This blog explains Bantu knots in a very simple and engaging way. The step-by-step approach makes it easy for beginners to try this beautiful hairstyle. I really enjoyed learning about its cultural roots too. Looking forward to more such helpful content from Tilak Nagar Escorts.
Definitely your all weblogs are helpful for me. I really enjoy a lot reading your all posts.
Thanks for sharing! Get informative, original content only at mytiger365. Boost your learning with easy-to-read guides. Check us out today! Get id now
For More Info:- https://mytiger365.net/
Looking for reliability? 99lotus delivers secure transactions and nonstop action. Start winning now. Thanks for reading and supporting our website. Get id now
For More Info:- https://99lotus.net/
Get your instant betting ID on mylaser247. Fast withdrawals, live cricket odds, and 24/7 support. Register now and start winning today. Get id now
For More Info:- https://mylaser247id.com/
Great post! Stay ahead with shadowexch9 fresh, clear, and original. Appreciated your engagement. Check our website now. Get id now
For More Info:- https://shadowexch9.net/
Thanks for this informative post! Experience smooth fantasy leagues with winzing247. Safe, fast, and user-friendly. Don’t wait—visit our website and claim your reward today! Get id now
For More Info:-https://winzing247.net/
ServiceNow Agentic AI leverages autonomous AI agents to plan, decide, and execute tasks across workflows. It uses real-time data and intelligent reasoning to optimize processes, reduce manual effort, and deliver faster, proactive outcomes across IT, customer service, and enterprise operations.
Wonderful content! Check out tigerclub365 for an unmatched digital experience. Our website prioritizes your needs with fast access and dependable support always. Get id now
For More Info:- https://tigerclub365.net/
Really enjoyed this! lasergame247 is a platform users appreciate. Feel free to explore our website for additional information. Get id now
For More Info:- https://lasergame247.net/
Upgrade your game now with cricbet99. Best odds, instant withdrawals, and secure betting. Join today and start winning like a pro.
For More Info:- https://cricbet99.io/
Offshore Software Engineering allows companies to optimize budgets while maintaining development quality through structured remote collaboration models.
Dubai sofa cleaning experts use safe methods to remove dust, stains, and unpleasant smells.
Experience premium coffee with De’Longhi Coffee Machines, designed to deliver café-quality beverages for both home and office use. Known for Italian craftsmanship and advanced technology, these machines brew rich espresso, creamy cappuccino, and smooth latte with perfect aroma and taste.
Whether you need a compact coffee maker for your kitchen or a powerful machine for office use, De’Longhi offers reliable performance, stylish design, and easy operation. Perfect for beginners and coffee enthusiasts alike, these machines ensure consistent results in every cup.
Upgrade your coffee experience with De’Longhi – one of the best coffee machine brands for home and office.
Really helpful tutorial—love how the steps are explained in a simple and realistic way, especially the tips about drying time and product use. It makes trying Bantu knots feel much more manageable for beginners. Great content! Also, for students balancing learning and tasks, getting Project Management Assignment Help can be just as useful
Very informative! Planning a kitesurfing holiday in Portugal with Kitevoodoo sounds exciting and well-organized for anyone looking to improve their skills.
Very informative post! If you’re looking for Yoga Classes in South Delhi at Home, it’s a great way to enjoy personalized sessions, better comfort, and consistent practice. Perfect for improving flexibility, reducing stress, and maintaining a healthy lifestyle right from your home.
The talent development market in the world is more than 400 billion in 2026. Nevertheless, most companies are still holding their 40 to 60 years old old-fashioned training traditions. The gap between the employer expectations and the needs of workers has never existed. Unlike traditional programs that did not lead to any apparent outcomes, businesses now start adopting AI and Innovation Services
Pest Control Near Me
समग्र आईडी पोर्टल
Very nice and informative article! Need Cipomox 500 for bacterial care? Visit powpil for trusted quality and affordable online ordering.
After having a negative encounter on a website, 88% of internet users say they won’t go back. These days, if your website takes too long to load or has too many steps to pay, it will be an insurmountable barrier to your earnings. Only by investing in expert Development & Tech Services can you guarantee that your virtual doors will always be open and inviting to all visitors. Nowadays, speed and simplicity are the key drivers of loyalty, thus investing in seamless tech is very necessary.
Great article, thanks for sharing! 👍 Tools like Waioz – ecommerce app builder make it even easier to create powerful online stores quickly and efficiently.
Finance and Accounting Services ensure proper financial tracking, compliance with regulations, and consistent reporting for business operations.
I appreciated the post for its useful insights on online cricket platforms. Reddyanna offers a reliable and smooth experience, making it easier for users to explore safely. Get id now
For More Info:- https://reddyannabookclub.com/
Excellent post! A trusted online cricket id ensures smooth streaming and real-time updates. Thanks for sharing this valuable information. Get id now
For More Info:- https://getiplcricketid.com/
Love this! Explore cricbet99ipl for engaging, informative, and 100% original posts. Make every read count. Visit our website today. Get id now
For More Info:- https://cricbet99ipl.com
Improve your digital batting skills using cricbet99green. Reliable, smooth, and easy. Grateful for your appreciation. Start winning now! Get id now
For More Info:- https://cricbet99green.com/
Punjab News Live: Get the latest Punjab news live, including breaking news updates from across the state. From political developments to sports and entertainment, stay informed with real-time news in Punjabi.
Upgrade your betting game with saffronexch. Peer-to-peer exchange, fair odds, no hidden fees. Withdraw your winnings within hours. Trust the best. Get id now
For More Info:- https://saffronexchcricketid.com/
Appreciate your support! Get fresh, secure updates with lotus999. Useful and plagiarism-free. Visit our website for more exclusive content. Get id now
For More Info:- https://lotus999cricketid.com/
Informative read! Your online cricket id is just a click away. India Play Cricket Online ID fast, secure, trusted. Join thousands of winners. Get id now
For More Info:- https://www.indiaplaycricketonlineid.com
Excellent share! Explore tej777 to discover a platform built for quality and trust. Our website makes every interaction smooth, safe, and truly enjoyable. Get id now
For More Info:- https://taj777id.com
Thank you for sharing this! play99exch continues to gain positive attention. Visit our website to learn more now. Get id now
For More Info:- https://play99exch.net/
Great content! Stay one step ahead with Wolf7Pay, offering a fast and user-friendly digital experience. Thanks for sharing such valuable insights—keep it up!
digital management by searching for methods to Hire Admin Support Services from India. In addition to being proficient with the most recent technologies on the market, these employees have no problem handling schedules that span international borders.
Feel the excitement with sand dune bashing dubai as you ride across the desert in powerful 4×4 vehicles. Driven by expert professionals, this activity delivers an adrenaline-filled experience with breathtaking views of the dunes. Ideal for adventure seekers and tourists, dune bashing offers both thrill and safety. It’s a must-try activity that showcases the beauty and excitement of Dubai’s desert landscape.
[Click Here https://dunebashingdubai.ae/evening-desert-safari/%5D
Nowadays, more than 82% of all web traffic is made up of motion graphics. Even nowadays, animation is something of a perfunctory add-on to the advertisers. The most popular business is not at this point paying more advertising today. To bring ideas into life, they are incurring costs on Creative Design Services
Great post—Bantu knots are such a versatile and meaningful hairstyle, blending cultural heritage with modern styling. The way they protect hair while creating beautiful curls makes them both practical and stylish. Just like mastering a hairstyle takes the right technique, students can also benefit from expert support like finance assignment help, making complex subjects easier to manage and understand.
Explore exclusive offers with Doha hotel deals designed to provide luxury stays at competitive prices. These deals include discounted room rates, special packages, and added benefits for guests. Ideal for both business and leisure travelers, hotel deals in Doha ensure comfort, convenience, and value for money. With premium amenities and excellent service, guests can enjoy a high-end experience while saving on accommodation costs.
Bantu notes are very protective and enhance the style. You explained it very well.
Welcome to Cricbet99 your ultimate betting destination. Visit our website now. Enjoy fast payouts, live odds, and 24/7 support. Join today.
ServiceNow integration connects multiple enterprise systems, enabling seamless data flow and unified workflows. It enhances efficiency by automating processes, reducing manual tasks, and improving collaboration across IT, HR, and business functions for a more streamlined digital ecosystem.
Impressive and informative content, really enjoyed reading it. It adds value for fans. For reliable access and performance, try our platform powered by ipl cricket id. Get id now
I appreciated the post and found it informative for beginners. reddy anna provides a structured platform, making online cricket access easier, safer, and more consistent for everyday users.
Really informative! Securing your online cricket id is the first step to seamless streaming. I appreciate this helpful post.
Excellent insight! Stay informed with cricbet99ipl your trusted source for fresh, useful, and plagiarism-free content. Read, learn, and improve every single day with our website.
cricbet99green helps you bat with confidence and control. Play smart shots, rotate strike, and avoid risky slogs. Thank you for supporting our website. Get id now
Appreciate your effort in writing this detailed post. Switch to saffron exchange for peer-to-peer betting with complete transparency. Set your own odds, enjoy instant payouts, and get 24/7 support. Register now and start winning smartly. Get id now
Appreciate your support! lotus999 delivers fresh, informative, and plagiarism‑free content. Useful and readable. Liked this post? Visit our website for more.
Thanks for reading! lotus999 keeps content original, clear, and valuable. Appreciate your engagement. Promote your brand with us. Check our website today. Get id now
Thanks for sharing! Unlock seamless fantasy cricket with a trusted online cricket id. Visit India Play Cricket Online ID. Register free. Play smart. Win big. Get id now
Thanks for sharing! Unlock seamless fantasy cricket with a trusted online cricket id. Visit India Play Cricket Online ID. Register free. Play smart. Win big. Get id now
Excellent share! Explore tej777 to discover a platform built for quality and trust. Our website makes every interaction smooth, safe, and truly enjoyable for all users. Get id now
I adore your wp web template, wherever would you obtain it through? bitlife latest version god mode
Needed to compose you a tiny note to finally thank you very much yet again for your personal splendid methods you have discussed above. It is strangely open-handed with people like you to provide publicly all that a number of people would have marketed as an electronic book to generate some bucks for their own end, primarily now that you could possibly have tried it if you ever wanted. These inspiring ideas likewise acted like a fantastic way to know that the rest have the same dreams really like my personal own to see a whole lot more concerning this problem. I’m sure there are thousands of more enjoyable times in the future for many who check out your blog. Vijay tv
I really enjoyed this! play99exch is a trusted gaming platform players appreciate. Feel free to explore our website for more fun and rewards. Get id now
Three times as many leads are generated by businesses who consistently post content as those that do not. Nevertheless, when it comes to technically good prose, 60 percent of businesses are challenged to create meaningful prose. It is this requirement that has now spawnedContent Writing Services . They go beyond issues of vocabulary or syntax.
prime hostilis Hostilis is the gold standard. Their Mimosa Hostilis is 100% pure, lab-verified, and completely free of fillers. If you want authentic inner root bark without the white wood, this is the only US supplier worth your time
best us supplier of mimosa hostilis root bark
Having a doctor at home in Dubai is really convenient, especially for elderly patients or busy families. Services like Care24 make it easier to get medical care without visiting a clinic.
Packaging Hippo provides high-quality custom boxes and packaging solutions designed to elevate your brand. We focus on durable construction, creative designs, and eco-friendly materials to deliver packaging that protects products and enhances visual appeal. Our custom packaging helps businesses boost brand recognition, attract customers, and create a premium unboxing experience.
DMT (N,N-Dimethyltryptamine) is a potent psychedelic naturally found in numerous plants and animals. Delivered through sleek vape carts, it offers a fast, accessible, and highly intense experience—far quicker and more convenient than traditional methods like ayahuasca. Vape carts provide precise dosing, discreet use, and immediate effects, making them the perfect choice for those seeking profound, transformative journeys on their own terms. Experience the next evolution in psychedelic exploration with DMT vape carts—powerful, portable, and ready whenever you are.
order dmt vape pen now
DMT vape offers a fast and convenient way to unlock one of the most intense psychedelic experiences available. Unlike traditional methods like ayahuasca, there’s no need for complex rituals or long preparation just inhale and feel the effects within seconds. The experience is deeply immersive yet short-lived, typically lasting 10 to 30 minutes, making it ideal for those seeking profound insights or spiritual exploration without hours of commitment. With discreet use, easy portability, and precise control over dosage, DMT vapes provide a customizable journey that’s both accessible and efficient. Perfect for modern explorers ready to tap into deeper consciousness anytime, anywhere.
buy dmt vape cart online
Great post on the importance of digital growth for businesses. Today, choosing the right SEO Services provider can make a big difference in online visibility, traffic, and lead generation. Many businesses struggle to rank well because they miss proper strategy, technical optimization, and quality content. IT Web Stream is doing a great job in helping brands improve their search presence with result-focused SEO Services. A strong SEO plan not only improves rankings but also builds trust and long-term business growth. Really useful insights shared in this blog.
Great post on the importance of digital growth for businesses. Today, choosing the right SEO Services provider can make a big difference in online visibility, traffic, and lead generation. Many businesses struggle to rank well because they miss proper strategy, technical optimization, and quality content. IT Web Stream is doing a great job in helping brands improve their search presence with result-focused SEO Services. A strong SEO plan not only improves rankings but also builds trust and long-term business growth. Really useful insights shared in this blog.
Bioprocessing Equipment plays a major role in modern biotechnology, pharmaceutical production, and research-based manufacturing. Choosing the right Bioprocessing Equipment helps improve process control, product quality, and production efficiency. Ritai Bioreactor is known for offering reliable and advanced solutions designed for lab, pilot, and industrial applications. Their systems are built to support stable performance, easy operation, and consistent results. For businesses looking to upgrade production with trusted Bioprocessing Equipment, Ritai Bioreactor is a strong choice for quality and innovation.
Bioprocessing Equipment plays a major role in modern biotechnology, pharmaceutical production, and research-based manufacturing. Choosing the right Bioprocessing Equipment helps improve process control, product quality, and production efficiency. Ritai Bioreactor is known for offering reliable and advanced solutions designed for lab, pilot, and industrial applications. Their systems are built to support stable performance, easy operation, and consistent results. For businesses looking to upgrade production with trusted Bioprocessing Equipment, Ritai Bioreactor is a strong choice for quality and innovation.
Bioprocessing Equipment plays a major role in modern biotechnology, pharmaceutical production, and research-based manufacturing. Choosing the right Bioprocessing Equipment helps improve process control, product quality, and production efficiency. Ritai Bioreactor is known for offering reliable and advanced solutions designed for lab, pilot, and industrial applications. Their systems are built to support stable performance, easy operation, and consistent results. For businesses looking to upgrade production with trusted Bioprocessing Equipment, Ritai Bioreactor is a strong choice for quality and innovation.
If you are planning a memorable Peru adventure, the Short Inca trail tour is a great choice for travelers from the USA, UK, and Canada. It offers the perfect mix of history, nature, and scenic trekking without requiring several days on the trail. Andean Path Travel helps make the Short Inca Trail Tour smooth, well-organized, and enjoyable for all kinds of travelers. From expert guidance to comfortable arrangements, they understand what international visitors need. For anyone in the USA, UK, or Canada looking for a trusted Peru travel experience, Andean Path Travel is a reliable option to consider.
If you are planning a memorable Peru adventure, the Short Inca trail tour is a great choice for travelers from the USA, UK, and Canada. It offers the perfect mix of history, nature, and scenic trekking without requiring several days on the trail. Andean Path Travel helps make the Short Inca Trail Tour smooth, well-organized, and enjoyable for all kinds of travelers. From expert guidance to comfortable arrangements, they understand what international visitors need. For anyone in the USA, UK, or Canada looking for a trusted Peru travel experience, Andean Path Travel is a reliable option to consider.
If you are planning a memorable Peru adventure, the Short Inca trail tour is a great choice for travelers from the USA, UK, and Canada. It offers the perfect mix of history, nature, and scenic trekking without requiring several days on the trail. Andean Path Travel helps make the Short Inca Trail Tour smooth, well-organized, and enjoyable for all kinds of travelers. From expert guidance to comfortable arrangements, they understand what international visitors need. For anyone in the USA, UK, or Canada looking for a trusted Peru travel experience, Andean Path Travel is a reliable option to consider.
If you are searching for reliable Machined Parts China solutions, this topic is very useful for buyers and businesses looking for quality manufacturing support. Many companies today need trusted sourcing partners that can help with supplier verification, quality control, and smooth communication. Supply Base Solutions is a strong name in this space because they help businesses connect with dependable manufacturers in China. Finding the right partner for Machined Parts China can save time, reduce risk, and improve product consistency. This is a great discussion for anyone who wants better sourcing results and long-term manufacturing success in China.!
If you are searching for reliable Machined Parts China solutions, this topic is very useful for buyers and businesses looking for quality manufacturing support. Many companies today need trusted sourcing partners that can help with supplier verification, quality control, and smooth communication. Supply Base Solutions is a strong name in this space because they help businesses connect with dependable manufacturers in China. Finding the right partner for Machined Parts China can save time, reduce risk, and improve product consistency. This is a great discussion for anyone who wants better sourcing results and long-term manufacturing success in China.!
If you are searching for reliable Machined Parts China solutions, this topic is very useful for buyers and businesses looking for quality manufacturing support. Many companies today need trusted sourcing partners that can help with supplier verification, quality control, and smooth communication. Supply Base Solutions is a strong name in this space because they help businesses connect with dependable manufacturers in China. Finding the right partner for Machined Parts China can save time, reduce risk, and improve product consistency. This is a great discussion for anyone who wants better sourcing results and long-term manufacturing success in China.!
If you are searching for reliable Machined Parts China solutions, this topic is very useful for buyers and businesses looking for quality manufacturing support. Many companies today need trusted sourcing partners that can help with supplier verification, quality control, and smooth communication. Supply Base Solutions is a strong name in this space because they help businesses connect with dependable manufacturers in China. Finding the right partner for Machined Parts China can save time, reduce risk, and improve product consistency. This is a great discussion for anyone who wants better sourcing results and long-term manufacturing success in China.!
A yoga teacher training 200 hour is a basic certification course for those who want to learn yoga in a proper and structured way. It covers yoga postures, breathing techniques, meditation, anatomy, and teaching methods in a simple and easy-to-understand manner. The course helps improve physical strength, flexibility, balance, and mental peace while also building confidence to teach others. It is suitable for beginners as well as yoga practitioners who want to deepen their knowledge. After completing the training, students receive a certification that allows them to start teaching yoga professionally.
MHRB powder, derived from the root bark of the Mimosa hostilis tree, is highly valued for its traditional and ethnobotanical uses. The root bark is carefully harvested, dried, and ground into a fine powder, which contains naturally occurring compounds such as DMT (dimethyltryptamine) and other alkaloids. Historically, MHRB has been used in ceremonial contexts by indigenous cultures for its psychoactive properties, often in the preparation of ayahuasca analogs. Beyond its traditional uses, the powder is sometimes studied for potential therapeutic applications, including introspective and spiritual experiences, although these uses require careful, legal, and responsible handling. It is important to note that MHRB powder is potent and should only be used with respect, proper knowledge, and awareness of legal restrictions in various regions.
mimosa hostilis root bark powder for sale
Mimosa pudica, often referred to as the “sensitive plant,” has roots that are valued in traditional medicine, particularly in Ayurveda, for their therapeutic properties. The root is commonly dried and powdered, yielding mimosa powder, which is known for its ability to support mental and emotional health. It is believed to have anxiolytic and mood-stabilizing effects, often used to help reduce stress, anxiety, and mild depression. Additionally, mimosa root powder is sometimes applied for its neuroprotective and restorative properties, potentially aiding in better sleep and overall nervous system support. Its natural, plant-based composition makes it a gentle supplement, though it should be used mindfully and under guidance due to its potent bioactive compounds.
buy mimosa bark
Mimosa hostilis (also known as Mimosa tenuiflora) is a perennial tree native to parts of South and Central America, especially Brazil and Mexico. Its root bark has been traditionally valued for generations for natural dyeing due to its rich purple-brown color and high tannin content, as well as for use in various cultural and botanical practices. The plant is also appreciated for its resilience, fast growth, and soil-repairing qualities, making it ecologically beneficial in arid regions.
mimosa hostilis root bark for sale
Great article! I really appreciate the detailed insights you shared—it’s very helpful for anyone looking to understand healthcare services better.
Nowadays, the convenience of a lab test at home is a game changer, especially for busy people who want accurate results without visiting a clinic. I’ve personally found such services quite reliable for home sample collection and fast reporting.
Thanks again for sharing such valuable information—looking forward to more posts like this!
Great post! You’ve explained everything in a very simple and informative way, which is really helpful.
In today’s fast-paced life, having access to a reliable doctor on call service is extremely important. It saves time and provides immediate medical assistance right at your doorstep, especially during emergencies or late hours.
Thanks for sharing such valuable information—keep up the great work!
Great post! This is a very important topic and you explained it really well.
With growing awareness about health and privacy, choosing a reliable std test at home service has become very convenient. It allows people to get tested comfortably and confidentially without visiting a clinic.
Thanks for sharing such valuable information—keep up the great work!
Very informative post! This is an important topic and you’ve explained it really well. Nowadays, choosing a reliable std test at home service is a great option for people who value privacy and convenience. It makes the testing process much easier without the need to visit a clinic. Thanks for sharing such helpful information—keep up the great work!
This was such an informative and well-explained piece—it’s refreshing to see a hairstyle being discussed with both its practical side and its cultural significance in mind. I really appreciated how you broke down the process in a way that feels approachable, especially for someone who might be trying Bantu knots for the first time. The step-by-step clarity makes it much less intimidating.
What stood out to me most is how versatile this style really is. From being a protective hairstyle to creating defined curls through a knot-out, it’s impressive how much can be achieved without heat or heavy manipulation. It’s also meaningful to see the cultural roots acknowledged, since Bantu knots originate from African traditions and carry more depth than just a styling trend .
I also liked how the article balances styling tips with hair care—highlighting how sectioning, moisture, and gentle handling all play a role in getting the best results. It makes the whole process feel more intentional rather than just cosmetic.
While browsing through similar content and platforms recently, I also came across my99exchh.com, which seems interesting and worth exploring in its own space.
Overall, a really insightful and well-rounded guide—it’s the kind of content that both educates and inspires people to try something new with confidence.
Smart IPTV är en modern lösning för digital underhållning där användare kan streama live-TV, filmer och serier direkt via internet. Många i Sverige väljer att köpa IPTV för att få flexibel tillgång till ett stort kanalutbud utan långa abonnemang. IPTV Sverige och tjänster som Viking IPTV erbjuder ofta användarvänliga appar, hög bildkvalitet och stöd för olika enheter som smart-TV, mobil och surfplatta, vilket gör IPTV till ett bekvämt och kostnadseffektivt alternativ för hemmaunderhållning.
I had a really great experience with the Diamond Exchange platform. It offers a wide variety of live sports options, which makes it exciting and engaging for any sports fan. The interface is clean, simple, and very easy to navigate, so everything feels smooth and hassle-free. Overall, it provides a fun and enjoyable online experience, and I’d definitely recommend it to anyone who wants a convenient way to stay connected with live sports. https://whetstonez.com/
Fresh poppy pods are the seed pods that are harvested from the poppy flower. Poppies are known for their beautiful flowers, but it’s their seed pods that are of the most value. These pods contain the seeds for the next crop and, when dried, they are frequently used in floral arrangements and other decorative crafts. By using fresh poppy pods, you can take your art to the next level as it gives a natural and pleasant look to your creations.
Green Flame Fuel: wood pellets is a comprehensive information resource promoting the UK as a global supplier of quality, environmentally-responsible forest products from sustainably-managed forests.
Our journey began with a simple, irresistible love for Maine Coon kittens for sale. Today, we operate under the brand name “Adorable Claw”, proudly pitting ourselves as one of the credible and well-established breeders in the industry. At our core, we specialize in the sale of superior quality, pedigree Maine Coon kittens, distinguishing ourselves through our passion, commitment, and exceptional standards.
Bihar Bhumi Jankari is a very useful initiative for bringing land-related information online. It helps people easily check land records, ownership details, and other important data without needing to visit government offices repeatedly. This kind of digital service improves transparency, saves time, and reduces corruption. However, there is still room for improvement in terms of website speed, user interface, and accessibility for people who are not very familiar with technology.
chipotle menu with prices are one of the most popular choices on the Chipotle menu, known for their generous portions and fully customizable ingredients. Each burrito is wrapped in a warm flour tortilla and filled with your choice of protein, cilantro-lime rice, beans, fresh salsas, cheese, and toppings. Whether you prefer a classic chicken burrito or a hearty steak or veggie option, Chipotle burritos allow you to build a meal that matches your taste and appetite.
dutch bros secret menu is a collection of the most loved and best-selling drinks from Dutch Bros Coffee, featuring signature flavors and premium quality ingredients. This category includes fan favorites like Golden Eagle, Caramelizer, Annihilator, Kicker, and Cocomo, all crafted with rich espresso, smooth cream, and delicious flavor blends. Whether you prefer hot lattes, refreshing iced coffees, or blended freezes, Dutch Bros Menu Faves offers something for every taste. With customizable options and consistent taste, these drinks have become the top choice for Dutch Bros Menu lovers across all locations.
The Cookout Menu is all about fresh-grilled flavor at a great value. Whether you are craving a double burger, Carolina-style BBQ, or a late-night milkshake, every item is made hot off the grill for that backyard cookout taste. With affordable prices, big portions, Cookout remains a Southern favorite.
mcalisters menu has introduced bold, tangy flavors with its new Dill Pickle lineup. From a savory grilled cheese with a pickle twist to a refreshing pickle-infused lemonade (available by the glass or gallon), these limited-time items bring a unique sweet-and-savory experience to the menu. Perfect for guests looking to try something different in 2026.
Great post! This is a very important topic and you’ve explained it clearly.
With increasing awareness about health and privacy, opting for a std test at home is becoming a preferred choice. It allows people to get tested comfortably and confidentially without visiting a clinic.
Thanks for sharing such valuable information—keep it up!
Great post! This is a very informative and useful topic.
In today’s fast-paced lifestyle, having access to a reliable doctor on call service is extremely helpful. It allows patients to receive immediate medical care at home without the hassle of visiting a clinic.
Services like these are available 24/7 with quick response times, often reaching patients within 30 minutes, which makes them ideal for emergencies or urgent care needs.
Thanks for sharing such valuable information—keep up the great work!
The Needoh Ice Cube is weirdly addictive in the best way—starting off cool and firm like a real ice cube, then slowly giving in to your squeeze until it turns into this soft, calming squish that makes you forget needoh ice cube what you were even stressed about in the first place.
good post..
deep cleaning
Good article on RAG solutions and how they improve AI accuracy with real-time data. Custom rag development services can really boost enterprise AI performance.
Fantastic article, thanks for sharing it with us. The best AKSport promotions for 2026, helping players get more value from their gameplay.
A clear and useful guide for anyone looking to maximize rewards and take advantage of the latest offers.
Thank you for providing such excellent information. Your website has a clean, professional feel, and I truly appreciate the depth of knowledge shared here. You have a strong understanding of the subject, which makes the content both insightful and engaging. I’ve bookmarked this page to revisit and look forward to exploring more of your articles. The way you present complex ideas clearly and helpfully is impressive and keeps readers wanting to return.
Very easy to follow explanation, perfect for anyone new to Papitogel.
Book NMIMS Solved Assignment for June 2026 at an affordable price. Get high-quality 100% plagiarism free NMIMS Assignment Answers within budget.
PLC programming using CODESYS enables engineers to develop, simulate, and deploy automation applications using IEC 61131-3 languages. It supports real-time control, debugging, and integration with various hardware platforms, improving efficiency, scalability, and reliable performance across industrial and manufacturing environments.
Corteiz est une marque de streetwear influente, appréciée en France pour son style audacieux et engagé. Parmi les catégories les plus populaires figurent les joggings, les t-shirts, les air max 95 corteiz. Also buy now https://corteizwears.com/air-max-95-corteiz/
Corteiz est une marque de streetwear influente, appréciée en France pour son style audacieux et engagé. Parmi les catégories les plus populaires figurent les joggings, les t-shirts, les air max 95 corteiz. Also buy now https://corteizofficielle.com/air-max-95-corteiz/.
pgsharp download runs fine with most Pokémon GO versions, but keep in mind it’s not the official app, so you’ll have to install it separately. Updates matter; if the game gets a new version, PGSharp needs one too, or things can break. Depending on your Android phone, some features might not work the same. iOS users? It’s trickier if you even get it running; don’t expect the full experience. Still, for people who like having more control and enjoy spoofing locations now and then, it definitely opens up new ways to play.
Planning a Peru trip from the USA, UK, or Canada? The Sacred valley and 1 day Inca trail hike is a great option for travelers who want culture, scenery, and a shorter trekking experience without missing the highlight of Machu Picchu. It gives you time to explore the beauty of the Sacred Valley while enjoying a rewarding trail experience in just one day. Andean Path Travel offers well-organized tours that make the Sacred Valley and 1 day Inca trail hike comfortable, informative, and memorable. This journey is ideal for travelers looking for a balanced Peru adventure with expert local support.
Between 2021 and 2024, the use of headless commerce at the global level grew by 54 percent. The conversion rates of web pages increased by 20 percent and the speed increased by 30 percent in companies that applied it. Due to the unquestionability of such an effect, more and more companies are choosing to contract with the Headless Commerce Development Services.
dmt carts ONLINE
Excellent article—clear, informative, and easy to follow. Really enjoyed reading it and will share it with others. Also worth exploring Cenforce 200 mg for further insight.
https://pinkpalmpufff.us
Actually quite glad to say, your post is extremely fascinating to read. Also Visit Pink Palm Puff
Actually quite glad to say, your post is extremely fascinating to read. Also Visit Kith Jacket
<!– If you're looking to improve your skills, check out this helpful guide on
belajar bahasa inggris untuk pemula
to start learning English from scratch effectively. –>
Premium research chemicals in Europe represent a highly specialized and tightly regulated segment of the scientific and industrial landscape.https://graymatterchemicals.com/
Mimosa hostilis, also known as Mimosa tenuiflora, is a perennial tree native to parts of South and Central America, especially Brazil and Mexico. It is well known for its rich, dark reddish bark and delicate fern-like leaves. Traditionally, its root bark has been used for natural dyeing due to its high tannin content, producing deep purple to reddish-brown hues. In some cultures, it has also been valued in folk practices and ecological restoration because of its ability to improve soil quality by fixing nitrogen.
Mhrb for sale
Mimosa tenuiflora, commonly known as tepezcohuite or the “skin tree,” is a perennial tree native to parts of Mexico and South America. It is widely valued for its bark, which is rich in tannins, flavonoids, and other bioactive compounds known for their regenerative and antimicrobial properties. Traditionally used in folk medicine for wound healing and skin treatments, Mimosa tenuiflora has gained global recognition in natural skincare for supporting collagen production and soothing burns, scars, and irritation. Its resilience in harsh climates also makes it an important species for soil restoration and ecological balance.
mimosa hostilis for sale
ग्रामीण क्षेत्रों में आवास की सुविधा आज भी एक बड़ी जरूरत है, जहां सरकार लगातार नई योजनाओं के माध्यम से लोगों को पक्का घर उपलब्ध कराने की कोशिश कर रही है। इसी संदर्भ में प्रधानमंत्री ग्रामीण आवास योजना 2026 को लेकर लोगों में काफी रुचि देखी जा रही है, क्योंकि यह योजना आर्थिक रूप से कमजोर परिवारों को घर बनाने में मदद करती है। इस योजना के तहत पात्र लाभार्थियों को वित्तीय सहायता दी जाती है जिससे उनका जीवन स्तर बेहतर हो सके। अधिक जानकारी के लिए लोग ऑनलाइन अपडेट भी देख रहे हैं।
Remaja Lampung Perkosa Pacar Yang Berusia 14 Tahun – https://iflorabella.com/remaja-lampung-perkosa-pacar-yang-berusia-14-tahun/
Exploring traditional and modern hairstyles often reveals how culture and identity connect through self-expression. While reading about unique styles like Bantu knots, it’s interesting to see how awareness and access to information are evolving in other areas too, especially for rural communities. For example, schemes like प्रधानमंत्री किसान सम्मान निधि play a key role in supporting farmers financially and improving livelihoods. How do you think digital platforms are helping spread awareness about such important initiatives alongside cultural trends?
This is such a detailed and insightful post on Bantu knots, especially for beginners trying protective styles. The step-by-step explanation makes it easy to follow, and the tips on hair care are really useful. By the way, for those interested in government schemes, you can also explore पीएम कुसुम योजना, which supports farmers with solar energy solutions. It’s always great to stay informed about both beauty and beneficial initiatives that can improve daily life.
Mimosa hostilis, also known as Mimosa tenuiflora, is a perennial tree native to parts of South and Central America, especially Brazil and Mexico. It is well known for its rich, dark reddish bark and delicate fern-like leaves. Traditionally, its root bark has been used for natural dyeing due to its high tannin content, producing deep purple to reddish-brown hues. In some cultures, it has also been valued in folk practices and ecological restoration because of its ability to improve soil quality by fixing nitrogen.
Mhrb for sale
Mimosa tenuiflora, commonly known as tepezcohuite or the “skin tree,” is a perennial tree native to parts of Mexico and South America. It is widely valued for its bark, which is rich in tannins, flavonoids, and other bioactive compounds known for their regenerative and antimicrobial properties. Traditionally used in folk medicine for wound healing and skin treatments, Mimosa tenuiflora has gained global recognition in natural skincare for supporting collagen production and soothing burns, scars, and irritation. Its resilience in harsh climates also makes it an important species for soil restoration and ecological balance.
mimosa hostilis for sale
Este artículo sobre Bantu knots es realmente interesante y útil para quienes buscan estilos únicos y llenos de personalidad. Me encanta cómo se explican los pasos de forma clara, lo que facilita mucho el proceso. Además, combinar este tipo de peinados con Fuentes De Letras creativas puede darle un toque aún más original a tus publicaciones en redes sociales. Sin duda, un contenido inspirador para quienes aman la moda y la creatividad.►fuentes copiar y pegar◄
“Bantu knots are such a beautiful and versatile protective style! I love how detailed this guide is, especially the tips on maintaining the knots to ensure a great curl definition afterward. For those who enjoy following beauty and hair care trends and are looking for reliable online platforms for helpful resources and community updates, I’ve found that https://winnaddaonline.com/ is a fantastic site to keep on your radar. Thank you for the hair inspiration!”
TNREGINET is a well-intentioned platform that makes property registration services more accessible and transparent. It helps users handle important tasks online without needing to visit offices. However, improving its speed, user interface, and overall reliability would greatly enhance the experience and make it more efficient for everyday use.
Cricket is a game powered by passion and performance. It is not just about playing well, but about giving your best in every moment, no matter the situation.
Each match brings a fresh challenge. Teams start with a plan, but the real test is how they adapt when things don’t go as expected. This ability to adjust makes cricket exciting and unpredictable.
The beauty of cricket lies in its simplicity. A bat, a ball, and a field—yet the possibilities are endless. Cricaza From careful defense to aggressive hitting, every style has its place in the game.
Cricket also teaches valuable lessons. It shows the importance of patience, the strength to handle pressure, and the power of teamwork. Players learn to stay focused, even when the odds are against them.
In the end, cricket is not just about results. It is about the effort, the mindset, and the spirit with which the game is played.
The cava allergen menu are fresh, healthy, and customizable Mediterranean food. You can begin the meal with a base of grains or greens, add a protein of your choice, such as chicken, falafel, or lamb, and finish it off with fresh vegetables, grains, and sauces. The bowls enable you to prepare a meal of your choice, be it light and healthy, a protein-rich one, or a vegan option. The option of consuming the bowls makes them a great way of enjoying a convenient and flavorful meal.
There has been a noticeable trend toward modular models in global digital trade, and by 26 online companies would have used headless commerce, according to study. There has been a growing awareness among company owners that outdated systems are just too.To meet the demands of today’s online customers, these businesses can create a seamless purchasing experience across all digital devices with the help of Spryker Development Services , saving their employees time and effort throughout the day.
great Buy cocaine online
Buy k2 spray online
If you’re searching for Residential Gutter Cleaning Sydney, check out Sydney Gutter Clear. Their team provides top-quality cleaning services, ensuring your gutters stay in perfect condition year-round.
Thanks for publishing such valuable insights. Most people talk about the problem, but you actually provided actionable solutions. That’s what makes your content stand out. Keep posting more like this!
Qnut electric bikes are an e-bike brand that focuses on affordable electric commuter and off-road style bikes, often featuring fat tires, strong motors, and long-range batteries designed for everyday riding and outdoor use. Riders commonly choose Qnut models for city commuting or weekend adventures because they aim to balance performance with a lower price point.
A Qnut Coupon Code is a discount code you can enter at checkout on their website to reduce the total price of a bike or get special promotions like fixed-dollar discounts or percentage savings. These codes can change frequently, so they’re usually tied to seasonal sales or limited-time deals.
blog is informative
I’m truly glad to say it’s an intriguing post to read. I get new information from your article. Also Vist Corteiz
Actually quite glad to say, your post is extremely fascinating to read. Also Visit Cole Buxton
Great website you have got here. Keep up the good work and thanks for sharing your blog site it really helps a lot.Also Visit Palace
Thanks for the information. I really like the way you express complex topics in lucid way. It really helps me understand it much better way. Also Visit Kith
Thanks for the information. I really like the way you express complex topics in lucid way. It really helps me understand it much better way. Also Visit pink palm puff
Upgrade your space with Best Carpets Perth, offering stylish and durable flooring for every interior.
Appreciate you sharing these insights,
Credit card companies often target young adults with cashback offers, reward points, easy approval, and low initial limits. They use social media ads, influencer promotions, and student-focused campaigns. “Buy now, pay later” messaging and lifestyle branding make spending feel easy and aspirational, encouraging early adoption and long-term customer loyalty.
Mimosa hostilis root bark, also known as jurema preta, is highly valued for its rich content of the natural compound DMT (dimethyltryptamine), making it significant in traditional spiritual and shamanic practices, particularly in South America. Beyond its psychoactive properties, the root bark contains tannins and other bioactive compounds that have antimicrobial, anti-inflammatory, and antioxidant effects, which some herbalists believe can support skin health and overall wellness. It is often used in ceremonial contexts to promote introspection, emotional healing, and a sense of spiritual connection. Additionally, its fibrous nature has historically made it useful in natural dyes and craft applications. While the root bark holds cultural and therapeutic importance, it should be approached with care due to its potent psychoactive effects.
mimosa tenuiflora buy
Mimosa hostilis (MHRB) Tenuiflora Powder is a finely ground botanical product derived from the inner root bark of Mimosa tenuiflora (also known as Mimosa hostilis), a tree native to regions of Brazil* and Mexico*. Traditionally, the root bark has been valued for its rich tannin content and natural dye properties, often used in textile coloring and artisanal leather processing. The powder is typically deep purple-brown in color and is sought after in natural skincare formulations and botanical research contexts due to its high concentration of plant compounds.
buy mimosa hostilis root bark
Nice Post
Watch anime online in English. You can watch free series and movies online and English subtitle.
Step-by-Step Admission Process for Top Schools in Faridabad
비아그라구매
I have learn a few just right stuff here. Definitely value bookmarking for revisiting.
I surprise how much attempt you place to create the
sort of fantastic informative web site.
정품시알리스
If you’re searching for Residential Gutter Cleaning Sydney, check out Sydney Gutter Clear. Their team provides top-quality cleaning services, ensuring your gutters stay in perfect condition year-round.
Maid Services in Dubai
I appreciate how straightforward and practical the writing is. https://in.nsibal.com/escorts/ahmedabad
Outstanding post, you have pointed out some good details , I likewise conceive this s a very good website. comments
Thanks for taking the time to discuss this, I really feel strongly about it and love learning extra on this topic. If attainable, as you achieve experience, would you thoughts updating your blog with additional data? It is extremely useful for me.
This is such a helpful and detailed tutorial! I really appreciate how you shared your personal struggles with Bantu knots before finding a method that works — it makes the guide feel so much more relatable and trustworthy. The tip about starting on dry, stretched hair and using minimal products is a game-changer. I’ve always tried doing them on wet hair and ended up with damp knots for hours. Can’t wait to try your approach for a successful knot-out. Thanks for the great advice and for shouting out Lianne’s method too! 🙌
NGOExperts provides clear and reliable support for obtaining an 80G certificate, helping NGOs offer tax benefits to their donors. Our legal team handles documentation, application filing, and follow-ups with care. We understand the practical challenges and guide you step by step, making the process smooth, compliant, and easy to manage for your organization.
I Visit This Website. You Have Done Great Work, Very Good
This is such a simple and helpful guide to achieving stylish Bantu knots! The steps are easy to follow, even for beginners, and the results look amazing. Loved how clearly everything is explained. Great inspiration for trying something new—perfect read, even while browsing topics like South Yarra escorts.
Give your home a fresh new look with Quality Carpets Perth, crafted for style, comfort, and longevity.
How do I know if a WordPress theme supports a subscribe option?
Perfect work you have done, this web site is really cool with good information.
This is my first time i visit here. I found so many entertaining stuff in your blog, especially its discussion. From the tons of comments on your posts, I guess I am not the only one having all the enjoyment here! Keep up the excellent work.
I really enjoyed this article explaining how to do Bantu knots in five easy steps. The breakdown makes it simple even for beginners who are trying the style for the first time. I like how it covers preparation, sectioning, twisting, and maintenance tips clearly. It’s helpful for people looking to protect their natural hair while still experimenting with creative styles. Articles like this are great because they encourage confidence in natural beauty routines. For more lifestyle and entertainment updates, you can also check bdg win which shares interesting content across different topics. Overall, very useful and practical guide indeed
prime hostilis Hostilis is the gold standard. Their Mimosa Hostilis is 100% pure, lab-verified, and completely free of fillers. If you want authentic inner root bark without the white
wood, this is the only US supplier worth your time
best us supplier of mimosa hostilis root bark
prime hostilis Hostilis is the gold standard. Their Mimosa Hostilis is 100% pure, lab-verified, and completely free of fillers. If you want authentic inner root bark without the white
wood, this is the only US supplier worth your time
best us supplier of mimosa hostilis root bark
THEY offer a variety of cannabis strains from around the world, as well as concentrates. Additionally, they are dedicated to providing innovative products including DMT and Edibles.
https://trappyexoticsmenu.com/
Situs Exabet88 Live Draw Singapore Pools
“Situs Exabet88 Live Draw Singapore Pools terbaik.
Klik: https://ecolemansouri.com “
Love how simple and beginner-friendly this guide is! 🙌 The step-by-step breakdown makes Bantu knots feel so easy to try at home, and the styling tips are super helpful too. Definitely saving this for my next protective hairstyle inspiration! ✨💛 https://commedesgarcons.mx/
Using damn login, players can stay connected to Damn Game and keep up with new updates.
The root bark of MHRB (Mimosa Hostilis Root Bark) is valued for its traditional and modern uses, particularly in spiritual, medicinal, and ethnobotanical contexts. It contains high concentrations of N,N-Dimethyltryptamine (DMT), a powerful psychoactive compound, which has been used in ceremonial practices like ayahuasca rituals for promoting introspection, emotional healing, and spiritual experiences. Beyond its psychoactive properties, MHRB root bark has been explored for its potential anti-inflammatory, antioxidant, and antimicrobial effects, supporting general health in traditional medicine. Its use is often guided carefully, emphasizing respect, preparation, and intention due to its potent effects on the mind and body.
Mhrb powder for sale
Mimosa hostilis, also known as Jurema or Mimosa tenuiflora, offers several notable advantages, particularly in medicinal, ecological, and cultural contexts. Its bark and root contain high levels of tannins, which give it strong wound-healing and anti-inflammatory properties, making it useful in traditional medicine for treating burns, skin infections, and ulcers. The plant is also valued for its soil-enriching ability, as it can fix nitrogen, improving soil fertility and supporting reforestation or land restoration projects. Additionally, its fibers have been used for making natural textiles and ropes. Beyond its practical uses, Mimosa hostilis holds cultural and spiritual significance in indigenous rituals, reflecting its multifaceted benefits for both health and heritage.
mimosa root bark for sale
Finding trusted amazon wholesale suppliers is one of the most important steps for any online seller looking to succeed in the Amazon marketplace, as these suppliers ensure a continuous flow of quality products at wholesale prices. With reliable sourcing partners, businesses can strengthen their supply chain, reduce inventory challenges, and focus on expanding their brand presence in the growing eCommerce industry.
https://empireproductllc.com/
This tutorial makes Bantu knots look much easier to try at home. I found it while playing wordlefi and the steps seem really simple to follow.
I like how clear and beginner-friendly this guide is. Saw it after wordle-deutsch and ended up watching the whole process carefully.
Thanks for Your article…it gives us immense knowledge. This is a titanic mixing article. I am all around that genuinely matters content with your call girl in Jaipur
Hi, Your website continues to impress me with high quality and reader friendly posts. Keep sharing this amazing work.
Bape Jackets Blue
Kuramanime adalah portal streaming anime sub Indo gratis terlengkap, kuramanime adalah portal nonton & download anime sub Indo gratis sepuasnya, Streaming lancar, update setiap hari, koleksi lengkap dari anime ongoing, movie, sampai batch hanya di Kuramanime.
This was a great read. I learned several new things from your article and found it extremely helpful.
Derschutze Hoodies
I appreciate the detailed explanation and the clear presentation of ideas. Looking forward to reading more from your blog.
Doudoune Paragoose
Pretty part of content. I just stumbled upon your weblog and in accession capital to assert that I get actually loved account your weblog posts. Any way I’ll be subscribing on your feeds or even I success you access constantly fast.
Perfect work you have done, this web site is really cool with good information.
The dermend specialized fragile skin moisturizing cream: formula to restore is created to address the needs of fragile and sensitive skin by offering deep, restorative hydration. It helps rebuild moisture levels while protecting the skin from further dryness and irritation. The formula is gentle enough for daily application and supports long-term skin health. It absorbs smoothly into the skin, leaving a soft and comfortable finish. This cream is especially useful for those experiencing weakened skin barriers. It enhances skin resilience and promotes a healthier appearance. With consistent use, it helps maintain balanced hydration levels. It is a dependable choice for restorative skincare routines. https://nationdistribution.com/product/dermend-specialized-fragile-skin-moisturizing-cream-formula-to-restore-rejuvenate-mature-skin-daily-moisturizer-anti-wrinkle-cream-for-firming-strengthening-thin-aging-skin-4-5-oz-tube/
Gaming desktops are not as problematic as you might assume, and earning your personal gaming personal pc is not as tough as a lot of folks would make you imagine. Given that you by now have a precise software in thoughts when setting up your personal gaming device, there are truly only three most important elements you need to have to be concerned about, and almost everything else is genuinely secondary: the processor, movie card, and RAM. free ip stresser
The root bark of MHRB (Mimosa Hostilis Root Bark) is valued for its traditional and modern uses, particularly in spiritual, medicinal, and ethnobotanical contexts. It contains high concentrations of N,N-Dimethyltryptamine (DMT), a powerful psychoactive compound, which has been used in ceremonial practices like ayahuasca rituals for promoting introspection, emotional healing, and spiritual experiences. Beyond its psychoactive properties, MHRB root bark has been explored for its potential anti-inflammatory, antioxidant, and antimicrobial effects, supporting general health in traditional medicine. Its use is often guided carefully, emphasizing respect, preparation, and intention due to its potent effects on the mind and body.
Mhrb powder for sale
Wedding Venues In GT Karnal Road. Wedding Venues GT Karnal Road Book Farmhouses, Banquet Halls, Hotels for Party places at GT Karnal Road Ever thought of enjoying a multi-theme Wedding Function while being at just one destination? If not then you must not have visited Farmhouses.
Oh i see, this is talking about new treatment for best experience, thanks for your advice https://mez.ink/gotung88
I never realize that this would be great idea, thank you for this article https://linktr.ee/gotung88
What I like most is how simple everything feels. There are no complicated settings, and the app works smoothly right after opening it.
Having access to all bikes from the start changes the experience completely. It allows more freedom and experimentation.
Removing the watermark gives videos a much cleaner appearance. It’s useful for anyone creating content for social media or YouTube.
The amazon wholesale approach allows sellers to buy products in large quantities at discounted rates and resell them on Amazon for profit. It provides a structured way to build a stable eCommerce business. This model reduces sourcing uncertainty and improves supply chain reliability. Sellers can choose products based on market demand and competition analysis. It helps increase efficiency in inventory management. The system supports predictable revenue growth. It is widely used in Amazon FBA business strategies. https://enwholesalellc.com/
surron electric bike available for purchase here
surron light bee x available for purchase here
surron for saleelectric dirt bike available for purchase here
best electric dirt bike sur-ron electric dirt bike available for purchase here
street legal surron sur-ron electric dirt bike available for purchase here.
cheapest surron electric bike sur-ron electric dirt bike available for purchase here.
Top 3 wheel electric bikes combine stability, convenience, and electric assistance to create a smooth and reliable transportation option for everyday use.
href=”https://usapvasell2026.com/product/buy-verified-cashapp-accounts/”>Buy verified Cash App accounts from usapvasell2026 offers numerous advantages for individuals and businesses alike.
Buy verified Cash App accounts from usapvasell2026 offers numerous advantages for individuals and businesses alike. These accounts come pre-verified, saving you the hassle of undergoing lengthy verification processes.
Buy verified Cash App accounts from usapvasell2026 offers numerous advantages for individuals and businesses alike.
Loved this easy 5-step guide to Bantu knots! Such a beautiful way to style natural hair. For a complete mood relaxation session, unwind with Patel Nagar Call Girls after trying out this look. Self-care and great hairstyles go hand in hand. Thanks for sharing these helpful tips!
The DMT vape cart is a powerful tool for experiencing intense psychedelic states with speed and efficiency. It delivers rapid effects—often within seconds—offering a deep, immersive journey that can include vivid visuals, altered perceptions, and profound insights. The concentrated power of a DMT cart makes it highly effective in small doses, allowing users to access powerful experiences without the need for complex preparation. Its portability, quick onset, and strong potency make it a favored option for experienced psychonauts seeking controlled, high-impact spiritual or consciousness-expanding sessions. Use with care and respect.
shop DMT vape pen discreetly
DMT vapes deliver an intense, immediate, and otherworldly psychedelic experience like no other. By vaporizing DMT for rapid absorption, the effects hit within seconds—unleashing vivid visuals, altered perception, and profound insights that can transform your consciousness. With a powerful yet short-lived journey lasting just 15 to 30 minutes, DMT vapes offer a uniquely efficient and accessible way to explore the full depth of this extraordinary compound. Perfect for those seeking deep, transformative experiences without a lengthy time commitment. Due to its potency, DMT vaping demands respect, careful preparation, and a safe, supportive environment to maximize the experience. Dive into the next level of exploration with DMT vapes—fast, powerful, and life-changing.
buy DMT vape online
MHRB powder, derived from the root bark of the Mimosa hostilis tree, is highly valued for its traditional and ethnobotanical uses. The root bark is carefully harvested, dried, and ground into a fine powder, which contains naturally occurring compounds such as DMT (dimethyltryptamine) and other alkaloids. Historically, MHRB has been used in ceremonial contexts by indigenous cultures for its psychoactive properties, often in the preparation of ayahuasca analogs. Beyond its traditional uses, the powder is sometimes studied for potential therapeutic applications, including introspective and spiritual experiences, although these uses require careful, legal, and responsible handling. It is important to note that MHRB powder is potent and should only be used with respect, proper knowledge, and awareness of legal restrictions in various regions.
mimosa hostilis root bark powder for sale
Soft, fresh curtains start with reliable Curtain Cleaning Near Me solutions nearby.
MHRB powder, derived from the root bark of the Mimosa hostilis tree, is highly valued for its traditional and ethnobotanical uses. The root bark is carefully harvested, dried, and ground into a fine powder, which contains naturally occurring compounds such as DMT (dimethyltryptamine) and other alkaloids. Historically, MHRB has been used in ceremonial contexts by indigenous cultures for its psychoactive properties, often in the preparation of ayahuasca analogs. Beyond its traditional uses, the powder is sometimes studied for potential therapeutic applications, including introspective and spiritual experiences, although these uses require careful, legal, and responsible handling. It is important to note that MHRB powder is potent and should only be used with respect, proper knowledge, and awareness of legal restrictions in various regions.
mimosa hostilis root bark powder for sale
MHRB root bark, which stands for Mimosa Hostilis Root Bark, is a natural plant material traditionally used in various cultural and spiritual contexts. It is highly valued for its rich concentration of harmala alkaloids and DMT precursors, making it a key ingredient in certain traditional ceremonies and natural medicine practices. The bark has a long history of use by indigenous communities in South America for its psychoactive and ritualistic properties, often prepared in teas or extracts. Beyond its traditional use, MHRB root bark has also gained attention for its applications in ethnobotany, research, and creative arts, though handling it requires care and respect due to its potent chemical composition. Sustainable harvesting is crucial, as overexploitation can threaten the plant’s populations in the wild.
mimosa tenuiflora root bark for sale
I also like how you shared your trial-and-error journey—it makes the results feel more real and achievable. Definitely inspired to give Bantu knots another try!
By the way, while exploring different lifestyle and food inspirations alongside beauty routines, I came across this helpful resource:
McAlister Menu — a handy place to check updated meals and prices if you’re planning something quick and easy after your styling routine 😊
Mimosa hostilis (also known as Mimosa tenuiflora) is a perennial tree native to parts of South and Central America, especially Brazil and Mexico. Its root bark has been traditionally valued for generations for natural dyeing due to its rich purple-brown color and high tannin content, as well as for use in various cultural and botanical practices. The plant is also appreciated for its resilience, fast growth, and soil-repairing qualities, making it ecologically beneficial in arid regions.
mimosa hostilis root bark for sale
Mimosa pudica, often referred to as the “sensitive plant,” has roots that are valued in traditional medicine, particularly in Ayurveda, for their therapeutic properties. The root is commonly dried and powdered, yielding mimosa powder, which is known for its ability to support mental and emotional health. It is believed to have anxiolytic and mood-stabilizing effects, often used to help reduce stress, anxiety, and mild depression. Additionally, mimosa root powder is sometimes applied for its neuroprotective and restorative properties, potentially aiding in better sleep and overall nervous system support. Its natural, plant-based composition makes it a gentle supplement, though it should be used mindfully and under guidance due to its potent bioactive compounds.
buy mimosa bark
This topic was actually informative. Many sites post incomplete details, but having a clean source really helps users stay updated. I also came across satta king gali which provides regular charts and fast result updates.
Easy-to-use websites always make online browsing more enjoyable. People exploring bangalore call girls, bangalore escort, bangalore escort services, and bangalore escorts usually prefer platforms that are clean, responsive, and user-friendly.
👉 https://bangalorepremiumescort.com/
Thank you for sharing such informative content. Your explanation was clear, insightful, and very helpful in improving my understanding of the topic. I truly appreciate the effort and knowledge you shared. Posts like yours are always valuable and inspiring. Looking forward to reading more of your helpful and educational content in the future.
Excellent write-up. The points you mentioned about improving customer interaction and operational efficiency are very relevant for today’s businesses. How to Switch from Hardware Phones to a Cloud Dialer in ten days.
Ebike coupon codes are a simple way for shoppers to reduce the cost of electric bikes, accessories, and upgrades. These discounts are commonly offered during seasonal sales, holiday promotions, and brand events, helping customers find more affordable options across a wide range of models. Many buyers search for promo codes before checkout to get better value on their purchase.
Brands such as Qnut Bike, Cemoto Ride, ENGWE Ride coupon code, Eahora, Himiway, HAPPYRUN Sports, Velotric, TST eBike, and WALLKE are often included in these promotions. Whether it’s commuter ebikes, fat-tire models, or folding designs, coupon codes can make higher-performance electric bikes more budget-friendly.
Mimosa hostilis (also known as Mimosa tenuiflora) is a perennial tree native to parts of South and Central America, especially Brazil and Mexico. Its root bark has been traditionally valued for generations for natural dyeing due to its rich purple-brown color and high tannin content, as well as for use in various cultural and botanical practices. The plant is also appreciated for its resilience, fast growth, and soil-repairing qualities, making it ecologically beneficial in arid regions.
mimosa hostilis root bark for sale
Mimosa pudica, often referred to as the “sensitive plant,” has roots that are valued in traditional medicine, particularly in Ayurveda, for their therapeutic properties. The root is commonly dried and powdered, yielding mimosa powder, which is known for its ability to support mental and emotional health. It is believed to have anxiolytic and mood-stabilizing effects, often used to help reduce stress, anxiety, and mild depression. Additionally, mimosa root powder is sometimes applied for its neuroprotective and restorative properties, potentially aiding in better sleep and overall nervous system support. Its natural, plant-based composition makes it a gentle supplement, though it should be used mindfully and under guidance due to its potent bioactive compounds.
buy mimosa bark
Really informative article. I was searching for premium options to buy copper water bottle products online and found some beautiful handcrafted designs recently. Copper drinkware is definitely becoming popular for modern and eco-friendly lifestyles.
The best hearing aid centre in Coimbatore provides high-quality hearing aids, accurate hearing evaluations, and excellent customer support. Discover comfortable and effective hearing solutions tailored to your hearing needs and budget.
An Enterprise AI Solutions Provider helps businesses use artificial intelligence in a practical and meaningful way. By turning data into insights, AI enables smarter decisions, improved efficiency, and better customer experiences. InSphere Solutions works closely with organizations to design and implement tailored AI strategies that fit real business needs. With Enterprise AI Solutions Provider expertise embedded into everyday operations, companies can automate processes, predict trends, and unlock new opportunities. This natural, business-focused approach to AI ensures technology delivers measurable results while supporting long-term growth and innovation across the enterprise.
An AWS Managed Services Provider helps organizations efficiently manage, optimize, and secure their cloud infrastructure while reducing operational complexity. By leveraging expert cloud engineers and proven best practices, businesses can achieve improved performance, cost efficiency, and scalability. InSphere Solutions delivers end-to-end cloud support including migration, monitoring, automation, security, and compliance. With AWS Managed Services Provider expertise integrated into daily operations, organizations benefit from higher reliability, proactive issue resolution, and faster innovation. This managed approach allows internal teams to focus on strategic initiatives while ensuring the AWS environment remains resilient, optimized, and aligned with evolving business and technology demands.
Plan your perfect vacation at the best resorts in Madikeri, featuring beautiful surroundings, cozy accommodations, and premium facilities. Enjoy a refreshing getaway in the heart of Coorg with excellent hospitality and comfort.
The Best Aluminium company in Chennai delivers quality aluminium products with precision and reliability. Get customized aluminium solutions, modern fabrication services, and professional support for industrial and commercial applications.
Discover trusted mechanical engineering colleges in Tamilnadu offering quality education, hands-on training, and excellent placement programs. Gain technical expertise and prepare for a bright future in the engineering industry.
Discover trusted BCom colleges in Chennai offering comprehensive commerce education, skilled faculty, and placement support. Gain the knowledge and confidence needed for successful careers in accounting, banking, and business management.
The best architecture colleges in Tamilnadu offer innovative courses, experienced faculty, and excellent infrastructure for aspiring architects. Students gain practical knowledge, design expertise, and career support for future success.
Discover trusted B Pharm colleges Chennai offering comprehensive pharmacy courses, modern infrastructure, and experienced faculty. Gain technical knowledge and practical skills needed for a successful career in pharmaceutical sciences.
Mimosa hostilis (also known as Mimosa tenuiflora) is a perennial tree native to parts of South and Central America, especially Brazil and Mexico. Its root bark has been traditionally valued for generations for natural dyeing due to its rich purple-brown color and high tannin content, as well as for use in various cultural and botanical practices. The plant is also appreciated for its resilience, fast growth, and soil-repairing qualities, making it ecologically beneficial in arid regions.
mimosa hostilis root bark for sale
Mimosa pudica, often referred to as the “sensitive plant,” has roots that are valued in traditional medicine, particularly in Ayurveda, for their therapeutic properties. The root is commonly dried and powdered, yielding mimosa powder, which is known for its ability to support mental and emotional health. It is believed to have anxiolytic and mood-stabilizing effects, often used to help reduce stress, anxiety, and mild depression. Additionally, mimosa root powder is sometimes applied for its neuroprotective and restorative properties, potentially aiding in better sleep and overall nervous system support. Its natural, plant-based composition makes it a gentle supplement, though it should be used mindfully and under guidance due to its potent bioactive compounds.
buy mimosa bark
mhrb powder for sale
buy mimosa bark
mhrb for sale
shop with us
The website is very solid and recommended, the information provided is easy to understand and the website appearance and features are user friendly.
anime is the best free anime streaming website where you can watch English Subbed, 9anime is one of the best online anime streaming sites.
One thing I really appreciate about is how beginner friendly the platform feels. I’m not someone who likes complicated interfaces, so having everything organized properly makes a big difference. The website responds quickly and works smoothly on mobile browsers as well. I’ve spent a decent amount of time using it recently and haven’t experienced major technical problems. The layout feels clean and professional instead of overcrowded. Another positive point is that browsing different sections feels effortless. It’s refreshing to use a platform that focuses on simplicity and usability. So far, my overall experience has been quite positive and stress free.
Loved this easy 5-step guide to Bantu knots! After a long day of styling and twisting my hair, I truly need some mood relaxation. Kolkata Escorts helped me unwind completely. Perfect way to end a self-care hair day while showing off those gorgeous curls!
Yes. Physical activity supports brain function and may improve concentration.
Keen Shoes deliver rugged outdoor performance, everyday comfort, and eco-friendly design—perfect for hiking, work, water, and adventure, with signature protective toe and durable construction.
Desi Porn Videos continue to attract viewers who enjoy regional stories, stylish performances, and high-quality entertainment experiences online. XXFlame delivers a smooth and engaging platform designed for users looking for fast streaming, updated collections, and easy navigation across multiple categories.
Thanks for sharing useful blog…
Finding reliable care at Minneapolis Drug Treatment Centers is important for lasting recovery. These centers offer safe detox, counseling, and personalized treatment plans for individuals struggling with addiction. Patients receive medical support, therapy sessions, and continuous guidance to help them rebuild a healthy life. Top Health Center provides compassionate care and evidence based treatment options tailored to each patient’s needs. Choosing the right support can make recovery more effective and sustainable over time. Trusted Minneapolis Drug Treatment Centers ensure professional guidance and long term wellness for every patient. We focus on holistic healing, combining therapy, medical care, and lifestyle support for complete recovery. Top Health Center stands committed to helping individuals achieve lasting recovery and improved mental wellbeing every day.
Mimosa hostilis (also known as Mimosa tenuiflora) is a perennial tree native to parts of South and Central America, especially Brazil and Mexico. Its root bark has been traditionally valued for generations for natural dyeing due to its rich purple-brown color and high tannin content, as well as for use in various cultural and botanical practices. The plant is also appreciated for its resilience, fast growth, and soil-repairing qualities, making it ecologically beneficial in arid regions.
mimosa hostilis root bark for sale
Mimosa pudica, often referred to as the “sensitive plant,” has roots that are valued in traditional medicine, particularly in Ayurveda, for their therapeutic properties. The root is commonly dried and powdered, yielding mimosa powder, which is known for its ability to support mental and emotional health. It is believed to have anxiolytic and mood-stabilizing effects, often used to help reduce stress, anxiety, and mild depression. Additionally, mimosa root powder is sometimes applied for its neuroprotective and restorative properties, potentially aiding in better sleep and overall nervous system support. Its natural, plant-based composition makes it a gentle supplement, though it should be used mindfully and under guidance due to its potent bioactive compounds.
buy mimosa bark
Right here, exactness shows up mid chaos – aside from brilliance close by – not just lower cost but clearly proven through graceful insight across an impossibly central scene still larger, yet beyond. sip33 daftar
Upgrade your cookware with handmade copper utensils designed for durability, beauty, and efficient cooking support. These utensils enhance meal preparation with excellent heat distribution and attractive traditional styling suitable for every kitchen. Crafted with attention to detail and long-lasting quality, they are ideal for cooking, serving, and kitchen decoration. Copper utensils offer a perfect combination of elegance, functionality, and healthier cooking experiences for modern households daily.
Create memorable cooking and dining experiences with premium copper utensils crafted for everyday use. These utensils combine durability, efficient heat distribution, and elegant design for practical kitchen performance. Suitable for serving and meal preparation, they add timeless sophistication to any kitchen environment. Copper utensils are perfect for homeowners seeking quality cookware that supports healthier cooking while offering attractive presentation and dependable long-lasting functionality in daily routines.
High quality home health care Minneapolis services are essential for individuals seeking professional support at home. Legal Medic LLC provides trusted, compassionate, and personalized medical assistance designed to improve comfort, recovery, and independence. It focuses on skilled caregivers, timely visits, and patient centered care plans that meet diverse health needs efficiently. Families benefit from reliable in home support, ensuring safety, dignity, and better quality of life for seniors and individuals recovering from illness or surgery. With a strong commitment to excellence, Legal Medic LLC stands out as a dependable provider in the community. We ensure quality care, comfort, and peace of mind for every client served across Minneapolis. Delivering reliable support that enhances daily living and overall wellness consistently provided.
CEMOTO electric bikes deliver smooth, reliable power with a clean, modern design that fits daily commuting and weekend adventures alike. Use CEMOTO coupon code RICHARDSTEPHENS to get 8% off your purchase.
Useful article. For anyone exploring this topic further, I found another relevant resource that complements the points mentioned here:
https://toosclaw.com/
Great post, thanks for sharing these useful insights. I like the practical angle here and found a related resource that may be helpful for readers:
https://mimo.video/
This is a helpful breakdown. In my experience, having the right tool or reference makes this kind of workflow much easier. This resource is worth checking out:
https://viewmax.studio/
Enhance your cooking experience with traditional copper utensils designed for beauty and durability. These utensils provide excellent heat conductivity and reliable kitchen performance for everyday cooking needs. Their polished finish adds sophistication to any kitchen setting while supporting healthier meal preparation. Suitable for cooking, serving, and display, copper utensils offer timeless appeal and dependable quality, making them an excellent addition to modern and traditional homes alike.
Hello Friends, are you looking for call girls in Rishikesh ? Contact Komal Kashyap Escorts Agency, Here you will get top and High Class Top Rishikesh Models 24/7. Rishikesh Call Girls
Thank you for sharing such valuable information. Your website has a clean, professional look, and the depth of knowledge presented is truly impressive. It’s clear you have a strong grasp of the subject, making the content both engaging and informative. I’ve bookmarked this page to revisit later and look forward to reading more of your articles. The way you simplify complex ideas into clear, helpful explanations really stands out and encourages readers to keep coming back.
DMT (N,N-Dimethyltryptamine) is a potent psychedelic naturally found in numerous plants and animals. Delivered through sleek vape carts, it offers a fast, accessible, and highly intense experience—far quicker and more convenient than traditional methods like ayahuasca. Vape carts provide precise dosing, discreet use, and immediate effects, making them the perfect choice for those seeking profound, transformative journeys on their own terms. Experience the next evolution in psychedelic exploration with DMT vape carts—powerful, portable, and ready whenever you are.
order dmt vape pen now
Interesting perspective! I believe more small businesses should adopt these solutions to improve productivity and customer experience.
https://voipgsmgateway.blogspot.com/2026/05/how-to-integrate-gsm-gateway-with-your.html
Mimosa hostilis (also known as Mimosa tenuiflora) is a perennial tree native to parts of South and Central America, especially Brazil and Mexico. Its root bark has been traditionally valued for generations for natural dyeing due to its rich purple-brown color and high tannin content, as well as for use in various cultural and botanical practices. The plant is also appreciated for its resilience, fast growth, and soil-repairing qualities, making it ecologically beneficial in arid regions.
mimosa hostilis root bark for sale
Mimosa pudica, often referred to as the “sensitive plant,” has roots that are valued in traditional medicine, particularly in Ayurveda, for their therapeutic properties. The root is commonly dried and powdered, yielding mimosa powder, which is known for its ability to support mental and emotional health. It is believed to have anxiolytic and mood-stabilizing effects, often used to help reduce stress, anxiety, and mild depression. Additionally, mimosa root powder is sometimes applied for its neuroprotective and restorative properties, potentially aiding in better sleep and overall nervous system support. Its natural, plant-based composition makes it a gentle supplement, though it should be used mindfully and under guidance due to its potent bioactive compounds.
buy mimosa bark
Wow, neat write-up. Getting into this takes effort – actually tough work to craft something solid… yet ideas often stall right at the start, stuck on one piece without moving forward.
Wow, neat write-up. Getting into this takes effort – actually tough work to craft something solid… yet ideas often stall right at the start, stuck on one piece without moving forward.
Mimosa hostilis (also known as Mimosa tenuiflora) is a perennial tree native to parts of South and Central America, especially Brazil and Mexico. Its root bark has been traditionally valued for generations for natural dyeing due to its rich purple-brown color and high tannin content, as well as for use in various cultural and botanical practices. The plant is also appreciated for its resilience, fast growth, and soil-repairing qualities, making it ecologically beneficial in arid regions.
mimosa hostilis root bark for sale
Mimosa pudica, often referred to as the “sensitive plant,” has roots that are valued in traditional medicine, particularly in Ayurveda, for their therapeutic properties. The root is commonly dried and powdered, yielding mimosa powder, which is known for its ability to support mental and emotional health. It is believed to have anxiolytic and mood-stabilizing effects, often used to help reduce stress, anxiety, and mild depression. Additionally, mimosa root powder is sometimes applied for its neuroprotective and restorative properties, potentially aiding in better sleep and overall nervous system support. Its natural, plant-based composition makes it a gentle supplement, though it should be used mindfully and under guidance due to its potent bioactive compounds.
buy mimosa bark
This is seriously impressive! I don’t think I’ve come across anything quite like this before. It’s refreshing to see someone bring such original ideas to the topic. I truly appreciate you putting this together and sharing your perspective. The site offers something the web really needs—fresh thinking and a unique voice. It’s great to find content that stands out and introduces something genuinely new and helpful.
Functional copper utensils improve cooking experiences while adding decorative beauty to kitchen interiors effortlessly. Their durable construction supports reliable heat distribution and practical daily meal preparation for modern households. Perfect for serving food and enhancing kitchen presentation, these utensils provide long-lasting performance and timeless appeal. Copper utensils combine attractive craftsmanship with efficient functionality, making them valuable additions for homeowners seeking stylish and dependable cookware solutions every single day naturally.
Order online tramadol using a reliable healthcare provider offering secure pharmacy services and fast medication delivery. Customers receive pain relief support, affordable healthcare products, and discreet shipping options with every purchase. Our pharmacy service provides genuine medicines, trusted payment methods, and dependable customer care designed for convenience. Experience quality healthcare solutions, smooth online ordering, and reliable medication support focused on satisfaction and comfort daily.
I think your website is well compatible with the web browsers as whenever I search your website in Safari or other web browsers, it runs smoothly without any technical issue. It seems fine and works well. It has been a great browsing and learning experience in your website. Keep doing good works.
I was looking for something like this. Thanks for writing such a useful post. The Luxury Ride
Visit the adult website of prostitution where you choose your sexual partner with this is the escort agency where you find the best call girls at your affordable rate. Call Girls in Rishikesh
Visit the adult website of prostitution where you choose your sexual partner with this is the escort agency where you find the best call girls at your affordable rate. Call Girls in Rishikesh
Thank you very much, this is exactly what I needed.
I really enjoyed reading this and found the information very helpful.
Looking forward to more content like this. https://annarborshroom.com
Motivasi adalah dorongan untuk melakukan sesuatu. Sumbernya bisa bermacam-macam, mulai dari tokoh inspiratif, teman, dan juga keluarga. Salah satu sumber motivasi yang paling mudah kita dapatkan adalah kata-kata motivasi di internet atau sosial media.
This is such a helpful Bantu knots tutorial! I’ve struggled with this style in the past too — especially the drying time issue. Your tip about starting on dry, stretched hair instead of wet hair makes total sense and seems to be the game-changer.
The product recommendations (light mist + whipped butter gel) and the advice about stacking the knots properly are excellent. The results look gorgeous — those big, defined curls are goals!
When I copy natural hair tutorials, product lists, or long blog posts like this one for reference, I sometimes run into tricky hidden characters that mess up the formatting. In those situations I turn to caracter invisible copiar to quickly restore clean text.
Thanks for sharing this detailed guide — definitely trying these steps next wash day!
I’m sharing it with others. Don’t miss checking Ivermectin mebendazole 100 mg tablet for added guidance.
I like the helpful info you provide in your articles. I will bookmark your weblog and check again here frequently. I am quite sure I will learn a lot of new stuff right here! Good luck for the next!
Drew justin bieber delivers the perfect mix of comfort and streetwear fashion.Drew justin bieber The premium fabric and trendy oversized style make it a must-have for casual everyday outfits.
Drew House brings a fresh and modern streetwear vibe with premium quality and stylish designs.Drew House The brand stands out for its comfort, unique fashion sense, and everyday wearable outfits.
Drew clothing brings a perfect combination of modern streetwear and everyday comfort.Drew clothing Drew House outfits are known for their stylish oversized fits and premium casual fashion vibe.
Mimosa hostilis, also known as Mimosa tenuiflora, is a perennial tree native to parts of South and Central America, especially Brazil and Mexico. It is well known for its rich, dark reddish bark and delicate fern-like leaves. Traditionally, its root bark has been used for natural dyeing due to its high tannin content, producing deep purple to reddish-brown hues. In some cultures, it has also been valued in folk practices and ecological restoration because of its ability to improve soil quality by fixing nitrogen.
Mhrb for sale
Mimosa tenuiflora, commonly known as tepezcohuite or the “skin tree,” is a perennial tree native to parts of Mexico and South America. It is widely valued for its bark, which is rich in tannins, flavonoids, and other bioactive compounds known for their regenerative and antimicrobial properties. Traditionally used in folk medicine for wound healing and skin treatments, Mimosa tenuiflora has gained global recognition in natural skincare for supporting collagen production and soothing burns, scars, and irritation. Its resilience in harsh climates also makes it an important species for soil restoration and ecological balance.
mimosa hostilis for sale
brazinocasinoonline.com es un ejemplo de buena UX. Todo está estructurado de manera que te facilita la vida. Muy buena plataforma.
Wow. This sweet little spot just pulls me right in. Hard to look away, really. Such sharp detail makes it tough to step back. Totally undone by it all. Hope you keep moving forward on this path ahead horse gelatin trick
Roma Pandey Rishikesh is a simple and user-friendly platform where you can explore profiles for smooth and comfortable companionship. With easy browsing and direct connection, it offers a private and hassle-free way to enjoy relaxed moments and quality time. Call Girls in Dehradun
강남 텐카페는 서울 강남 지역에서 주로 운영되는 ‘회원제 룸살롱’의 한 종류입니다. 일반 유흥주점과 달리 매니저(접객원)의 10분 단위 회전율이 높고, 고급스러운 분위기 속에서 자유롭게 대화와 술자리를 즐기는 것을 의미합니다. 강남텐카페
Great step-by-step guide! I love how detailed the instructions are. As someone who creates hair tutorial videos, I often need to clean up my footage by removing watermarks or text overlays. Tools like AI Remover have been really helpful for that. Thanks for sharing this tutorial!
Mimosa hostilis, also known as Mimosa tenuiflora, is a perennial tree native to parts of South and Central America, especially Brazil and Mexico. It is well known for its rich, dark reddish bark and delicate fern-like leaves. Traditionally, its root bark has been used for natural dyeing due to its high tannin content, producing deep purple to reddish-brown hues. In some cultures, it has also been valued in folk practices and ecological restoration because of its ability to improve soil quality by fixing nitrogen.
Mhrb for sale
Finding the best paint protection film requires understanding performance, clarity, and durability. A high-quality film ensures long-term protection without affecting your car’s appearance. UltrashieldX delivers top-tier solutions designed to meet modern automotive standards, making it a reliable choice for superior paint protection.
Transform worn furniture through Sofa Cleaning Near Me, ensuring hygienic, fresh, and long-lasting results.
Mimosa hostilis, also known as Mimosa tenuiflora, is a perennial tree native to parts of South and Central America, especially Brazil and Mexico. It is well known for its rich, dark reddish bark and delicate fern-like leaves. Traditionally, its root bark has been used for natural dyeing due to its high tannin content, producing deep purple to reddish-brown hues. In some cultures, it has also been valued in folk practices and ecological restoration because of its ability to improve soil quality by fixing nitrogen.
Mhrb for sale
Mimosa tenuiflora, commonly known as tepezcohuite or the “skin tree,” is a perennial tree native to parts of Mexico and South America. It is widely valued for its bark, which is rich in tannins, flavonoids, and other bioactive compounds known for their regenerative and antimicrobial properties. Traditionally used in folk medicine for wound healing and skin treatments, Mimosa tenuiflora has gained global recognition in natural skincare for supporting collagen production and soothing burns, scars, and irritation. Its resilience in harsh climates also makes it an important species for soil restoration and ecological balance.
mimosa hostilis for sale
Our DMT vape cartridge delivers a fast, intense, and transformative psychedelic experience like no other. Engineered for smooth vaporization, it provides rapid onset effects within seconds, plunging you into profound states of consciousness and vivid visual realms. With a compact design and precise dosing control, this cartridge offers both convenience and potency, perfect for those seeking a quick yet deeply immersive journey. Whether for spiritual exploration or personal insight, our DMT vape cartridge combines high purity with user-friendly vaporization for a powerful, unforgettable experience. Use responsibly and with respect.
buy dmt vape pen
Unlock the door to one of the most profound and intense psychedelic journeys with DMT vape. Known for its rapid onset and short, yet deeply transformative effects, vaping DMT delivers a powerful experience within seconds, allowing users to explore vivid visuals, altered states of consciousness, and profound spiritual insights. Its fast-acting nature and manageable duration make it a preferred choice for those seeking a high-intensity, immersive experience without lengthy commitment. With precise dosing control and discreet use, DMT vape offers unparalleled convenience for personal exploration.
shop beginner dmt vape
Great work! This blog provides valuable insights and practical tips. I appreciate the effort you put into creating such informative and engaging content.
Mimosa hostilis, also known as Mimosa tenuiflora, is a perennial tree native to parts of South and Central America, especially Brazil and Mexico. It is well known for its rich, dark reddish bark and delicate fern-like leaves. Traditionally, its root bark has been used for natural dyeing due to its high tannin content, producing deep purple to reddish-brown hues. In some cultures, it has also been valued in folk practices and ecological restoration because of its ability to improve soil quality by fixing nitrogen.
Mhrb for sale
HORSE GELATIN TRICK FOR MEN – (( HONEST REVIEW!! )) – HORSE GELATIN – HORSE GELATIN TRICK RECIPE HORSE GELATIN for Men
are you searching for high-quality entertainment that treats your desires with a mature, sophisticated touch? our premium adult sex games offer intricate storylines, complex character relationship webs, and breathtaking visuals that far exceed basic adult videos.
Great tutorial! The step-by-step instructions make Bantu knots look much easier to create.
Thanks for sharing these tips. Bantu knots are such a beautiful and versatile hairstyle.
This was an interesting and insightful post. I enjoyed going through the details and found the information quite useful. Keep up the great work! Indian Diet Plan For Weight Loss is a subject that also deserves more awareness.
Paint Protection Film is becoming essential for car owners who want long-term shine and protection. With increasing road damage risks, choosing a reliable solution like UltrashieldX ensures your car stays scratch-free and glossy. It’s a smart investment that not only protects your vehicle’s paint but also maintains its resale value over time.
Calc Buddy Online is your trusted platform for fast, accurate, and easy-to-use online calculator tools. Whether you need help with finance, health, math, construction, conversion, or daily calculations, our smart calculators deliver instant results in just a few clicks. At Calc Buddy Online, we focus on providing user-friendly tools designed for students, professionals, businesses, and everyday users. Our online calculators save time, reduce manual errors, and simplify complex calculations with accuracy and convenience. From EMI calculators to percentage calculators and unit converters, Calc Buddy Online offers a wide range of free tools to make your calculations easier, smarter, and more efficient anytime, anywhere.
Educational content helps readers understand important anatomy topics through simple explanations and easy language. Many visitors search for information about g spot while exploring health-related subjects. Learning from organized resources can improve awareness and provide valuable knowledge for curious readers everywhere.
I am a thousand winds that blow.
XXFlame Adult Dating Site is designed for adults who want to explore new connections in a secure and user-friendly online environment. Whether you are looking for casual conversations, exciting friendships, or meaningful relationships, XXFlame offers a platform that helps like-minded people connect with confidence.
해운대출장마사지 24시간 연중무휴 운영! 여성 전문 테라피스트가 해운대 전 지역 어디든 찾아갑니다. 아로마마사지·스포츠마사지·타이마사지 출장안마 서비스를
Emotional reactions become strongest when markets move rapidly in either direction: https://cryptorobotics.ai/learn/bull-vs-bear-market-psychology-how-sentiment-shapes-decisions/
This post is good enough to make somebody understand this amazing thing, and I’m sure everyone will appreciate this interesting things.
Great post—thank you for sharing such valuable insights on this topic. Your article was easy to understand and very informative. I really appreciate the effort you put into explaining everything so clearly.
While searching for reliable entertainment and premium companionship services in Rajasthan, I also came across https://siyaworld.com/call-girls/jodhpur/, which provides useful information and verified profiles for visitors looking for trusted services.
Keep up the excellent work—your blogs are truly helpful and engaging for readers.
Excellent article on guardrail manufacturing. High-quality guardrails are essential for road safety and long-term durability. Reliable manufacturers help ensure strong protection, compliance with standards, and safer highways for everyone.
Mimosa hostilis root bark, also known as jurema preta, is highly valued for its rich content of the natural compound DMT (dimethyltryptamine), making it significant in traditional spiritual and shamanic practices, particularly in South America. Beyond its psychoactive properties, the root bark contains tannins and other bioactive compounds that have antimicrobial, anti-inflammatory, and antioxidant effects, which some herbalists believe can support skin health and overall wellness. It is often used in ceremonial contexts to promote introspection, emotional healing, and a sense of spiritual connection. Additionally, its fibrous nature has historically made it useful in natural dyes and craft applications. While the root bark holds cultural and therapeutic importance, it should be approached with care due to its potent psychoactive effects.
mimosa tenuiflora buy
Mimosa hostilis (MHRB) Tenuiflora Powder is a finely ground botanical product derived from the inner root bark of Mimosa tenuiflora (also known as Mimosa hostilis), a tree native to regions of Brazil* and Mexico*. Traditionally, the root bark has been valued for its rich tannin content and natural dye properties, often used in textile coloring and artisanal leather processing. The powder is typically deep purple-brown in color and is sought after in natural skincare formulations and botanical research contexts due to its high concentration of plant compounds.
buy mimosa hostilis root bark
AnimeSuge – Watch anime online with English sub for free in HD. Stream anime anytime, anywhere with fast servers and daily updates.
TNREGINET is one of the most important online portals for people dealing with property, registration, and certificate-related services in Tamil Nadu. Many users visit the portal to view an Encumbrance Certificate, check guideline value, track document status, download certificates, or verify property details before making a legal decision. This guide explains TNREGINET in simple language so buyers, sellers, landowners, and first-time users can understand what to check, where to click, and how to avoid common mistakes while using the portal.
Filipinos abroad may need to access LTO services, check license status, or understand digital driver’s license options through LTMS. But using the portal from outside the Philippines can raise questions about login access, renewal, email verification, and official records. This guide explains what OFWs should know about LTMS and how they can manage account-related concerns more carefully.
오피아트 은 대전의밤 문화를 책임지고 있는 대전 유흥 정보 사이트입니다. 오피아트(opart)의 도메인 주소나 홈페이지를 찾고 계신다면 즐겨찾기를 하신 후 바로가기 오피아트
Great post! Guardrail installation equipment plays a vital role in ensuring fast, safe, and accurate highway barrier installation. Using modern machinery helps improve efficiency, reduce labor costs, and maintain high-quality road safety standards. Thanks for sharing this valuable information on guardrail installation solutions.
Thanks for this helpful guide on Bantu knots! The photos and instructions make the process much easier to understand, and I like that you included tips for maintaining the style. It’s always great to find content that celebrates creativity and self-expression through hair styling. I also enjoy exploring creative online communities and resources at https://mincraftmod.org/
mimosabarks.com
Mimosa Barks
http://www.mimosabarks.com
The Mimosa Barks team
visit mimosabarks.com
mimosa hostilis root bark
buy mimosa bark online
powdered mimosa tenuiflora
premium mimosa bark
mimosa hostilis inner root bark (MHRB)
high-quality mimosa barks
organic mimosa tenuiflora bark
source for root bark powder
shredded mimosa hostilis bark
natural mimosa bark dye
benefits of mimosa tenuiflora for skin
how to use mimosa root bark
traditional uses of mimosa hostilis
mimosa bark soap recipes
natural soap making with root bark
Click here to view products
check out their selection
buy it here
Learn more about their sourcing
read this guide
Excellent article! The information provided is simple, organized, and easy to understand. I particularly liked the useful tips on hair preparation and styling. Thank you for sharing such valuable information with your readers.
When it comes to cannabis extracts, purity and craft matter. That’s why the best whole melts carts are highly recommended. Their small-batch live resin and hash rosin stand out for potency, unique terpene profiles, and consistency.
Looking for premium disposables? Explore Fryd Carts with amazing flavors like Berry Blow Pop and Tropical Runtz Punch. Pure quality, strong effects, and delicious profiles.
Reliable sourcing matters—Nitrile gloves distributor options here deliver strong durability, comfort, and consistent supply for professional use.
Researchers looking for quality and consistency should explore biotech peptides for advanced peptide compounds, dependable sourcing, and a professional research-focused catalog.
Discover premium vaping with the best fryd donuts disposable. Designed for potency, purity, and bold flavors with rich terpene profiles.
For the highest quality cannabis extracts, Whole melt v5 is an excellent pick. Their craft live resin and hash rosin offer unmatched strength and terpene richness.
For trusted quality and steady stock, Cedical gloves suppliers provide dependable protection suited for medical and industrial needs.
For high-quality research compounds, biotech peptides offers a well-organized selection designed for laboratories, researchers, and scientific applications.
Discover the intensity of DMT like never before with our premium DMT vape cartridges. Engineered for fast, potent delivery, these cartridges offer a rapid onset of vivid, transformative psychedelic experiences within seconds. Perfectly designed for ease of use and precise dosing, our DMT carts provide a controlled, discreet, and short-lived journey lasting 15 to 30 minutes ideal for both beginners and seasoned explorers. Experience deep spiritual insights and mind-expanding visions with the convenience and power of a high-quality DMT vape cartridge. Use responsibly and embrace the profound potential of this extraordinary compound.
buy dmt vape Canada and USA
Experience the profound intensity of DMT like never before with our premium DMT vape pen cartridges. Designed for fast, smooth vaporization, these carts deliver rapid onset of vivid, immersive psychedelic effects within seconds, lasting for a concise 15–30 minutes. Perfect for both seasoned psychonauts and curious explorers, our DMT vape carts offer precise dosage control and unmatched convenience, no preparation needed, just pure, powerful journeys at your fingertips. Whether for deep spiritual insight or intense visionary exploration, our vape pen carts provide a discreet, easy-to-use, and highly effective way to unlock the extraordinary. Use responsibly and respect the power of DMT.
buy microdose dmt vape
Mimosa hostilis root bark, also known as jurema preta, is highly valued for its rich content of the natural compound DMT (dimethyltryptamine), making it significant in traditional spiritual and shamanic practices, particularly in South America. Beyond its psychoactive properties, the root bark contains tannins and other bioactive compounds that have antimicrobial, anti-inflammatory, and antioxidant effects, which some herbalists believe can support skin health and overall wellness. It is often used in ceremonial contexts to promote introspection, emotional healing, and a sense of spiritual connection. Additionally, its fibrous nature has historically made it useful in natural dyes and craft applications. While the root bark holds cultural and therapeutic importance, it should be approached with care due to its potent psychoactive effects.
mimosa tenuiflora buy
Mimosa hostilis (MHRB) Tenuiflora Powder is a finely ground botanical product derived from the inner root bark of Mimosa tenuiflora (also known as Mimosa hostilis), a tree native to regions of Brazil* and Mexico*. Traditionally, the root bark has been valued for its rich tannin content and natural dye properties, often used in textile coloring and artisanal leather processing. The powder is typically deep purple-brown in color and is sought after in natural skincare formulations and botanical research contexts due to its high concentration of plant compounds.
buy mimosa hostilis root bark
I think this website is very helpful for users looking for clear online content. The layout is neat, and all sections are easy to access. The website speed is also good, which improves the browsing experience. I like the professional design and smooth performance. It gives visitors a comfortable experience online. 은평구출장안마
Database Programming Assignment Help is valuable for students struggling with SQL queries, database design, normalization, ER diagrams, PL/SQL, and complex programming tasks. This page offers expert academic support to help students improve coding skills, understand database concepts more effectively, and submit accurate, plagiarism-free assignments before deadlines.
शादी के बाद Bihar ration card में wife का नाम add करना कई families के लिए important होता है, लेकिन process तब confusing हो जाता है जब पत्नी का नाम पहले उसके मायके वाले ration card में हो। ऐसे में नाम deletion, transfer, Aadhaar details, marriage proof और new family addition.
White label poker software is a complete pre-built online poker platform that helps businesses launch their own branded poker website or mobile app quickly without developing software from the ground up. It includes advanced features such as multiplayer poker games, secure payment gateways, player management systems, tournament options, security protection, and customizable branding. A white label poker software poker company specializes in providing these ready-made poker solutions along with technical support, software maintenance, customization services, and backend management, allowing operators to enter the competitive online gaming market with a professional and scalable poker platform.
Mimosa hostilis root bark, also known as jurema preta, is highly valued for its rich content of the natural compound DMT (dimethyltryptamine), making it significant in traditional spiritual and shamanic practices, particularly in South America. Beyond its psychoactive properties, the root bark contains tannins and other bioactive compounds that have antimicrobial, anti-inflammatory, and antioxidant effects, which some herbalists believe can support skin health and overall wellness. It is often used in ceremonial contexts to promote introspection, emotional healing, and a sense of spiritual connection. Additionally, its fibrous nature has historically made it useful in natural dyes and craft applications. While the root bark holds cultural and therapeutic importance, it should be approached with care due to its potent psychoactive effects.
mimosa tenuiflora buy
Mimosa hostilis (MHRB) Tenuiflora Powder is a finely ground botanical product derived from the inner root bark of Mimosa tenuiflora (also known as Mimosa hostilis), a tree native to regions of Brazil* and Mexico*. Traditionally, the root bark has been valued for its rich tannin content and natural dye properties, often used in textile coloring and artisanal leather processing. The powder is typically deep purple-brown in color and is sought after in natural skincare formulations and botanical research contexts due to its high concentration of plant compounds.
buy mimosa hostilis root bark
Watch mainlaind dramas free
watch all animes in high quality
This post struck a nice balance between being detailed and keeping things simple. https://in.lalcg.com/escorts/mumbai
Wing foiling in Portugal is an amazing experience for water sports lovers. With steady winds, beautiful coastlines, and excellent riding conditions, Portugal is a great destination for both beginners and experienced riders looking to enjoy this exciting sport.
Very well written and easy to understand. This post shares useful information in a simple way. You may also learn more about kamagra oral jelly
If you’re looking for a trustworthy source of Mimosa Hostilis, HostilisBark is a great choice. Their products are consistently high quality, and their dedication to customer satisfaction sets them apart.
mimosa hostilis for sale
The root bark of MHRB (Mimosa Hostilis Root Bark) is valued for its traditional and modern uses, particularly in spiritual, medicinal, and ethnobotanical contexts. It contains high concentrations of N,N-Dimethyltryptamine (DMT), a powerful psychoactive compound, which has been used in ceremonial practices like ayahuasca rituals for promoting introspection, emotional healing, and spiritual experiences. Beyond its psychoactive properties, MHRB root bark has been explored for its potential anti-inflammatory, antioxidant, and antimicrobial effects, supporting general health in traditional medicine. Its use is often guided carefully, emphasizing respect, preparation, and intention due to its potent effects on the mind and body.
Mhrb powder for sale
Customers searching for premium botanical sourcing consistently choose Mexican Mimosa hostilis inner root bark for its recognized quality, dependable harvesting practices, and carefully maintained preparation standards. Every batch is thoroughly inspected to ensure purity, freshness, and a consistent appearance that meets the expectations of international buyers. Its growing popularity reflects strong demand for trusted botanical suppliers offering secure packaging, fast delivery, and reliable customer support for a smooth purchasing experience. Purchase from the Best Mexican Mimosa hostilis inner root bark supplier online today.
mhrb for sale
This is a clear and informative explanation of Bantu knots and their cultural origins. It’s interesting how the style can be worn both as knots and as a way to create natural waves, showing its versatility as well as its historical significance.
This is a great overview of Bantu knots and their versatility. It’s also important to highlight their cultural roots and how the style continues to be both meaningful and practical today.
Customers searching for premium botanical sourcing consistently choose Mexican Mimosa hostilis inner root bark for its recognized quality, dependable harvesting practices, and carefully maintained preparation standards. Every batch is thoroughly inspected to ensure purity, freshness, and a consistent appearance that meets the expectations of international buyers. Its growing popularity reflects strong demand for trusted botanical suppliers offering secure packaging, fast delivery, and reliable customer support for a smooth purchasing experience. Purchase from the Best Mexican Mimosa hostilis inner root bark supplier online today.
mhrb for sale
Mimosa hostilis, also known as Mimosa tenuiflora, is a perennial tree native to parts of Mexico and South America, widely valued for its rich inner root bark that is naturally high in tannins and has long been used in traditional applications such as natural dyeing, leather tanning, and botanical research. The finely shredded root bark is especially prized for its deep reddish-purple pigment and high-quality fibrous composition, making it a sought-after material among artisans and collectors interested in plant-based dyes and ethnobotanical studies. Known for its resilience and fast regrowth in tropical climates, Mimosa hostilis continues to attract global attention for sustainable and versatile natural uses, particularly in eco-friendly craft and botanical supply markets
buy MHRB online
The root bark of MHRB (Mimosa Hostilis Root Bark) is valued for its traditional and modern uses, particularly in spiritual, medicinal, and ethnobotanical contexts. It contains high concentrations of N,N-Dimethyltryptamine (DMT), a powerful psychoactive compound, which has been used in ceremonial practices like ayahuasca rituals for promoting introspection, emotional healing, and spiritual experiences. Beyond its psychoactive properties, MHRB root bark has been explored for its potential anti-inflammatory, antioxidant, and antimicrobial effects, supporting general health in traditional medicine. Its use is often guided carefully, emphasizing respect, preparation, and intention due to its potent effects on the mind and body.
Mhrb powder for sale
The DMT vape pen is a cutting-edge device designed to deliver powerful, fast-acting psychedelic experiences within seconds. By vaporizing DMT directly into the lungs, it ensures rapid absorption and an almost instantaneous breakthrough into profound altered states of consciousness. Users can expect deeply immersive effects—including vivid visuals, ego dissolution, and powerful spiritual insights—all unfolding within a concise 10 to 30-minute session. Combining convenience, portability, and precise dosing control, the DMT vape pen stands as one of the most efficient and user-friendly methods to experience this extraordinary compound. Experience the future of psychedelic exploration—fast, effective, and on your terms.
buy trusted DMT cart
This piece made sense right away, yet felt light to move through. A clean way of putting things held attention without effort. Finding sites that care about what they give stays rare. Your take came across as honest, not just filling space. More like this would mean something. 동탄출장안마
When it comes to cannabis extracts, purity and craft matter. That’s why the best whole melts carts are highly recommended. Their small-batch live resin and hash rosin stand out for potency, unique terpene profiles, and consistency.
Looking for premium disposables? Explore Fryd Carts with amazing flavors like Berry Blow Pop and Tropical Runtz Punch. Pure quality, strong effects, and delicious profiles.
Reliable sourcing matters—Nitrile gloves distributor options here deliver strong durability, comfort, and consistent supply for professional use.
Researchers looking for quality and consistency should explore biotech peptides for advanced peptide compounds, dependable sourcing, and a professional research-focused catalog.
Discover premium vaping with the best fryd donuts disposable. Designed for potency, purity, and bold flavors with rich terpene profiles.
For the highest quality cannabis extracts, Whole melt v5 is an excellent pick. Their craft live resin and hash rosin offer unmatched strength and terpene richness.
For the highest quality cannabis extracts, Whole melt v5 is an excellent pick. Their craft live resin and hash rosin offer unmatched strength and terpene richness.
For trusted quality and steady stock, Cedical gloves suppliers provide dependable protection suited for medical and industrial needs.
For high-quality research compounds, biotech peptides offers a well-organized selection designed for laboratories, researchers, and scientific applications.
Indulge in dessert-like clouds with Fryd Bars. Smooth, creamy, and powerful.
Customers searching for premium botanical sourcing consistently choose Mexican Mimosa hostilis inner root bark for its recognized quality, dependable harvesting practices, and carefully maintained preparation standards. Every batch is thoroughly inspected to ensure purity, freshness, and a consistent appearance that meets the expectations of international buyers. Its growing popularity reflects strong demand for trusted botanical suppliers offering secure packaging, fast delivery, and reliable customer support for a smooth purchasing experience. Purchase from the Best Mexican Mimosa hostilis inner root bark supplier online today.
mhrb for sale
Mimosa hostilis, also known as Mimosa tenuiflora, is a perennial tree native to parts of Mexico and South America, widely valued for its rich inner root bark that is naturally high in tannins and has long been used in traditional applications such as natural dyeing, leather tanning, and botanical research. The finely shredded root bark is especially prized for its deep reddish-purple pigment and high-quality fibrous composition, making it a sought-after material among artisans and collectors interested in plant-based dyes and ethnobotanical studies. Known for its resilience and fast regrowth in tropical climates, Mimosa hostilis continues to attract global attention for sustainable and versatile natural uses, particularly in eco-friendly craft and botanical supply markets
buy MHRB online
Vehicle owner details play a vital role in ensuring accountability and transparency on the road. Accurate ownership records help with legal verification, vehicle registration, insurance processes, and secure ownership transfers. Maintaining updated information protects both vehicle owners and potential buyers while supporting a more reliable transportation system.
It’s a personal tutorial post about trying Bantu knots again on natural hair, following a friend’s method, and finally achieving a successful and satisfying Bantu knot-out result.
Great post! The step-by-step explanation of Bantu Knots is simple and easy to follow, especially for beginners looking to try a stylish natural hairstyle. I also appreciate the brief history behind the look. Reading informative content like this can be as refreshing as finding Chennai Escorts for mood relaxation after a busy day.
Excellent post about bantu. The information was clear, informative, and easy to understand. Thanks for sharing your knowledge on this subject.
This is a very clear and helpful guide on how to do Bantu knots in just five easy steps. I appreciate how you break the process down in a simple and approachable way, making it easy for beginners to follow along with confidence. The instructions feel practical while also celebrating the beauty and versatility of the style. A great and well-written tutorial that empowers readers to try a stylish and cultural hairstyle with ease.
Good morning everyone, are you all well?
Discover Uttarakhand, a serene Himalayan state known for its natural beauty, spiritual heritage, and adventure spots. Explore sacred temples, lush valleys, and vibrant culture.
Uttarakhand Pin Code List
Bantu knots are a beautiful and versatile hairstyle that combines cultural heritage with modern fashion. This step-by-step guide makes the process easy to follow, even for beginners. The tips provided help achieve neat, long-lasting knots while protecting natural hair. malleswaram call girls
Very cool! You’ve made some strong, insightful points here. I can tell you put real thought into this piece, and it shows. The rest of the site is impressive as well—great work all around.
MOMO99
I wanted to know the popular items on the 7 Brew menu before visiting.
This page provided a useful overview of customer favorites.
https://7brewmenuhub.com/
helyszíni állapotfelmérés
I recently visited yd-youdaofanyi.com and found it very useful for translation tasks. The website is simple to use and helps users understand different languages quickly. The translation results are easy to read, making it a good choice for students, travelers, and anyone who needs fast language support. 有道翻译
This tutorial makes Bantu knots look much less intimidating. The step-by-step instructions are easy to follow, and the final result looks beautiful and well-defined.
Thanks for breaking the process down into simple steps! I especially liked the practical tips for keeping the knots neat and helping the style last longer. Great guide for beginners.
I’ve been wanting to try Bantu knots for a while, and this guide gave me the confidence to do it. The photos and clear instructions were super helpful, and the finished style looks amazing!
Housewife Escorts Delhi is frequently appeared as one in every of the most important factors in companionship offerings. customers might also come from diverse expert backgrounds, inclusive of business, leisure, tourism, and diplomacy. for many people, confidentiality is a key attention while arranging personal offerings.expert carrier vendors commonly emphasize discretion and respect for non-public facts. maintaining privacy helps build belief and contributes to a relaxed experience for all parties concerned.
One thing stands out – this post delivers clear insights without confusion. It hits differently when complex ideas get split into steps anyone can grasp. Lately, your site shows up often in my searches for answers. Worth saying, what you share actually sticks in memory. Gratitude fits here – for the time put into work like this. 경기도광주출장마사지
This is a very clear and helpful step-by-step guide on how to do Bantu knots. I appreciate how the instructions are broken down into simple, easy-to-follow steps that make the hairstyle approachable even for beginners. The content feels practical, well-structured, and empowering for readers who want to try a stylish and cultural hairstyle at home. A great and informative tutorial that combines clarity with creativity and confidence-building guidance.
When it comes to cannabis extracts, purity and craft matter. That’s why the best whole melts carts are highly recommended. Their small-batch live resin and hash rosin stand out for potency, unique terpene profiles, and consistency.
For the highest quality cannabis extracts, Whole melt v5 is an excellent pick. Their craft live resin and hash rosin offer unmatched strength and terpene richness.
If clean extractions and strong terpene profiles matter to you, then whole melt extracts live resin is the way to go. Artisan-crafted and updated regularly with fresh drops.
Looking for premium disposables? Explore Fryd Carts with amazing flavors like Berry Blow Pop and Tropical Runtz Punch. Pure quality, strong effects, and delicious profiles.
Discover premium vaping with the best fryd donuts disposable. Designed for potency, purity, and bold flavors with rich terpene profiles.
Finely processed Mimosa hostilis inner root bark powder offers outstanding convenience for customers seeking premium ready-to-use botanical material. Its smooth, uniform consistency and carefully maintained preparation standards make it a trusted choice among natural product enthusiasts, resellers, and wholesale buyers. Packaged for freshness, purity, and easy handling, this powder format continues to stand out as one of the most in-demand botanical products available today.
mimosa hostilis for sale
MHRB powder, derived from the root bark of the Mimosa hostilis tree, is highly valued for its traditional and ethnobotanical uses. The root bark is carefully harvested, dried, and ground into a fine powder, which contains naturally occurring compounds such as DMT (dimethyltryptamine) and other alkaloids. Historically, MHRB has been used in ceremonial contexts by indigenous cultures for its psychoactive properties, often in the preparation of ayahuasca analogs. Beyond its traditional uses, the powder is sometimes studied for potential therapeutic applications, including introspective and spiritual experiences, although these uses require careful, legal, and responsible handling. It is important to note that MHRB powder is potent and should only be used with respect, proper knowledge, and awareness of legal restrictions in various regions.
mimosa hostilis root bark powder for sale
MHRB root bark, which stands for Mimosa Hostilis Root Bark, is a natural plant material traditionally used in various cultural and spiritual contexts. It is highly valued for its rich concentration of harmala alkaloids and DMT precursors, making it a key ingredient in certain traditional ceremonies and natural medicine practices. The bark has a long history of use by indigenous communities in South America for its psychoactive and ritualistic properties, often prepared in teas or extracts. Beyond its traditional use, MHRB root bark has also gained attention for its applications in ethnobotany, research, and creative arts, though handling it requires care and respect due to its potent chemical composition. Sustainable harvesting is crucial, as overexploitation can threaten the plant’s populations in the wild.
mimosa tenuiflora root bark for sale
This article provides a clear and helpful explanation of Bantu knots, including styling tips and hair care guidance. The step-by-step approach makes it easy for readers to understand the process and achieve great results. I appreciate the practical advice and detailed information shared here. While exploring useful online resources, I also came across fairdeal login, which offers a smooth and user-friendly experience.
Many employees appreciate the transparency of the Iloe fine system because it clearly outlines the consequences of missing deadlines. This approach helps create fairness and consistency across the workforce. Understanding the regulations and taking prompt action can prevent fines and ensure continuous access to insurance-related protections.
strongest thc vape disposable UK
MHRB powder, derived from the root bark of the Mimosa hostilis tree, is highly valued for its traditional and ethnobotanical uses. The root bark is carefully harvested, dried, and ground into a fine powder, which contains naturally occurring compounds such as DMT (dimethyltryptamine) and other alkaloids. Historically, MHRB has been used in ceremonial contexts by indigenous cultures for its psychoactive properties, often in the preparation of ayahuasca analogs. Beyond its traditional uses, the powder is sometimes studied for potential therapeutic applications, including introspective and spiritual experiences, although these uses require careful, legal, and responsible handling. It is important to note that MHRB powder is potent and should only be used with respect, proper knowledge, and awareness of legal restrictions in various regions.
mimosa hostilis root bark powder for sale
MHRB root bark, which stands for Mimosa Hostilis Root Bark, is a natural plant material traditionally used in various cultural and spiritual contexts. It is highly valued for its rich concentration of harmala alkaloids and DMT precursors, making it a key ingredient in certain traditional ceremonies and natural medicine practices. The bark has a long history of use by indigenous communities in South America for its psychoactive and ritualistic properties, often prepared in teas or extracts. Beyond its traditional use, MHRB root bark has also gained attention for its applications in ethnobotany, research, and creative arts, though handling it requires care and respect due to its potent chemical composition. Sustainable harvesting is crucial, as overexploitation can threaten the plant’s populations in the wild.
mimosa tenuiflora root bark for sale
The DMT vape cart is a powerful tool for experiencing intense psychedelic states with speed and efficiency. It delivers rapid effects—often within seconds—offering a deep, immersive journey that can include vivid visuals, altered perceptions, and profound insights. The concentrated power of a DMT cart makes it highly effective in small doses, allowing users to access powerful experiences without the need for complex preparation. Its portability, quick onset, and strong potency make it a favored option for experienced psychonauts seeking controlled, high-impact spiritual or consciousness-expanding sessions. Use with care and respect.
shop DMT vape pen discreetly
DMT vapes deliver an intense, immediate, and otherworldly psychedelic experience like no other. By vaporizing DMT for rapid absorption, the effects hit within seconds—unleashing vivid visuals, altered perception, and profound insights that can transform your consciousness. With a powerful yet short-lived journey lasting just 15 to 30 minutes, DMT vapes offer a uniquely efficient and accessible way to explore the full depth of this extraordinary compound. Perfect for those seeking deep, transformative experiences without a lengthy time commitment. Due to its potency, DMT vaping demands respect, careful preparation, and a safe, supportive environment to maximize the experience. Dive into the next level of exploration with DMT vapes—fast, powerful, and life-changing.
buy DMT vape online
Realism Hoodie at the australian streetwear Clothing Brand. Get Up To 30% Off On Realists Hoodie Online Clothing Store. Fast Shipping.
explore our exclusive adult collection and find the perfect flogger toys buy online to elevate your sensory play sessions today with discreet shipping.
**Massar Service 2026** is a digital education platform in Morocco that helps students, parents, teachers, and school administrators manage and access academic information online. Developed to support the country’s education system, it allows users to check exam results, view continuous assessment grades, monitor academic progress, and access important school-related services through a secure login. Students typically use their Massar code or `@taalim.ma` account to sign in and stay updated on their educational records. The platform simplifies communication between schools and families while making academic information more accessible and organized throughout the school year.
✨ A New Chapter in Fine Diamond Earrings Jewellery ✨
Discover our newest Diamond Earrings collection—where timeless craftsmanship, modern elegance, and effortless luxury come together.
💎 Ears Decor Jewels
#NewCollection #FineJewellery #EarsDecorJewels
Loved this tutorial! The step-by-step instructions make Bantu knots feel much less intimidating, especially for beginners. I appreciate the practical tips about starting with stretched hair and using minimal product to achieve the best results. The final knot-out looks gorgeous, and it’s inspiring to see how a protective style can also create such beautiful curls. Thanks for sharing your experience and helpful advice!
Glad you put this piece out into the world. Every bit of it dug deep, yet stayed clear enough to follow along without slowing down. Something fresh clicked in my mind while reading – not common these days. Finding stuff that teaches without feeling like a lecture feels rare. All the effort behind the scenes? Noticed. More when you’re ready.
Buy Pokémon Cards Online is a trusted destination for Pokémon collectors and players. Browse the newest booster boxes, ETBs, special collections, and exclusive Pokémon TCG products.
https://buypokemoncardsonlines.com
Finely processed Mimosa hostilis inner root bark powder offers outstanding convenience for customers seeking premium ready-to-use botanical material. Its smooth, uniform consistency and carefully maintained preparation standards make it a trusted choice among natural product enthusiasts, resellers, and wholesale buyers. Packaged for freshness, purity, and easy handling, this powder format continues to stand out as one of the most in-demand botanical products available today.
mimosa hostilis for sale
Professionally shredded Mimosa hostilis root bark delivers exceptional convenience and consistent quality for customers seeking a reliable botanical product. The finely prepared texture makes measuring, storing, and handling much easier while helping preserve the bark’s natural characteristics. Carefully sourced and processed to high standards, this premium product is valued for its clean preparation, dependable consistency, and superior usability in the botanical marketplace. Perfect for buyers who prioritize quality, freshness, and professional-grade preparation.
Buy Wholesale Mimosa hostilis root bark shredded
MHRB powder, derived from the root bark of the Mimosa hostilis tree, is highly valued for its traditional and ethnobotanical uses. The root bark is carefully harvested, dried, and ground into a fine powder, which contains naturally occurring compounds such as DMT (dimethyltryptamine) and other alkaloids. Historically, MHRB has been used in ceremonial contexts by indigenous cultures for its psychoactive properties, often in the preparation of ayahuasca analogs. Beyond its traditional uses, the powder is sometimes studied for potential therapeutic applications, including introspective and spiritual experiences, although these uses require careful, legal, and responsible handling. It is important to note that MHRB powder is potent and should only be used with respect, proper knowledge, and awareness of legal restrictions in various regions.
mimosa hostilis root bark powder for sale
MHRB root bark, which stands for Mimosa Hostilis Root Bark, is a natural plant material traditionally used in various cultural and spiritual contexts. It is highly valued for its rich concentration of harmala alkaloids and DMT precursors, making it a key ingredient in certain traditional ceremonies and natural medicine practices. The bark has a long history of use by indigenous communities in South America for its psychoactive and ritualistic properties, often prepared in teas or extracts. Beyond its traditional use, MHRB root bark has also gained attention for its applications in ethnobotany, research, and creative arts, though handling it requires care and respect due to its potent chemical composition. Sustainable harvesting is crucial, as overexploitation can threaten the plant’s populations in the wild.
mimosa tenuiflora root bark for sale
I have spent a considerable amount of time using Official FlixFox App and have found it to be a useful entertainment application. The interface is straightforward and designed in a way that makes browsing simple. The app offers a wide range of content, ensuring there is something suitable for various tastes and preferences. Streaming quality is generally stable, and videos load quickly on a good internet connection. The search function is effective and helps locate specific titles without wasting time. I appreciate the regular updates that improve functionality and expand the available content. Overall, FlixFox provides an enjoyable platform for watching movies and television shows whenever desired.
Mr Winston Clothing at the streetwear Australian Brand. Get Up To 40% Off On Mr Winston’s online clothing store. Fast Shipping.
Thanks for Your article..it gives us immense knowledge. Body massage gives you ultimate relief to your body. I would like to recommend each and everyone go for massage once in a week for ultimate relief, and for full fun and entertainment with beautifulcall girl Jaipur . it will not only gives you relief but also increase your productivity.
Great tip—starting on dry, stretched hair really makes a big difference with Bantu knots, especially since drying time can be so long. It’s also important that the hair is well-conditioned beforehand to keep it healthy and manageable throughout the process.
MOI Qatar Visa Check Online 2026 is a convenient online service provided by the Ministry of Interior (MOI) of Qatar that allows users to check the status of their visa applications and residency permits from anywhere. By entering details such as a visa number, passport number, nationality, and verification code, applicants can quickly verify visa approvals, track application progress, print issued visas, and confirm the authenticity of their travel documents. This service helps travelers, residents, and expatriates save time by accessing important visa information online without needing to visit a government office.
This is a fantastic tutorial! The step-by-step instructions make Bantu knots feel much less intimidating, especially for those trying the style for the first time. While exploring beauty and lifestyle resources, I also came across lotus365 blue, which was an interesting website to discover. Thank you for sharing practical tips and clear guidance—I’m excited to try this hairstyle and look forward to reading more of your hair care content.
Looking for where to buy pure concentrates and vapes?? Look no more. Raw Garden provides the purest of all.
Have You been looking for where to buy pure Extracts and vapes?? Look no more. Whole melts provides the purest of all.
nice post
Understanding paint protection film cost is important before making a decision. While prices may vary, investing in quality matters more than choosing the cheapest option. UltrashieldX provides value-for-money solutions with long-lasting durability, ensuring your investment pays off by protecting your car’s finish for years.
I Read your article highlights strong leadership and commitment to public service. The grand assembly appears to be an effective way. Dubai Escorts. Dubai Escorts
mumbai escorts Welcome to Isha Bansal, the gold standard of high-end, sophisticated, and elite companionship in India’s most dynamic metropolis. If you are searching for the most exquisite escorts Mumbai has to offer, you have arrived at a sanctuary of luxury and absolute refinement.
Nice article! I found this content very useful and informative. It gives clear explanation without any confusion. I will recommend this to others who are interested in this topic. Good job and continue creating quality content like this. baking soda for weight loss
Howdy I am so delighted I found your web site, I really found you by error, while I was looking on Google for something else, Adderall XR online no prescription Anyways I am here now and would just like to say thanks a lot for a remarkable post and a all round entertaining blog
Essentials Hoodie from the American streetwear brand. Get up to 60% off Essentials Hoodies at the USA Official Online Store. Fast shipping.
https://essentialshoodieus.us/
Great article! The step-by-step explanation makes Bantu knots easy to understand, even for beginners. I especially liked the brief history and styling tips. Content like this is helpful for anyone exploring new hairstyles. Even readers searching for topics like Kolkata Call Girls for mood relaxation can appreciate informative and engaging blogs.
Great post! Very informative and easy
Great post! It was both informative and thoughtfully written. The concepts were explained clearly and accurately, making them easy to follow. Looking forward to more valuable content from you!
Great tutorial idea! Bantu knots are such a beautiful and versatile hairstyle, and breaking it down into simple steps makes it much more approachable for beginners.
Watch online Free Chinaqtv content
portal of vraities to watch free
Great tutorial idea! Bantu knots are such a beautiful and versatile hairstyle, and breaking it down into simple steps makes it much more approachable for beginners.
great https://euresearchchemicalsforsale.com/
nice
https://stremchemicalsusa.com/
beautiful https://australiachemsupply.com/
nice one https://stremchemicalsusa.com/
Awesome content. I bookmarked it for future reference.
plumber Dubai
Whole Mimosa hostilis root bark remains one of the most preferred options for customers who prioritize natural, untouched botanical products. Preserved in its original form, this product retains maximum integrity and offers long-lasting storage benefits. It is commonly selected by botanical collectors and natural product enthusiasts seeking authentic plant material sourced from trusted suppliers with strict quality standards.
mhrb powder for sale
Mimosa hostilis (also known as Mimosa tenuiflora) is a perennial tree native to parts of South and Central America, especially Brazil and Mexico. Its root bark has been traditionally valued for generations for natural dyeing due to its rich purple-brown color and high tannin content, as well as for use in various cultural and botanical practices. The plant is also appreciated for its resilience, fast growth, and soil-repairing qualities, making it ecologically beneficial in arid regions.
mimosa hostilis root bark for sale
Mimosa pudica, often referred to as the “sensitive plant,” has roots that are valued in traditional medicine, particularly in Ayurveda, for their therapeutic properties. The root is commonly dried and powdered, yielding mimosa powder, which is known for its ability to support mental and emotional health. It is believed to have anxiolytic and mood-stabilizing effects, often used to help reduce stress, anxiety, and mild depression. Additionally, mimosa root powder is sometimes applied for its neuroprotective and restorative properties, potentially aiding in better sleep and overall nervous system support. Its natural, plant-based composition makes it a gentle supplement, though it should be used mindfully and under guidance due to its potent bioactive compounds.
buy mimosa bark
This is a very clear and helpful post that makes learning how to do Bantu knots easy and approachable for readers of all skill levels. I appreciate how the article breaks the process down into simple steps, making it easy to follow while still being detailed enough to achieve great results. The content feels practical, well-structured, and empowering for anyone looking to try this beautiful protective hairstyle. A well-written and informative guide that successfully combines style, education, and confidence-building in one tutorial.
I enjoyed reading this article about slot online. The information is simple and easy to understand. It is helpful for beginners who want to learn more. Thank you for sharing useful tips and explaining everything clearly. I hope you keep posting more interesting content like this. slot online
Whole Mimosa hostilis root bark remains one of the most preferred options for customers who prioritize natural, untouched botanical products. Preserved in its original form, this product retains maximum integrity and offers long-lasting storage benefits. It is commonly selected by botanical collectors and natural product enthusiasts seeking authentic plant material sourced from trusted suppliers with strict quality standards.
mhrb powder for sale
Authentic Mexican Mimosa hostilis whole root inner bark is highly valued for its premium botanical characteristics and dependable sourcing. Carefully selected and naturally preserved, this product appeals to customers searching for traditional botanical materials with strong visual quality and freshness. Its growing demand among botanical enthusiasts reflects the importance of trusted sourcing, professional packaging, and reliable international availability.
buy mimosa tenuiflora
타임케어 안성출장홈타이 – 안성출장마사지와 안성출장안마 안성홈타이 서비스를 전국 어디서나 24시간 편하게! 전문 마사지사의 맞춤 홈케어로 피로를 빠르게 해소 안성출장마사지 [url=https://timecare24.uriweb.kr/anseong]안성출장마사지[/url]
타임케어 안성출장홈타이 – 안성출장마사지와 안성출장안마 안성홈타이 서비스를 전국 어디서나 24시간 편하게! 전문 마사지사의 맞춤 홈케어로 피로를 빠르게 해소 안성출장마사지
Mimosa hostilis (also known as Mimosa tenuiflora) is a perennial tree native to parts of South and Central America, especially Brazil and Mexico. Its root bark has been traditionally valued for generations for natural dyeing due to its rich purple-brown color and high tannin content, as well as for use in various cultural and botanical practices. The plant is also appreciated for its resilience, fast growth, and soil-repairing qualities, making it ecologically beneficial in arid regions.
mimosa hostilis root bark for sale
Mimosa pudica, often referred to as the “sensitive plant,” has roots that are valued in traditional medicine, particularly in Ayurveda, for their therapeutic properties. The root is commonly dried and powdered, yielding mimosa powder, which is known for its ability to support mental and emotional health. It is believed to have anxiolytic and mood-stabilizing effects, often used to help reduce stress, anxiety, and mild depression. Additionally, mimosa root powder is sometimes applied for its neuroprotective and restorative properties, potentially aiding in better sleep and overall nervous system support. Its natural, plant-based composition makes it a gentle supplement, though it should be used mindfully and under guidance due to its potent bioactive compounds.
buy mimosa bark
A DMT cart (cartridge) offers a convenient, efficient, and modern way to experience the powerful effects of DMT. Easily used with a standard vape pen, it delivers a rapid onset—often within seconds—and a short, yet deeply transformative journey lasting 15 to 30 minutes. Perfect for those seeking intense introspection, spiritual insight, or a quick breakthrough experience without hours of preparation. With discreet use, precise dosage control, and unmatched convenience, DMT carts are the go-to choice for conscious explorers. Ready to elevate your journey? Discover the power of DMT carts today and experience the extraordinary in minutes.
order dmt vape juice
DMT vape offers one of the most powerful and fast-acting psychedelic experiences available today—delivering rapid, immersive effects within seconds. Unlike traditional methods, the vaporized form provides a smooth, convenient, and efficient way to explore altered states of consciousness without lengthy preparation. Lasting only 15 to 30 minutes, each session offers a profound journey into vivid visuals, ego release, and spiritual insight—perfect for modern explorers seeking maximum impact in minimal time. With discreet design, easy portability, and precise control over dosage, DMT vape pens bring the future of psychedelic exploration to your fingertips. Experience the extraordinary—anytime, anywhere.
shop 5meo dmt cart
Mimosa hostilis (also known as Mimosa tenuiflora) is a perennial tree native to parts of South and Central America, especially Brazil and Mexico. Its root bark has been traditionally valued for generations for natural dyeing due to its rich purple-brown color and high tannin content, as well as for use in various cultural and botanical practices. The plant is also appreciated for its resilience, fast growth, and soil-repairing qualities, making it ecologically beneficial in arid regions.
mimosa hostilis root bark for sale
Mimosa pudica, often referred to as the “sensitive plant,” has roots that are valued in traditional medicine, particularly in Ayurveda, for their therapeutic properties. The root is commonly dried and powdered, yielding mimosa powder, which is known for its ability to support mental and emotional health. It is believed to have anxiolytic and mood-stabilizing effects, often used to help reduce stress, anxiety, and mild depression. Additionally, mimosa root powder is sometimes applied for its neuroprotective and restorative properties, potentially aiding in better sleep and overall nervous system support. Its natural, plant-based composition makes it a gentle supplement, though it should be used mindfully and under guidance due to its potent bioactive compounds.
buy mimosa bark
The Movie box gives South Africans one free app to replace Netflix, Amazon Prime Video, and Disney+ — all three.
Are you looking to buy shroom chocolate bars near me?. I recently tried dried mushrooms, mushroom bars, and mushroom spores, and I’m deeply enjoying the experience. The scents are unique, customary, and pleasant. They add a distinctive touch to my daily routine, enhancing the atmosphere and overall vibe. A massive recommendation for anyone who appreciates savory wellness tools.
Fresh poppy pods are the seed pods that are harvested from the poppy flower. Poppies are known for their beautiful flowers, but it’s their seed pods that are of the most value. These pods contain the seeds for the next crop and, when dried, they are frequently used in floral arrangements and other decorative crafts. By using fresh poppy pods, you can take your art to the next level as it gives a natural and pleasant look to your creations.
I’ve been exploring Buy LSD Online – LSD FOR SALE?. recently, and I’m deep down enjoying the experience. The scents are with, customary, and pleasant. They add a discriminative touch to my daily routine, ration congeal the willing and atmosphere. A massive catch sight of quest of anyone who appreciates savoury wellness tools.
Paint protection film for car is the ultimate solution for safeguarding your vehicle’s exterior. It protects against scratches, UV rays, and minor damages. UltrashieldX offers industry-leading films that combine strength and clarity, ensuring your car maintains its premium look without compromising on protection or aesthetics.
Great post! I really enjoyed reading about Bantu knots and the helpful styling tips you shared. This hairstyle is not only beautiful but also has deep cultural significance and serves as a versatile protective style for natural hair. The step-by-step guidance makes it much easier for beginners to achieve neat, long-lasting results while keeping their hair healthy. I also came across lotus365 blue apk, which is a useful online resource. Thanks for sharing such an informative and inspiring hair care guide.
Great insight! Quality academic support doesn’t always have to come with a high price tag. Many students look for Cheap Assignment Help services that provide reliable guidance while staying within a student-friendly budget, making it easier to manage both academics and finances.
Mimosa hostilis, also known as Mimosa tenuiflora, is a perennial tree native to parts of South and Central America, especially Brazil and Mexico. It is well known for its rich, dark reddish bark and delicate fern-like leaves. Traditionally, its root bark has been used for natural dyeing due to its high tannin content, producing deep purple to reddish-brown hues. In some cultures, it has also been valued in folk practices and ecological restoration because of its ability to improve soil quality by fixing nitrogen.
Mhrb for sale
Mimosa tenuiflora, commonly known as tepezcohuite or the “skin tree,” is a perennial tree native to parts of Mexico and South America. It is widely valued for its bark, which is rich in tannins, flavonoids, and other bioactive compounds known for their regenerative and antimicrobial properties. Traditionally used in folk medicine for wound healing and skin treatments, Mimosa tenuiflora has gained global recognition in natural skincare for supporting collagen production and soothing burns, scars, and irritation. Its resilience in harsh climates also makes it an important species for soil restoration and ecological balance.
mimosa hostilis for sale
Assignment Maker is a valuable academic solution for students who need assistance in creating well-structured and high-quality assignments. Whether the task involves research, analysis, report writing, or coursework preparation, professional support helps students complete their work effectively. Expert guidance ensures that assignments are organized, informative, and aligned with academic standards. Students can save time, reduce stress, and improve their understanding of complex topics through personalized assistance. Every assignment is prepared with originality, accuracy, and attention to detail to support better academic performance. The service is suitable for various subjects and educational levels, making it a reliable choice for learners seeking quality academic support. If you need professional assistance with assignment preparation, contact +61 489080136 for dependable guidance and timely solutions.
Great tutorial! The step-by-step instructions make Bantu knots easy to understand, even for beginners. Helpful guides like this build trust with readers, just as businesses value their online reputation and sometimes explore Buy Verified Trustpilot Reviews to strengthen credibility. Thanks for sharing!
Finding the best paint protection film requires understanding performance, clarity, and durability. A high-quality film ensures long-term protection without affecting your car’s appearance. UltrashieldX delivers top-tier solutions designed to meet modern automotive standards, making it a reliable choice for superior paint protection.
Thanks for the informative blog. Paint Protection Film is the ultimate solution to safeguard your car’s paint from scratches, stone chips, UV rays, road debris, and daily wear. At The Detailing Mafia, we offer premium-quality Paint Protection Film that preserves your vehicle’s original finish while enhancing its appearance with a glossy or matte look. Our expert installers ensure seamless application using advanced techniques for long-lasting protection. Whether you own a luxury car or a daily driver, our PPF helps maintain resale value and keeps your vehicle looking brand new. Choose The Detailing Mafia for reliable, durable, and professionally installed paint protection solutions.
Meet India’s Best Sexologist in Delhi NCR at Gautam Ayurveda
Best Sexologist in Delhi | ED & PE Treatment In Delhi
Best Sexologist in Gurgaon | ED & PE Treatment Gurgaon
Best Sexologist in Faridabad | ED & PE Treatment Faridabad
Best Sexologist in Patna | ED & PE Treatment Patna
Best Sexologist in Noida | ED & PE Treatment In Noida
Best Sexologist in Laxmi Nagar | ED & PE Treatment In Laxmi Nagar
Best Sexologist in Rohini | ED & PE Treatment In Rohini
Gautam Ayurveda Clinic in Laxmi Nagar, Delhi | Book Now
Best Sexologist in Rohini | ED & PE Treatment In Rohini
Gautam Ayurveda Clinic in Sector 79, Faridabad | Book Now
Gautam Ayurveda Clinic in Rohini, Delhi | Book Now
Many employees searching for Sainsbury’s login support often struggle with access issues on the MySainsburys portal , https://mysainsburrys.com/ especially when the system rejects correct credentials or shows unexpected errors. Understanding why the login fails can help staff quickly restore access to payslips, schedules, and internal updates without waiting for IT support.
Carefully prepared Mimosa hostilis inner root bark shredded products provide a balanced combination of freshness and usability. The shredded format makes measuring, storing, and handling significantly easier while maintaining the natural characteristics of the bark. Customers prefer this option for botanical collections, natural crafting purposes, and dye-related applications because of its consistent cut size and premium quality assurance.
mimosa root bark for sale
This is a great recipe exactly as it is! Don’t understand why people complain about the ingredients…..Thank You buy Dilaudid with no prescription
Mimosa hostilis root bark shredded is widely appreciated for its practical preparation and superior botanical quality. Sustainably sourced and professionally processed, this shredded bark offers convenience without compromising authenticity. Its rich natural coloration and carefully preserved texture make it ideal for buyers seeking dependable botanical material for traditional and commercial uses. Many customers choose this product for its excellent packaging, freshness, and reliable supply availability.
mhrb sale
Carefully prepared Mimosa hostilis inner root bark shredded products provide a balanced combination of freshness and usability. The shredded format makes measuring, storing, and handling significantly easier while maintaining the natural characteristics of the bark. Customers prefer this option for botanical collections, natural crafting purposes, and dye-related applications because of its consistent cut size and premium quality assurance.
mimosa root bark for sale
Mimosa hostilis root bark shredded is widely appreciated for its practical preparation and superior botanical quality. Sustainably sourced and professionally processed, this shredded bark offers convenience without compromising authenticity. Its rich natural coloration and carefully preserved texture make it ideal for buyers seeking dependable botanical material for traditional and commercial uses. Many customers choose this product for its excellent packaging, freshness, and reliable supply availability.
mhrb sale
Mimosa hostilis, also known as Mimosa tenuiflora, is a perennial tree native to parts of South and Central America, especially Brazil and Mexico. It is well known for its rich, dark reddish bark and delicate fern-like leaves. Traditionally, its root bark has been used for natural dyeing due to its high tannin content, producing deep purple to reddish-brown hues. In some cultures, it has also been valued in folk practices and ecological restoration because of its ability to improve soil quality by fixing nitrogen.
Mhrb for sale
Mimosa tenuiflora, commonly known as tepezcohuite or the “skin tree,” is a perennial tree native to parts of Mexico and South America. It is widely valued for its bark, which is rich in tannins, flavonoids, and other bioactive compounds known for their regenerative and antimicrobial properties. Traditionally used in folk medicine for wound healing and skin treatments, Mimosa tenuiflora has gained global recognition in natural skincare for supporting collagen production and soothing burns, scars, and irritation. Its resilience in harsh climates also makes it an important species for soil restoration and ecological balance.
mimosa hostilis for sale
DMT (N,N-Dimethyltryptamine) is a potent psychedelic naturally found in numerous plants and animals. Delivered through sleek vape carts, it offers a fast, accessible, and highly intense experience—far quicker and more convenient than traditional methods like ayahuasca. Vape carts provide precise dosing, discreet use, and immediate effects, making them the perfect choice for those seeking profound, transformative journeys on their own terms. Experience the next evolution in psychedelic exploration with DMT vape carts—powerful, portable, and ready whenever you are.
order dmt vape pen now
DMT vape offers a fast and convenient way to unlock one of the most intense psychedelic experiences available. Unlike traditional methods like ayahuasca, there’s no need for complex rituals or long preparation just inhale and feel the effects within seconds. The experience is deeply immersive yet short-lived, typically lasting 10 to 30 minutes, making it ideal for those seeking profound insights or spiritual exploration without hours of commitment. With discreet use, easy portability, and precise control over dosage, DMT vapes provide a customizable journey that’s both accessible and efficient. Perfect for modern explorers ready to tap into deeper consciousness anytime, anywhere.
buy dmt vape cart online
Factory Automation streamlines manufacturing processes using advanced control systems, robotics, sensors, and industrial software. It improves productivity, enhances product quality, minimizes manual intervention, reduces operational costs, increases workplace safety, and enables efficient, consistent, and scalable production across modern manufacturing facilities.
The solar panel price in Pakistan has become increasingly affordable over the past few years, making renewable energy a practical option for households and businesses alike.
https://makenergy.com/, providing sustainable, reliable and renewable energy solutions to domestic and commercial clients since 2007.
https://edu-advance.pk/ guides students with smart learning support that builds confidence, strengthens knowledge, and helps turn their goals into real achievements.
https://edu-advance.pk/ guides students with smart learning support that builds confidence, strengthens knowledge, and helps turn their goals into real achievements.
iTel Energy Pakistan — Authorized distributor of premium solar inverter, battery & systems. Top brands, best wholesale prices. Inquire now!
Find out more about Al baik from . Al Baik has become one of the most loved fast-food brands, known for its delicious fried chicken and unique flavors.
Fantastic post with valuable insights. It was easy to understand and worth sharing. You can also explore Ivermectin 12 mg
A Bitumen Calculator helps you accurately estimate the amount of bitumen required for road construction, roofing, and waterproofing projects. It saves time, reduces material waste, and improves project planning. Use the free online Bitumen Calculator at https://bitumencalcul.com/ to get fast and reliable calculations.
Informative post! I really enjoyed this read. Today, I’d like to share some helpful information about Zopisign 10 Mg, a trusted medication used to manage insomnia and improve sleep quality
This was a very engaging and well-written blog post, I really appreciated how clearly the ideas were explained. The content is informative and easy to follow, making it valuable for readers from different backgrounds. Students looking for academic support can also explore History Assignment Help to strengthen their understanding of historical concepts, complete research-based assignments effectively, and achieve better academic results. Keep up the great work and continue sharing such helpful content!
Owners of newly registered motorcycles may receive an MV File Number before the vehicle appears in the LTO Tracker. The dealer may still be completing registration documents, or the tracker may not yet contain the latest motorcycle record. Entering the number repeatedly will not solve a delay in data submission. This guide explains how to verify whether the registration has been finalized, what documents to request from the dealer, and how to check for number-entry mistakes. It also covers when to follow up with the registering LTO office, especially if the motorcycle has an OR/CR but remains invisible in the plate tracker for an extended period.
Porn, Poker, Blackjack88, Berita Palsu, Hoax News, Spam
Excellent information. Better with age clothing creates apparel that suits every style.
Mimosa hostilis, also known as Mimosa tenuiflora, is a perennial tree native to parts of South and Central America, especially Brazil and Mexico. It is well known for its rich, dark reddish bark and delicate fern-like leaves. Traditionally, its root bark has been used for natural dyeing due to its high tannin content, producing deep purple to reddish-brown hues. In some cultures, it has also been valued in folk practices and ecological restoration because of its ability to improve soil quality by fixing nitrogen.
Mhrb for sale
Mimosa tenuiflora, commonly known as tepezcohuite or the “skin tree,” is a perennial tree native to parts of Mexico and South America. It is widely valued for its bark, which is rich in tannins, flavonoids, and other bioactive compounds known for their regenerative and antimicrobial properties. Traditionally used in folk medicine for wound healing and skin treatments, Mimosa tenuiflora has gained global recognition in natural skincare for supporting collagen production and soothing burns, scars, and irritation. Its resilience in harsh climates also makes it an important species for soil restoration and ecological balance.
mimosa hostilis for sale
This post feels very well written because the ideas are communicated with clarity and the tone stays measured throughout, creating a discussion that is both pleasant to read and easy for different audiences to connect with.
공주 출장마사지 서비스를 담당하는 모든 관리사는 체계적인 교육과 실무 경험을 갖춘 전문 테라피스트로 구성되어 있습니다.
고객 한 분 한 분의 컨디션과 니즈를 정확하게 파악하여 맞춤형 케어를 제공하며, 피로 회복, 근육 이완, 스트레스 완화에 최적화된 프로그램을 진행합니다.
공주출장만남, 공주 홈케어 서비스를 찾는 고객분들께 보다 높은 만족도를 제공하기 위해 철저한 관리사 선발 기준과 지속적인 서비스 교육을 운영하고 있습니다. 공주출장샵
또한 위생 관리와 서비스 매너를 최우선으로 하여 처음 이용하시는 고객도 안심하고 이용할 수 있도록 준비되어 있습니다.
Production services video for ecommerce growth has become a core driver of modern online business success, as brands increasingly rely on high-performing video content to attract, engage, and convert customers. In today’s competitive digital landscape, ecommerce companies are no longer limited by platforms or ad channels, but by their ability to consistently produce fresh and engaging creative assets. Video production services enable brands to create multiple variations of ads, product demos, and storytelling content that can be tested across platforms like Meta, TikTok, and YouTube to identify what works best. This constant testing is essential because consumer attention shifts quickly, and repetitive creatives often lead to declining performance, a challenge known as creative fatigue. Effective production services help solve this by reducing turnaround time, allowing businesses to move from concept to launch faster and maintain a steady flow of new content. Moreover, ecommerce videos are proven to boost engagement and purchasing decisions, with many users more likely to buy after watching product videos. Beyond just views and likes, the real value of video production lies in improving key business metrics such as conversion rate, customer acquisition cost, and return on ad spend. By integrating strategy, creativity, and speed, production services video solutions turn content into a scalable growth engine, helping ecommerce brands expand reach, optimize campaigns, and drive consistent revenue growth.
Recognizing achievements deserves a timeless touch, and Engraved Crystal Awards from Crystal Sensations offer the perfect combination of elegance and personalization. Crafted with exceptional clarity and precision, these awards transform every milestone into a cherished memory. Whether honoring employees, business leaders, sports champions, or academic achievers, each crystal piece reflects excellence and appreciation.
I just recently found out about Lumin Lash and, honestly, I was pretty impressed by the sort of beauty services they offer. It’s like there’s this steady vibe of quality and professionalism, plus they care a lot about client satisfaction. So for anyone trying to bring out more of their natural beauty, it feels like a trusted pick, not just some random place. If you’re on the hunt for Microblading Missouri City tx services, Lumin Lash has more tailored treatments, meant to build natural-looking, well-shaped brows. And their team is experienced , they really pay attention to the small stuff, the little details. That way, each person ends up with results that match their features instead of looking copied. Lots of people choose Lumin Lash for Microblading Missouri City tx, mainly because they show real commitment to comfort, precision, and that longer-lasting kind of beauty. It is honestly kind of refreshing to see a brand that’s not only about the result, but also about helping clients feel more confident and look their absolute best.
It’s a best article and full of helpful information about Blogger Outreach Services. The information convincingly covers the importance of strategic outreach in boosting SEO, establishing quality backlinks, and improving brand credibility. It is a practical and educative tool for companies looking to make their digital marketing efforts sustainable for achieving growth.
Discover a trusted Nasha Mukti Kendra in India offering personalized addiction treatment with expert medical care, professional counseling, behavioral therapy, and holistic rehabilitation. Our compassionate approach helps individuals break free from substance dependence, regain emotional strength, rebuild family relationships, and achieve a healthier, fulfilling, drug-free life with confidence.
I believe this is a great website,everything is educative and it helped with my work and i have bookmark this page to come back. May you continue to help others.Check these below for your research
buy diazepam online uk
World Facts For Children… […]here are some links to sites that we link to because we think they are worth visiting[…]… Situs Toto Togel
Interesting perspective! Every assignment presents an opportunity to deepen subject knowledge and develop critical-thinking abilities. Assignment Help Canberra can support students in making the most of these valuable learning experiences.
This is a very helpful and easy-to-follow guide that does a great job explaining how to create beautiful Bantu knots. I really appreciate how you break the process down into simple steps, making the hairstyle approachable for both beginners and anyone looking to refresh their styling techniques. The tips and instructions are clear, practical, and inspiring for readers interested in natural hair care and, Cemoto discount code creative hairstyles. A well-written beauty guide that celebrates versatility, confidence, and the art of hair styling!
It’s such a handy article. Very interesting to read this article. I want to thank you for the efforts you made to write this awesome article. nfl jackets
weed in seoul
weed delivery netherlands
Are you looking for a fun and relaxing time in Dehradun? Angels For Men is here to help. We offer the best Dehradun Escort Service in the city. Our girls are beautiful, friendly, and ready to make you smile.
Serving looks without even trying – impressive. Best Nainital Escort Service
Your energy is so contagious; Top Dehradun Call Girl Service love seeing your adventures!
Surely you are the most beautiful woman alive, the most that I’ve seen. Dehradun Call Girl Service
The word “pretty” is worthless without you. Nainital Escort Service
buy best quality undetectable counterfeit 500 euros
chinese weed for sale
vape shops in south korea
seoul weed
تُعد Massar Service وMoutamadris (مسار متمدرس) من أبرز الخدمات الرقمية التعليمية المعتمدة في المغرب، إذ توفران للتلاميذ وأولياء الأمور والأطر التربوية منصة موحدة لمتابعة مختلف المعلومات والخدمات الدراسية بسهولة وعلى مدار السنة. من خلال منصة مسار متمدرس يمكن الاطلاع على النقط والنتائج الدراسية، ومتابعة المراقبة المستمرة، ومعرفة مواعيد الامتحانات الجهوية والوطنية، والاطلاع على جدول العطل المدرسية، إضافة إلى الوصول إلى الموارد التعليمية مثل الدروس، والتمارين، والفروض المصححة، ونماذج الامتحانات، وخدمات التوجيه الدراسي التي تساعد التلميذ في اختيار مساره التعليمي المناسب.
Our DMT vape cartridge delivers a fast, intense, and transformative psychedelic experience like no other. Engineered for smooth vaporization, it provides rapid onset effects within seconds, plunging you into profound states of consciousness and vivid visual realms. With a compact design and precise dosing control, this cartridge offers both convenience and potency, perfect for those seeking a quick yet deeply immersive journey. Whether for spiritual exploration or personal insight, our DMT vape cartridge combines high purity with user-friendly vaporization for a powerful, unforgettable experience. Use responsibly and with respect.
buy dmt vape pen
Unlock the door to one of the most profound and intense psychedelic journeys with DMT vape. Known for its rapid onset and short, yet deeply transformative effects, vaping DMT delivers a powerful experience within seconds, allowing users to explore vivid visuals, altered states of consciousness, and profound spiritual insights. Its fast-acting nature and manageable duration make it a preferred choice for those seeking a high-intensity, immersive experience without lengthy commitment. With precise dosing control and discreet use, DMT vape offers unparalleled convenience for personal exploration.
shop beginner dmt vape
LABUBU Canada at the sale price. Get Up To 30% Off On Labubu Official Canada Online Store. Huge Discount With Fast Shipping.
Mimosa hostilis root bark, also known as jurema preta, is highly valued for its rich content of the natural compound DMT (dimethyltryptamine), making it significant in traditional spiritual and shamanic practices, particularly in South America. Beyond its psychoactive properties, the root bark contains tannins and other bioactive compounds that have antimicrobial, anti-inflammatory, and antioxidant effects, which some herbalists believe can support skin health and overall wellness. It is often used in ceremonial contexts to promote introspection, emotional healing, and a sense of spiritual connection. Additionally, its fibrous nature has historically made it useful in natural dyes and craft applications. While the root bark holds cultural and therapeutic importance, it should be approached with care due to its potent psychoactive effects.
mimosa tenuiflora buy
Mimosa hostilis (MHRB) Tenuiflora Powder is a finely ground botanical product derived from the inner root bark of Mimosa tenuiflora (also known as Mimosa hostilis), a tree native to regions of Brazil* and Mexico*. Traditionally, the root bark has been valued for its rich tannin content and natural dye properties, often used in textile coloring and artisanal leather processing. The powder is typically deep purple-brown in color and is sought after in natural skincare formulations and botanical research contexts due to its high concentration of plant compounds.
buy mimosa hostilis root bark
Mexican Mimosa hostilis inner root bark (MHRB) is valued for its rich natural composition, consistent texture, and premium botanical quality. Sourced from carefully selected mature root systems, this product is ideal for buyers seeking dependable bulk supply and authentic plant material for research, natural dye applications, and traditional botanical collections. Its vibrant reddish-purple appearance and clean processing standards make it a preferred choice among global botanical enthusiasts looking for reliable quality and freshness in every order.
buy jurema
Premium Mexican Mimosa hostilis whole root inner bark offers a natural and unprocessed option for customers who value authenticity and maximum botanical integrity. Carefully harvested and preserved to maintain its original structure, this whole bark product is highly sought after for traditional botanical use, collection purposes, and natural applications requiring minimally processed material. Customers appreciate its freshness, long shelf life, and dependable sourcing standards for wholesale and retail purchasing.
mimosa hostilis root bark for sale
I enjoyed browsing 7777-casino.com because the pages are fast and simple. The website has many interesting games and promotions. It is a nice place for players who want an easy online casino experience with a clean layout and user-friendly design. slot gacor 777
Mexican Mimosa hostilis inner root bark (MHRB) is valued for its rich natural composition, consistent texture, and premium botanical quality. Sourced from carefully selected mature root systems, this product is ideal for buyers seeking dependable bulk supply and authentic plant material for research, natural dye applications, and traditional botanical collections. Its vibrant reddish-purple appearance and clean processing standards make it a preferred choice among global botanical enthusiasts looking for reliable quality and freshness in every order.
buy jurema
Premium Mexican Mimosa hostilis whole root inner bark offers a natural and unprocessed option for customers who value authenticity and maximum botanical integrity. Carefully harvested and preserved to maintain its original structure, this whole bark product is highly sought after for traditional botanical use, collection purposes, and natural applications requiring minimally processed material. Customers appreciate its freshness, long shelf life, and dependable sourcing standards for wholesale and retail purchasing.
mimosa hostilis root bark for sale
Looking to buy Adderall 10 mg online? Our trusted platform offers a secure and discreet way to purchase Adderall 10 mg online with fast shipping and verified quality. Whether you’re managing ADHD or seeking relief from certain conditions, buying Adderall 10 mg online has never been easier or more convenient. We ensure all transactions are confidential, and our licensed pharmacists provide expert guidance. Shop confidently knowing you’re getting genuine medication at competitive prices. Don’t wait—buy Adderall 10 mg online today and experience the convenience of doorstep delivery while maintaining your privacy. Your health and satisfaction are our top priorities. Start your order now and enjoy a hassle-free buying experience for Adderall 10 mg online.
Premium Mexican Mimosa hostilis whole root inner bark offers a natural and unprocessed option for customers who value authenticity and maximum botanical integrity. Carefully harvested and preserved to maintain its original structure, this whole bark product is highly sought after for traditional botanical use, collection purposes, and natural applications requiring minimally processed material. Customers appreciate its freshness, long shelf life, and dependable sourcing standards for wholesale and retail purchasing.
mimosa hostilis root bark for sale
Complete your TNT SIM Registration online in just a few steps. Register your TNT SIM card, verify your identity, check your registration status, update your details, and keep your mobile number active. Once registered, you can enjoy uninterrupted calls, text messages, mobile data services, and access to TNT promos without service restrictions.
Really enjoyed this one! It’s clear, practical, and easy to follow. Appreciate how you made everything so simple to understand.
Innotox 100U
Thanks so much for sharing this great info! I am looking forward to see more posts! Situs Toto Togel
Cập nhật sxmn mỗi ngày với kết quả mới, thông tin chính xác và danh sách số trúng thưởng. Giao diện thân thiện giúp người dùng tìm kiếm thông tin nhanh và tiện lợi.
Accessing important Army service information has become easier with the Hamraaz Personal Login portal. https://hamraazweeb.com/ Indian Army personnel can use this online platform to check payslips, download Form-16, view service-related updates, and manage personal records without depending on physical paperwork. However, many users still face confusion during login, registration, and document downloads. This guide explains the complete process, common issues, and practical solutions to help soldiers use the portal smoothly.
Thanks again for this excellent contribution. It was informative, easy to understand, and definitely worth reading from start to finish. Tune in to Mannat Full Episodes.
A project finance consultant plays a crucial role in helping businesses plan, structure, and secure funding for large-scale projects by providing expert financial and technical advisory services. These consultants work closely with companies, lenders, and investors to evaluate project feasibility, assess risks, and design optimal financing structures that ensure long-term sustainability. Firms like Frontline Consultants have established themselves as trusted advisors in India, offering multidisciplinary services tailored to banking institutions, financial organizations, and business enterprises. With decades of experience, such firms support projects across industries by delivering specialized solutions including techno-economic viability (TEV) studies, lender’s independent engineer (LIE) services, asset valuation, and credit syndication.
A key responsibility of a project finance consultant is to prepare detailed project reports, analyze cash flows, and evaluate the financial viability of proposed ventures. They assist in structuring debt and equity, coordinating with multiple lenders, and ensuring compliance with regulatory and financial requirements. By providing data-driven insights and strategic planning, these consultants significantly improve the chances of securing funding and executing projects successfully. Their expertise also extends to risk assessment, cost optimization, and ongoing project monitoring, ensuring that projects remain on track and within budget.
In today’s competitive and capital-intensive business environment, the role of a project finance consultant has become increasingly important. They act as a bridge between businesses and financial institutions, simplifying complex processes and enhancing transparency throughout the funding lifecycle. By leveraging industry knowledge, financial modeling, and strong institutional relationships, project finance consultants enable businesses to achieve efficient capital raising, minimize risks, and drive sustainable growth, making them an essential partner in modern project development and execution.
Access your Chamberlain Student Portal resources by logging into the official portal to manage your coursework, grades, and academic profile. This guide provides step-by-step instructions to help you securely sign in and resolve common account access issues.
Qatar Visa on Arrival makes visiting simple for travelers from 102 countries in 2026, allowing eligible visitors to receive their entry permit directly at the airport without applying in advance. The latest Qatar on arrival visa new rules have made the process faster and more convenient for international tourists arriving in Doha. Visit for more infomoiqatarvisachecks.com/qatar-visa-on-arrival-for-tourists
Access to your academic journey with our comprehensive guide to navigating the Western Governors University (WGU) student portal. Learn how to quickly log in, troubleshoot credential issues, and manage your courses efficiently all in one place.
إذا كانت غايتك هي الاستفادة الكاملة من السكربتات في “روبلوكس”، فإن الخطوة الأساسية التي لا غنى عنها هي الحصول على مفتاح التنشيط (Delta Key). يعمل هذا المفتاح بمثابة بوابة تفتح لك كافة أدوات المشغل وتمنحك صلاحية الوصول إلى جميع الميزات المتقدمة دون قيود، وهو إجراء ضروري لضمان تفعيل المشغل داخل اللعبة بكفاءة.
E-Shikshakosh is an exceptional initiative that showcases how technology can transform education for the better. By providing a centralized platform for quality learning resources, digital content, and academic support, it has made education more accessible, efficient, and engaging for both students and teachers. The platform encourages continuous learning, promotes digital literacy, and helps create a more organized and transparent educational environment.
Many Ayushman Bharat beneficiaries complete the verification process and see their name approved, but still face difficulty while downloading their Ayushman Card online. This problem can happen due to OTP issues, portal errors, incomplete beneficiary details, Aadhaar authentication failures, or temporary technical problems on the official system. In 2026, downloading an Ayushman Card has become easier through digital platforms such as the NHA beneficiary portal, Ayushman App, DigiLocker, and authorised service centres, but users still need clear guidance when something goes wrong https://ayushmancarrd.com/
I like using Alexistogel Alternatif because it gives a stable connection when the main website is unavailable. The pages are easy to navigate, and everything works smoothly. It is a useful alternative for players who want quick and reliable access anytime. Alexistogel Alternatif
Teacher attendance on Prerna-related systems is a common search topic because many teachers want clarity about login, timing, mobile access, and submission errors. If the app or portal does not load properly, attendance work may become stressful. This article explains Prerna teacher attendance in a simple and helpful manner, including the role of registered login details, app permissions, internet connection, and correct school information. It also helps users understand what to check when attendance does not submit or when the app shows an unexpected error message. https://prernapoortal.com/
The gcustudentsportal.us is an online platform designed to help Grand Canyon University students manage their academic activities in one convenient place. Through the portal, students can access their courses, check grades, view class schedules, manage financial aid, communicate with instructors, and receive important university updates. Whether you are a new or returning student, the portal makes it easy to stay organized and connected throughout your academic journey.
Mexican Mimosa hostilis inner root bark (MHRB) is valued for its rich natural composition, consistent texture, and premium botanical quality. Sourced from carefully selected mature root systems, this product is ideal for buyers seeking dependable bulk supply and authentic plant material for research, natural dye applications, and traditional botanical collections. Its vibrant reddish-purple appearance and clean processing standards make it a preferred choice among global botanical enthusiasts looking for reliable quality and freshness in every order.
buy jurema
Premium Mexican Mimosa hostilis whole root inner bark offers a natural and unprocessed option for customers who value authenticity and maximum botanical integrity. Carefully harvested and preserved to maintain its original structure, this whole bark product is highly sought after for traditional botanical use, collection purposes, and natural applications requiring minimally processed material. Customers appreciate its freshness, long shelf life, and dependable sourcing standards for wholesale and retail purchasing.
mimosa hostilis root bark for sale
Mimosa hostilis root bark, also known as jurema preta, is highly valued for its rich content of the natural compound DMT (dimethyltryptamine), making it significant in traditional spiritual and shamanic practices, particularly in South America. Beyond its psychoactive properties, the root bark contains tannins and other bioactive compounds that have antimicrobial, anti-inflammatory, and antioxidant effects, which some herbalists believe can support skin health and overall wellness. It is often used in ceremonial contexts to promote introspection, emotional healing, and a sense of spiritual connection. Additionally, its fibrous nature has historically made it useful in natural dyes and craft applications. While the root bark holds cultural and therapeutic importance, it should be approached with care due to its potent psychoactive effects.
mimosa tenuiflora buy
Mimosa hostilis (MHRB) Tenuiflora Powder is a finely ground botanical product derived from the inner root bark of Mimosa tenuiflora (also known as Mimosa hostilis), a tree native to regions of Brazil* and Mexico*. Traditionally, the root bark has been valued for its rich tannin content and natural dye properties, often used in textile coloring and artisanal leather processing. The powder is typically deep purple-brown in color and is sought after in natural skincare formulations and botanical research contexts due to its high concentration of plant compounds.
buy mimosa hostilis root bark
영덕출장샵|영덕출장마사지|영덕출장샵 |영덕출장안마|영덕후불출장샵 |영덕일본인출장샵|영덕홈타이|영덕콜걸
영덕출장샵
Tried these steps on my natural hair last weekend and was surprised how simple it actually is once you get the twisting motion down – definitely saves me from pulling out the heat tools every time. It’s a bit like landing on a new favorite feature at this sweep coin casino where everything just clicks into place without fuss. My only mistake was not using enough product on the ends, so they got a little fuzzy by day two. Anyone else add oil or gel halfway through for extra hold?
Thank you for sharing this! Really appreciate the time and effort you put into it. Your insights are valuable and inspiring. Keep up the amazing work!..
If you’re looking for Yoga Teacher Training in Rishikesh, I suggest choosing a school that focuses on authentic teaching rather than just certification. A well-balanced course should include asana practice, pranayama, meditation, yoga philosophy, anatomy, and teaching methodology. It’s also worth considering the quality of the instructors, class size, accommodation, and meals, as these all contribute to the overall experience. I found that learning in a peaceful environment with supportive teachers made a big difference. Take your time to compare reviews and course details, and choose the school that feels like the best fit for your goals.
Having accurate travel details before departure can make your journey easier and more organized. The Avelo Airlines New Haven Office Address provides useful information about office details, airport procedures, terminal information, baggage guidelines, check in requirements, and passenger facilities. Reviewing these details in advance helps travelers prepare properly, manage their time, and enjoy a smoother airport experience.
HappyMod is a well-known website where people find modified Android apps and games that have extra features, premium content, and better gameplay.Here you can learn how HappyMod functions, check out its main features, see the advantages of using it, get step-by-step instructions on how to install mod APKs, find safety advice, and gather all the information you need before downloading modified apps.
HappyMod is a well-known site where people find modified Android apps and games that have extra features, premium content, and better gameplay.Find out how HappyMod works, what its main features are, the advantages it offers, how to install it, safety advice, and all the important information you should know before downloading modified APK files.
HappyMod App is a well-known site where people find modified Android apps and games that have special features, premium items, and better game experiences.Here’s how it works, what makes it special, the advantages of using it, step-by-step instructions on how to install the apps, tips for staying safe, and all the important information you should know before downloading these modified APK files.
HappyMod Download is a well-known website where you can find modified Android apps and games that have special features, premium content, and better gameplay.Find out how HappyMod functions, check out its main features, advantages, step-by-step guide to install it, safety advice, and all the important information you should know before downloading modified APK files.
National Police Clearance is an official document issued by the Philippine National Police (PNP) that confirms whether an individual has any recorded criminal history in the PNP database at the time of issuance. It is commonly required for employment, business applications, government transactions, travel, and other legal purposes. Applicants must complete the online registration process, schedule an appointment, pay the required fee, and visit their selected police station for identity verification, fingerprinting, and photo capture. Once the verification process is complete and no record is found, the National Police Clearance is issued and can be used as proof of good standing for various official requirements.
https://policeclearancepnp.com/
Thanks for your article…it gives us immense knowledge. Rajasthan is home to a unique type of beauty, and the lovely Call girl Jaipur featured on Empire Escorting embody this.
Great post! Your explanation was clear, thoughtful, and easy to understand. I really appreciated the insights you shared and look forward to reading more of your content.
I’ve been exploring different streetwear brands lately, and Derschutze Jeans really caught my attention. The designs feel modern, stylish, and suitable for people who want something different from ordinary denim.
One thing that stands out about Derschutze is its unique approach to fashion. The collections have a creative edge that makes them appealing to anyone who appreciates contemporary streetwear trends.
The quality and design direction of Derschutze Clothing are impressive. It’s refreshing to find apparel that combines individuality, comfort, and a strong fashion identity in one place.
I recently came across Derchutze and was impressed by its unique approach to modern streetwear.Derchutze The brand combines creativity, quality, and contemporary fashion in a way that stands out. Derchutze is definitely worth checking out for anyone who appreciates stylish and trend-driven clothing.
Finding a reliable host used to be a struggle, but switching to QloudRDP changed everything. My workflows now run flawlessly thanks to their NVMe storage and 99.99% uptime. If you want to buy RDP server options without sacrificing professional speed or 24/7 support, their global infrastructure is a total game-changer for staying productive and connected.
인천출장마사지는 호텔, 자택, 오피스 등 어디서나 받을 수 있는 방문형 전문 마사지 서비스입니다. 아로마, 스웨디시, 스포츠, 림프, 풋마사지까지 — 인천 전역 출장 인천출장마사지
Discover Escort and Call Girl listings in your City with Nyt girl Free Adult Classifieds city-specific Platform optimized for Local Search.
Kepala bergetar provides the latest Malaysian dramas, Malay TV series, telemovies, and full episodes online. Watch updated drama releases, trending Malay entertainment, and the newest episod terkini in one place.